


目 录
1.6 iptables表(tables)和链(chains) 2
1.10 手动执行iptables命令配置企业生产环境下的防火墙 16
1.10.7 允许业务服务端口对外访问(允许http服务无条件通过) 18
1.10.9 允许关联的状态包通过(web服务不要使用FTP服务) 18
1.10.11 2种将iptables临时命令保存为配置文件的方法 20
2.1 问题:企业硬件防火墙和iptables防火墙是否要同时用? 27
3.4 把外部IP地址及端口映射到内部服务器地址及端口(共享上网环境一样) 29
3.4.1 在10段主机可以通过访问B10.0.0.5:9000, 即可访问到172.16.1.8:80 29
3.7 实现10网段外网IP和内网172网段IP一对一映射 29
iptable防火墙
关闭两项功能:
1.selinux(生产中也是关闭的),ids入侵检测,md5指纹.
2.iptables(生产中看情况,内网关闭,外网打开)
大并发的情况,不能开iptables,影响性能,硬件防火墙.
安全优化:
1.尽可能不给服务器配置外网IP.可以通过代理转发.
2.并发不是特别大的情况再外网IP的环境,要开启iptables防火墙.
学好iptables的基础
1.OSI7层模型以及不同层对应哪些协议?
2.TCP/IP三次握手,四次断开的过程,TCP HEADER.
3.常见服务端口要了如指掌.
iptables防火墙简介
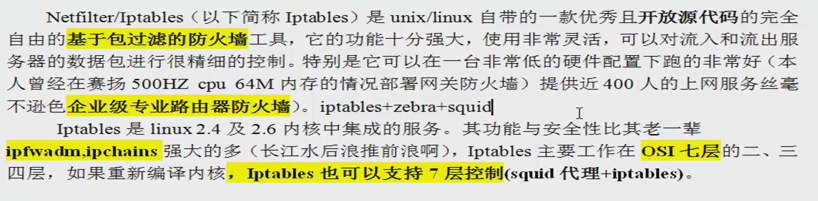
iptables名词和术语

什么是容器
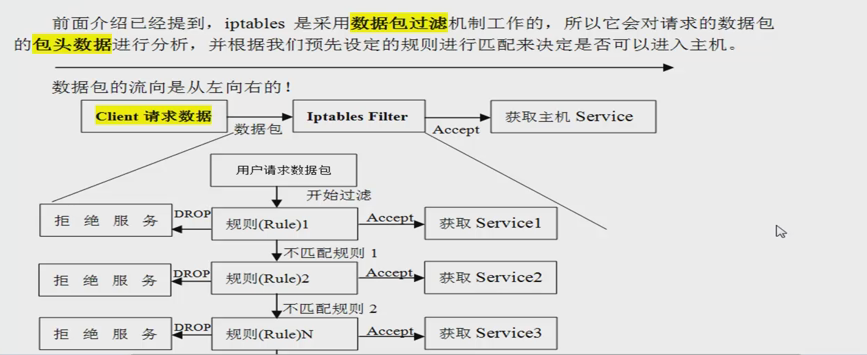
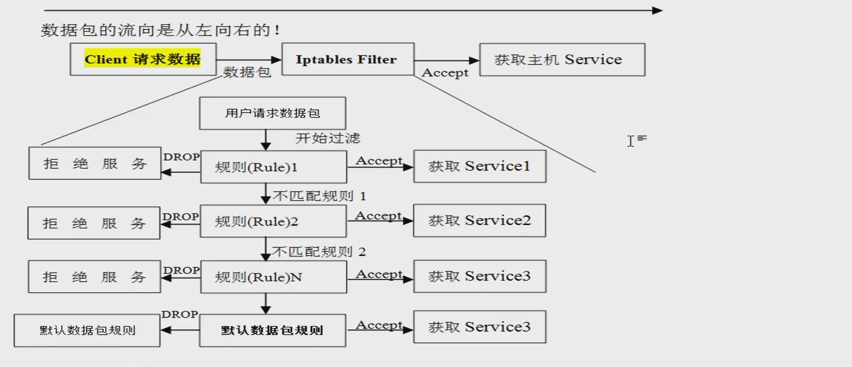
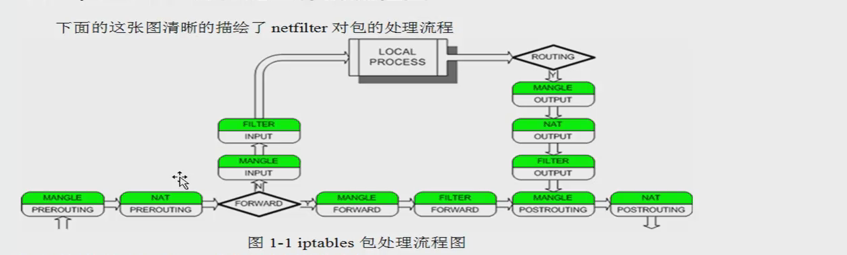
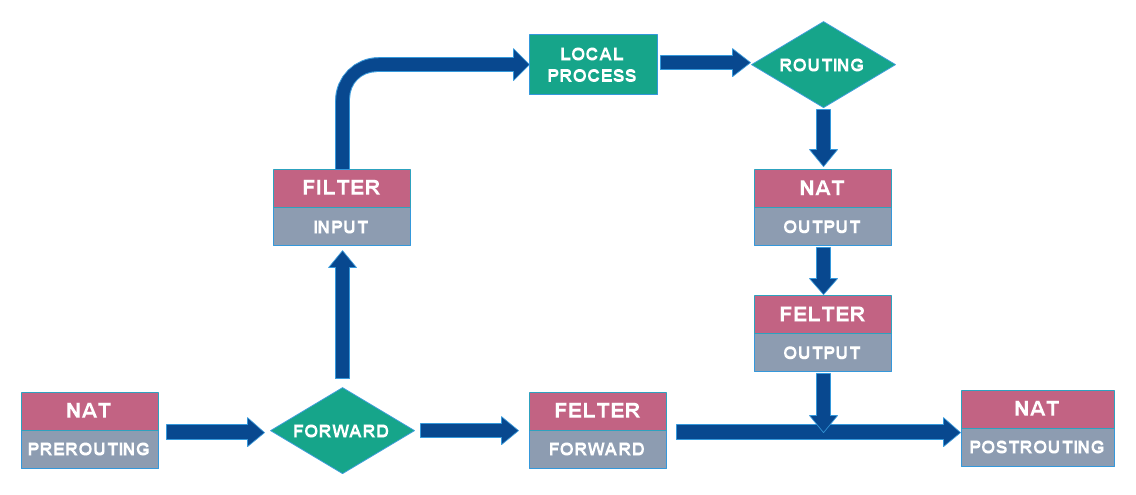
iptables工作流程

iptables表(tables)和链(chains)

Filter 真正的防火墙功能
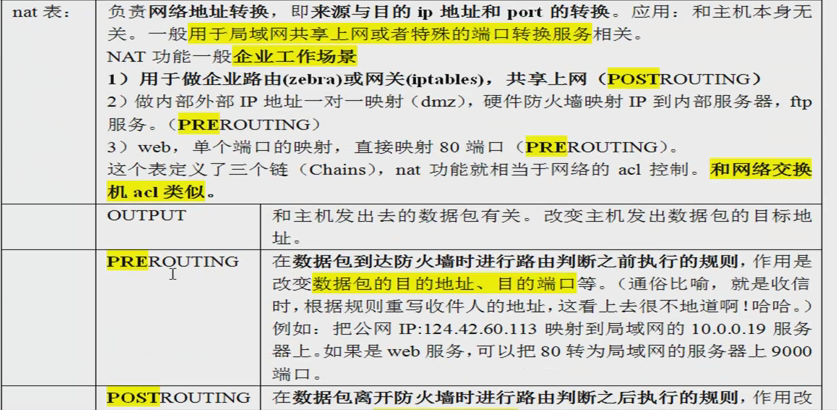
Nat 负责数据包改写,网关共享上网,端口映射
Mangle 路由相关,用到的不多
RAW 不常用
filter表

nat表

Mangle表

man iptables
filter:
This is the default table (if no -t option is passed). It contains the built-in chains INPUT
(for packets destined to local sockets), FORWARD (for packets being routed through the box),
and OUTPUT (for locally-generated packets).
nat:
This table is consulted when a packet that creates a new connection is encountered. It con-
sists of three built-ins: PREROUTING (for altering packets as soon as they come in), OUTPUT
(for altering locally-generated packets before routing), and POSTROUTING (for altering pack-
ets as they are about to go out).
iptables表和链工作的流程图

iptables命令帮助信息
[root@nginx-8 ~]# iptables -V
iptables v1.4.7
[root@nginx-8 ~]# rpm -qa iptables
iptables-1.4.7-16.el6.x86_64
[root@nginx-8 ~]# iptables -h
iptables v1.4.7
Usage: iptables -[ACD] chain rule-specification [options]
iptables -I chain [rulenum] rule-specification [options]
iptables -R chain rulenum rule-specification [options]
iptables -D chain rulenum [options]
iptables -[LS] [chain [rulenum]] [options]
iptables -[FZ] [chain] [options]
iptables -[NX] chain
iptables -E old-chain-name new-chain-name
iptables -P chain target [options]
iptables -h (print this help information)
Commands:
Either long or short options are allowed.
--append -A chain Append to chain
--check -C chain Check for the existence of a rule
--delete -D chain Delete matching rule from chain
--delete -D chain rulenum
Delete rule rulenum (1 = first) from chain
--insert -I chain [rulenum]
Insert in chain as rulenum (default 1=first)
--replace -R chain rulenum
Replace rule rulenum (1 = first) in chain
--list -L [chain [rulenum]]
List the rules in a chain or all chains
--list-rules -S [chain [rulenum]]
Print the rules in a chain or all chains
--flush -F [chain] Delete all rules in chain or all chains
--zero -Z [chain [rulenum]]
Zero counters in chain or all chains
--new -N chain Create a new user-defined chain
--delete-chain
-X [chain] Delete a user-defined chain
--policy -P chain target
Change policy on chain to target
--rename-chain
-E old-chain new-chain
Change chain name, (moving any references)
Options:
[!] --proto -p proto protocol: by number or name, eg. `tcp'
[!] --source -s address[/mask][...]
source specification
[!] --destination -d address[/mask][...]
destination specification
[!] --in-interface -i input name[+]
network interface name ([+] for wildcard)
--jump -j target
target for rule (may load target extension)
--goto -g chain
jump to chain with no return
--match -m match
extended match (may load extension)
--numeric -n numeric output of addresses and ports
[!] --out-interface -o output name[+]
network interface name ([+] for wildcard)
--table -t table table to manipulate (default: `filter')
--verbose -v verbose mode
--line-numbers print line numbers when listing
--exact -x expand numbers (display exact values)
[!] --fragment -f match second or further fragments only
--modprobe=<command> try to insert modules using this command
--set-counters PKTS BYTES set the counter during insert/append
[!] --version -V print package version.
iptables参数翻译
选项名 功能及特点
-A 在指定链的末尾添加(--append)一条新的规则
-D 删除(--delete)指定链中的某一条规则,按规则序号或内容确定要删除的规则
-I 在指定链中插入(--insert)一条新的规则,若未指定插入位置,则默认在链的开头插入
-R 修改、替换(--replace)指定链中的某一条规则,按规则序号或内容确定要替换的规则
-t 指定表,也可以不指定默认是filter
-L 列出(--list)指定链中的所有的规则进行查看,若未指定链名,则列出表中所有链的内容
-F 清空(--flush)指定链中的所有规则,若未指定链名,则清空表中所有链的内容
-N 新建(--new-chain)一条用户自己定义的规则链
-X 删除指定表中用户自定义的规则链(--delete-chain)
-P 设置指定链的默认策略(--policy)
-p 指定过滤的协议(all.tcp,udp.icmp)默认all
--sport 指定源端口
-s 指定源地址 ! 取反
-d 目的地址
--dport 指定目标端口(用户请求的端口)
-j 处理的行为 ACCPET接收、DROP丢弃、REJECT拒绝
-n 使用数字形式(--numeric)显示输出结果,若显示主机的IP地址而不是主机名
-Z 链的计数器清零
-i 匹配进入的网卡接口 (eth0 eth1)
-o 匹配出去的网卡接口 (eth0 eth1)
-m state --state 匹配网络状态
-v 查看规则列表时显示详细(--verbose)的信息
-V 查看iptables命令工具的版本(--Version)信息
-h 查看命令帮助信息(--help)
--line-number 查看规则列表时,同时显示规则在链中的顺序号
-mlimit --limit n/{second/minute/hour}限制限定时间包的允许通过数量及并发数
实际测试iptables规则
[root@nginx-8 ~]# /etc/init.d/iptables start
iptables: No config file. [WARNING]
如果/etc/init.d/iptables启动不了,需要创建iptables文件
[root@nginx-8 ~]# touch /etc/sysconfig/iptables
[root@nginx-8 ~]# /etc/init.d/iptables start
iptables: Applying firewall rules: [ OK ]
或者
[root@nginx-8 ~]# iptables -F
[root@nginx-8 ~]# service iptables save
iptables: Saving firewall rules to /etc/sysconfig/iptables:[ OK ]
[root@nginx-8 ~]# service iptables restart
iptables: Setting chains to policy ACCEPT: filter [ OK ]
iptables: Flushing firewall rules: [ OK ]
iptables: Unloading modules: [ OK ]
iptables: Applying firewall rules:
启动和查看iptables状态
iptables -L -n 或 iptables -L -n -v -x
[root@nginx-8 ~]# iptables -L -n
Chain INPUT (policy ACCEPT)
target prot opt source destination
Chain FORWARD (policy ACCEPT)
target prot opt source destination
Chain OUTPUT (policy ACCEPT)
target prot opt source destination
[root@nginx-8 ~]# /etc/init.d/iptables status
Table: filter
Chain INPUT (policy ACCEPT)
num target prot opt source destination
Chain FORWARD (policy ACCEPT)
num target prot opt source destination
Chain OUTPUT (policy ACCEPT)
num target prot opt source destination
iptables默认加载的内核模块
[root@nginx-8 ~]# lsmod |egrep 'nat|filter'
iptable_filter 2793 0
ip_tables 17831 1 iptable_filte
加载iptables需要的模块
[root@nginx-8 ~]# modprobe ip_tables
[root@nginx-8 ~]# modprobe iptable_filter
[root@nginx-8 ~]# modprobe iptable_nat
[root@nginx-8 ~]# modprobe ip_conntrack
[root@nginx-8 ~]# modprobe ip_conntrack_ftp
[root@nginx-8 ~]# modprobe ip_nat_ftp
[root@nginx-8 ~]# modprobe ipt_state
再次查看加载的模块
[root@nginx-8 ~]# lsmod |egrep 'nat|filter'
nf_nat_ftp 3443 0
nf_conntrack_ftp 12049 1 nf_nat_ftp
iptable_nat 5923 0
nf_nat 22676 2 nf_nat_ftp,iptable_nat
nf_conntrack_ipv4 9186 3 iptable_nat,nf_nat
nf_conntrack 79537 6 xt_state,nf_nat_ftp,nf_conntrack_ftp,iptable_nat,nf_nat,nf_conntrack_ipv4
iptable_filter 2793 0
ip_tables 17831 2 iptable_nat,iptable_filter
清除默认规则
iptables -F ###清除所有规则,不会处理默认的规则
iptables -X ###删除用户自定义的链
iptables -Z ###链的计数器清零
实例演示2:
[root@nginx-8 ~]# iptables -nL
Chain INPUT (policy ACCEPT)
target prot opt source destination
Chain FORWARD (policy ACCEPT)
target prot opt source destination
Chain OUTPUT (policy ACCEPT)
target prot opt source destination
[root@nginx-8 ~]# iptables -F
[root@nginx-8 ~]# iptables -X
[root@nginx-8 ~]# iptables -Z
禁用规则
禁止ssh端口
(1)找出当前的ssh端口
[root@nginx-8 ~]# netstat -lntup|egrep ssh
tcp 0 0 0.0.0.0:22 0.0.0.0:* LISTEN 1258/sshd
tcp 0 0 :::22 :::* LISTEN 1258/sshd
(2)禁止掉当前ssh端口,这里是默认的22
[root@nginx-8 ~]# iptables -t filter -A INPUT -p tcp --dport 22 -j DROP
[root@nginx-8 ~]# ###此时Xshell已经断掉了
基本的处理行为: ACCEPT(接受),DROP(丢弃),REJECT(拒绝) 注意:命令行里的规则,仅仅在内存里临时生效
(3)查看刚才自定义的规则,注意,这里是在服务器里直接操作的,因为ssh端口已经被禁用了!
(4)清空自定义规则

(5)恢复刚才断掉的SSH连接
1) 去机房重启系统或者登录服务器删除刚才的禁止规则
2) 让机房人员重启服务器或者让机房人员拿用户密码登陆进去
3) 通过服务器的远程管理卡管理(推荐)
4) 先写一个定时任务,每五分钟就停止防火墙
5) 测试环境测试好,写成脚本,批量执行
我们恢复的方法,登录服务器删掉刚才的规则

当然也可以执行iptables -F /etc/init.d/iptables stop等.
练习: 禁止用户访问80端口或3306:
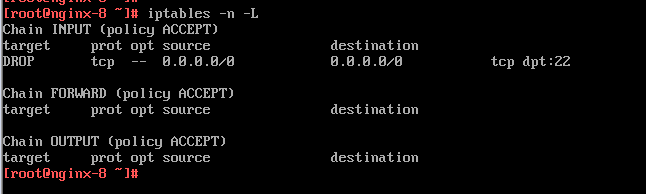
[root@nginx-8 ~]# iptables -t filter -A INPUT -p tcp --dport 80 -j DROP
[root@nginx-8 ~]# iptables -nL
Chain INPUT (policy ACCEPT)
target prot opt source destination
DROP tcp -- 0.0.0.0/0 0.0.0.0/0 tcp dpt:80
Chain FORWARD (policy ACCEPT)
target prot opt source destination
Chain OUTPUT (policy ACCEPT)
target prot opt source destination
使用-I和-A的顺序,防火墙的过滤规则顺序的.
-A 是添加规则到指定链的结尾,最后一条
-I 是添加规则到链的开头,第一条
查看规则的编号
[root@nginx-8 ~]# iptables -nL --line-number
在指定位置插入规则
iptables -I INPUT 2 -p tcp --dport 10000 -j DROP ####在第二条前插入一条规则
在指定位置删除规则
iptables -D INPUT 2 ###删除第2条规则
小结:总结删除规则的方法
1) iptables -D INPUT -p tcp --dropt 8080 -j DROP
2) iptables -F 删除所有规则
3) /etc/init.d/iptables restart (用iptables命令行配置的命令都是临时生效)
4) iptables -D INPUT规则序号
5)删除nat表的POSTROUTING链
[root@nginx-8 ~]# iptables -t nat -D POSTROUTING 2
禁止10.0.0.0 网段连入
iptables -t filter -A INPUT -i eth0 -s 10.0.0.0/24 -j DROP
iptables -A INPUT -i eth0 -s 10.0.0.0/24 -j DROP
注意: iptables默认用的就是filter表,因此以上两条命令.等价.
执行以上命令可以发现,这里已经无法远程连接了.
登陆虚拟机,删除刚才禁止的来源地址为10网段的命令.
iptables -D INPUT -i eth0 -s 10.0.0.0/24 -j DROP(完整策略规则删除)
iptables -D INPUT 1 (根据策略在链中的序号删,每条链都是各自从1编号)
取反匹配规则
iptables -A INPUT ! -s 10.0.0.0/24 -j DROP
1.源地址不是10.0.0.101 单个IP的禁止连接
iptables -t filter -I INPUT -i eth0 -s ! 10.0.0.101 -j DROP
iptables -A INPUT -p all -i eth0 ! -s 10.0.0.106 -j DROP (-p udp tcp icmp all)
iptables -t filter -I INPUT -p icmp --icmp-type 8 -i eth0 -s ! 10.0.0.115 -j DROP
2.源地址不是10.0.0..0/24的网段禁止连接
iptables -t filter -I INPUT -i eth0 -s ! 10.0.0.0/24 -j DROP
等价于
iptables -t filter -I INPUT -i eht0 -s 10.0.0.0/24 -j ACCEPT
工作场景:
封堵ssh端口
iptables -A INPUT -p tcp --dport 22 ! -s 10.0.0.0/24 -j DROP
iptables -A INPUT -p tcp --dport 22 ! -s 172.16.1.0/24 -j DROP
在默认规则为允许的情况下,上述可以封堵SSH访问
企业工作中解决这个问题
(1)vpn服务(拨号拨到vpn上,然后以VPN的内网地址去访问内部的机器)
(2)前端对外提供服务的机器SSH端口都做禁止外部IP访问限制,可以开启后端或者不对外提供服务的机器,保留SSH服务(更改root和ssh端口).然后,我们平时就先连接此机器,再去连接其它机器
这种被老师称作为牤牛阵
(3)流量特别大的外网机器不要开启防火墙,会影响性能,购买硬件防火墙
封掉3306端口
iptables -A INPUT -p tcp --dport 3306 -j DROP
匹配指定的协议
iptables -A INPUT -p tcp
iptables -A INPUT -p udp
如果不指定-p 默认就是
匹配指定协议外的所有协议
iptables -A INPUT -p ! tcp
[root@nginx-8 ~]# iptables -A INPUT ! -p tcp -s 10.0.0.110 -j DROP
[root@nginx-8 ~]# dmesg|tail -5
e1000: eth0 NIC Link is Down
e1000: eth0 NIC Link is Up 1000 Mbps Full Duplex, Flow Control: None
e1000: eth0 NIC Link is Down
e1000: eth0 NIC Link is Up 1000 Mbps Full Duplex, Flow Control: None
nf_conntrack version 0.5.0 (3796 buckets, 15184 max)
匹配主机源IP , 目的IP
iptables -A INPUT -s 10.0.0.14
iptables -A INPUT -s ! 10.0.0.14
iptables -t nat -A PREROUTING -d 10.0.0.14
iptables -t nat -A PREROUTING -d ! 10.0.0.14
匹配网段
iptables -A INPUT -s 10.0.0.0/24
iptables -A INPUT -s ! 10.0.0.0/24
匹配单一端口
iptables -A INPUT -p tcp --sport 53
iptables -A INPUT -p udp --sport 53
匹配指定端口之外的端口
iptables -A INPUT -p tcp --sport ! 22
iptables -I INPUT -p tcp ! --dport 22 -s 10.0.0.110 -j DROP
匹配端口范围
iptables -A INPUT -p tcp --sport 22:80
iptables -I INPUT -p tcp --dport 21,22,23,24 -j ACCEPT ===>错误语法
iptables -I INPUT -p tcp -m multiport --dport 21,22,23,24 -j ACCEPT
iptables -I INPUT -p tcp --dport 3306:8809 -j ACCEPT
iptables -I INPUT -p tcp --dport 18:80 -j DROP <===最佳方法
匹配ICMP类型
iptables -A INPUT -p icmp --icmp-type 8
例如:
iptables -I INPUT -p icmp --icmp-type 8 -j DROP
###icmp有很多类型,其中的8是ping,所以这里相当于禁ping
iptables -I INPUT -p icmp --icmp-type 8 -j ACCEPT
iptables -A INPUT -p icmp -m icmp --icmp-type any -j ACCEPT
iptables -A FORWARD -s 10.0.0.0/24 -p icmp -m icmp --icmp-type any -j ACCEPT
匹配指定的网络接口
iptables -A INPUT -i eth0
iptables -A FORWARD -o eth0
记忆方法:
--in-interface -i [!] input name[+]
network interface name ([+] for wildcard)
--out-interface -o [!] output name[+]
network interface name ([+] for wildcard)
匹配网络状态
-m state --state
NEW: 已经或将启动新的连接
ESTABLISHED: 已建立的连接
RELATED: 正在启动的新连接
INVALID: 非法或无法识别的
FTP 服务是特殊的, 需要配状态
INVALLD
meaning that the packet is accociated with np know connetcion
NEW
meaning that the packet has started a new connection, or otherwise associated with a connection which has not seen packets in both directions,and
ESTABLISHED
meaning that the packet is associated with a connection which has seen packets in both directions
RELATED
meaning that the packet is starting a new connection, but is associated with an existing connection,such as an FTP data transfer , or an ICMP error.
7.允许关联的状态包通过(web服务不需要FTP服务)
#other RELATED ftp协议
#允许关联的状态包
iptables -A INPUT -m state --state ESTABLISHED,RELATED -j ACCEPT
iptables -A OUTPUT -m state --state ESTABLISHED,RELATED -j ACCEPT
#来回都得允许
限定指定时间包的允许通过数量及并发数
-m limit --limit n/{second/minute/hour}:
指定时间内的请求速率"n"为速率,后面时间分别为:秒,分,时
--limit-burst [n]:
在同一时间内允许通过的请求"n"为数字,不指定默认为5
[root@nginx-8 ~]# iptables -I INPUT -s 10.0.0.0/24 -p icmp --icmp-type 8 -m limit --limit 5/min --limit-burst 2 -j ACCEPT
[root@nginx-8 ~]# iptables -nL
Chain INPUT (policy ACCEPT)
target prot opt source destination
ACCEPT icmp -- 10.0.0.0/24 0.0.0.0/0 icmp type 8 limit: avg 5/min burst 2
DROP !tcp -- 10.0.0.110 0.0.0.0/0
Chain FORWARD (policy ACCEPT)
target prot opt source destination
Chain OUTPUT (policy ACCEPT)
target prot opt source destination
手动执行iptables命令配置企业生产环境下的防火墙
生产环境配置主机防火墙的两种模式:
清空自定义的规则和链和计数器
[root@nginx-8 ~]# iptables -F
[root@nginx-8 ~]# iptables -X
[root@nginx-8 ~]# iptables -Z
首先设置允许ssh连接
[root@nginx-8 ~]# iptables -A INPUT -p tcp -s 10.0.0.0/24 -j ACCEPT
[root@nginx-8 ~]# iptables -A INPUT -p tcp --dport 22 -j ACCEPT
[root@nginx-8 ~]# iptables -nL
###提示: 此步是为了防止执行下面的步骤,把自己关在外面,除非你是本地处理,这步可以不做.
设置允许本机lo通信规则
[root@nginx-8 ~]# iptables -A INPUT -i lo -j ACCEPT
[root@nginx-8 ~]# iptables -A OUTPUT -o lo -j ACCEPT
目前为止的配置已经允许本机可以操作
[root@nginx-8 ~]# iptables -nL
Chain INPUT (policy ACCEPT)
target prot opt source destination
ACCEPT tcp -- 10.0.0.0/24 0.0.0.0/0
ACCEPT tcp -- 0.0.0.0/0 0.0.0.0/0 tcp dpt:22
ACCEPT all -- 0.0.0.0/0 0.0.0.0/0
Chain FORWARD (policy ACCEPT)
target prot opt source destination
Chain OUTPUT (policy ACCEPT)
target prot opt source destination
ACCEPT all -- 0.0.0.0/0 0.0.0.0/0
修改默认规则
[root@nginx-8 ~]# iptables -P INPUT DROP
[root@nginx-8 ~]# iptables -P FORWARD DROP
[root@nginx-8 ~]# iptables -P OUTPUT ACCEPT
[root@nginx-8 ~]# iptables -nL
Chain INPUT (policy DROP)
target prot opt source destination
ACCEPT tcp -- 10.0.0.0/24 0.0.0.0/0
ACCEPT tcp -- 0.0.0.0/0 0.0.0.0/0 tcp dpt:22
ACCEPT all -- 0.0.0.0/0 0.0.0.0/0
Chain FORWARD (policy DROP)
target prot opt source destination
Chain OUTPUT (policy ACCEPT)
target prot opt source destination
ACCEPT all -- 0.0.0.0/0 0.0.0.0/0
开启信任的IP网段
#setting Lan access rules
#允许IDC LAN/WAN和办公网IP的访问,及对外合作机构访问
iptables -A INPUT -s 124.43.62.96/27 -p all -j ACCEPT <---办公室固定IP段
iptables -A INPUT -s 192.168.1.0/24 -p all -j ACCEPT <---IDC机房的内网网段
iptables -A INPUT -s 10.0.0.0/24 -p all -j ACCEPT <---其他机房的内网网段
iptables -A INPUT -s 203.83.24.0/24 -p all -j ACCEPT <---IDC机房的外网网段
iptables -A INPUT -s 201.82.34.0/24 -p all -j ACCEPT <---其他IDC机房的外网网段
###提示: 本步骤表示允许IDC LAN和办公网IP的无条件连接访问,因为是我们自己人,所以要信任通过,但是,对于外部用户还无法访问服务器的任何服务.
允许业务服务端口对外访问(允许http服务无条件通过)
#output service|允许普通的外部服务80
iptables -A INPUT -p tcp --dport 80 -j ACCEPT
允许icmp类型协议通过
iptables -A INPUT -p icmp -m icmp --icmp-type any -j ACCEPT
提示:如果不想开,就不执行此命令
如果对内开,对外不开就用下面的方式
iptables -A INPUT -p icmp -s 10.0.0.0/24 -m icmp --icmp-type any -j ACCEPT
#iptables -A INPUT -p icmp --icmp-typr 8 -j ACCEPT
允许关联的状态包通过(web服务不要使用FTP服务)
#others RELATED ftp 协议
#允许关联的状态包
iptables -A INPUT -m stste --state ESTABLISHED,RELATED -j ACCEPT
iptables -A OUTPUT -m state --state ESTABLISHED,RELATED -j ACCEPT
最终的配置结果
[root@nginx-8 ~]# iptables -nL
Chain INPUT (policy DROP)
target prot opt source destination
ACCEPT tcp -- 10.0.0.0/24 0.0.0.0/0
ACCEPT tcp -- 0.0.0.0/0 0.0.0.0/0 tcp dpt:22
ACCEPT all -- 0.0.0.0/0 0.0.0.0/0
ACCEPT all -- 124.43.62.96/27 0.0.0.0/0
ACCEPT all -- 192.168.1.0/24 0.0.0.0/0
ACCEPT tcp -- 0.0.0.0/0 0.0.0.0/0 tcp dpt:80
ACCEPT icmp -- 10.0.0.0/24 0.0.0.0/0 icmp type 255
Chain FORWARD (policy DROP)
target prot opt source destination
Chain OUTPUT (policy ACCEPT)
target prot opt source destination
ACCEPT all -- 0.0.0.0/0 0.0.0.0/0
ACCEPT all -- 0.0.0.0/0 0.0.0.0/0 state RELATED,ESTABLISHED
2种将iptables临时命令保存为配置文件的方法
[root@nginx-8 ~]# /etc/init.d/iptables save
iptables: Saving firewall rules to /etc/sysconfig/iptables:[ OK ]
或
[root@nginx-8 ~]# iptables-save >/etc/sysconfig/iptables
查看已保存的配置文件
[root@nginx-8 ~]# cat /etc/sysconfig/iptables
# Generated by iptables-save v1.4.7 on Sun Apr 16 11:01:16 2017
*nat
:PREROUTING ACCEPT [2:104]
:POSTROUTING ACCEPT [585:38610]
:OUTPUT ACCEPT [585:38610]
COMMIT
# Completed on Sun Apr 16 11:01:16 2017
# Generated by iptables-save v1.4.7 on Sun Apr 16 11:01:16 2017
*filter
:INPUT DROP [16:2100]
:FORWARD DROP [0:0]
:OUTPUT ACCEPT [8:512]
-A INPUT -s 10.0.0.0/24 -p tcp -j ACCEPT
-A INPUT -p tcp -m tcp --dport 22 -j ACCEPT
-A INPUT -i lo -j ACCEPT
-A INPUT -s 124.43.62.96/27 -j ACCEPT
-A INPUT -s 192.168.1.0/24 -j ACCEPT
-A INPUT -p tcp -m tcp --dport 80 -j ACCEPT
-A INPUT -s 10.0.0.0/24 -p icmp -m icmp --icmp-type any -j ACCEPT
-A OUTPUT -o lo -j ACCEPT
-A OUTPUT -m state --state RELATED,ESTABLISHED -j ACCEPT
COMMIT
# Completed on Sun Apr 16 11:01:16 2017
生产维护
(1)确定的规则:
编辑/etc/sysconfig/iptables
加入想要的规则:例如:
-A INPUT -p tcp -m tcp --dport 873 -j ACCEPT
/etc/init.d/iptables reload
或者改配置的同时命令行在执行,也是永久生效
[root@nginx-8 ~]# /etc/init.d/iptables reload
iptables: Trying to reload firewall rules: [ OK ]
[root@nginx-8 ~]# /etc/init.d/iptables restart
iptables: Setting chains to policy ACCEPT: nat filter [ OK ]
iptables: Flushing firewall rules: [ OK ]
iptables: Unloading modules: [ OK ]
iptables: Applying firewall rules: [ OK ]
(2)命令试错,没问题了,然后保存到配置文件.这时不需要重启了
手工封IP
iptables -I INPUT -s 10.0.0.116 -j DROP #粗,范围大,外部攻击者.
iptables -I INPUT -s 10.0.0.106 -j FROP
iptables -I INPUT -p tcp -s 10.0.0.106 --drpot 80 -j DROP #细,范围小,内部
自动封IP
分析web或应用日志或者网络连接状态封掉辣鸡IP
[root@nginx-8 ~]# cat drop_ip.sh
#!/bin/bash
/bin/netstat -na|grep ESTABLISHED|awk '{print $5}'|awk -F: '{print $1}'|sort|uniq -c|sort -rn|head -10|grep -v -E '192.168|127.0'|awk '{if ($2!=null && $1>4) {print $2}}'>/home/shell/dropip
for i in $(cat /home/shell/dropip)
do
/sbin/iptables -I INPUT -s $i -j DROP
#-m limit --limit 20/min --limit-burst 6
echo "$i kill at $(date)">>/var/log/ddos
done
[root@nginx-8 ~]# cat drop_ip2.sh
#!/bin/bash
##search connection established ips
#netstat -an|grep EST|awk -F" " '{print $5}'|cut -d ":" -f4|grep "[0-9]*.[0-9]*.[0-9]*.[0-9]*"|sort |uniq -c|sort -rn|head -50>/home/shell/ip_connection.log
netstat -an|grep EST|awk -F "[: ]+" '{print $6}'|sort |uniq -c|sort -rn|head -50>/home/shell/ip...
##drop ips
cat /home/shell/ip_connection.log|egrep -v "[a-z][A-Z]*"|egrep -v"202.165|127.0"|while read line
do
cat /home/shell/ip_connection.log|egrep -v "[a-zA-Z]*"|egrep -v"202.165|127.0"|while read line
do
count=$(echo $line|awk '{print $1}'
ip=$(echo $line|awk '{print $2}'
if [ $count -ge 100 ]
then
echo "all established status connection > 100 ip is: $ip"
echo "apply rule,drop $ip access 100 !"
/sbin/iptables -I INPUT 6 -s $ip -p tcp --dport 80 -j DROP
/sbin/service iptables save
fi
done
企业实战题:请用至少两种方法实现:
写一个脚本解决DOS攻击生产案例
提示:根据web日志或网络连接数,监控当某个IP并发连接数或者短时间内PV达到100,即调用防火墙命令封掉对应的IP,监控的频率为每隔3分钟
防火墙命令为:iptables -I INPUT -s 10.0.0.10 -j DROP
将前一天封掉的IP给解禁
第一种是ip多就禁掉,属于TCP的
第二种是如果访问连接数多就禁掉,属于http的
方法一:
[root@nginx-8 ~]# cat drop_ip3.sh
#!/bin/bash
. /etc/init.d/functions
conut=10
Path=/server/scripts/access.log.2017-03-23
function ipt(){
awk '{print $1}'$Path|sort|uniq -c|sort -rn >/tmp/tmp.log
exec < /tmp/tmp.log
while read line
do
ip=echo $line|awk '{print $2}'
if [ echo $line|awk '{print $1}' -ge $conut -a iptables -L -n|grep "$ip"|wc -l -lt 1 ]
then
iptables -I INPUT -s $ip -j DROP
RETVAL=$?
if [ $RETVAL -eq 0 ]
then
action "iptables -I INPUT -s $ip -j DROP" /bin/true
echo "$ip" >>/tmp/ip_$(date +%F).log
else
action "iptables -I INPUT -s $ip -j DROP" /bin/false
fi
fi
done
}
function del(){
[ -f /tmp/ip_$(date +%F -d '-1 day').log ]||{
echo "log is not exist"
exit 1}
exec </tmp/ip_$(date +%F -d '-1 day').log
while read line
do
if [ iptables -L -n|grep "$line"|wc -l -ge 1 ]
then
iptables -D INPUT -s $line -j DROP
fi
done
}
function main(){
flag=0
while true
do
sleep 180
((falg++))
ipt
[ $flag -ge 480 ] && del && flag=0
done
}
main
生产环境iptables脚本讲解
见脚本,
技巧:具备外网IP的服务器上不对外的服务最好要做源地址限制
对外提供的服务,不能做源地址限制,例如:80端口
[root@nginx-8 ~]# cat ipt.sh
#!/bin/bash
IPT=/sbin/iptables
#Remove any existing rules
$IPT -F
$IPT -X
$IPT -z
#setting dafault filewall policy
$IPT --policy OUTPUT ACCEPT
$IPT --policy FORWARD DROP
$IPT -p INPUT DROP
#setting for loopback interface
$IPT -A INPUT -i lo -j ACCEPT
$IPT -A OUTPUT -o lo -j ACCEPT
#source Address Spoofing and Other Bad Address
$IPT -A INPUT -i eth0 -s 172.16.0.0/12 -j DROP
$IPT -A INPUT -i eth0 -s 0.0.0.0/8 -j DROP
$IPT -A INPUT -i eth0 -s 169.254.0.0/16 -j DROP
$IPT -A INPUT -i eth0 -s 192.0.2.0/24 -j DROP
#prevent all stealth scans and TCP state falgs
$IPT -A INPUT -p tcp --tcp-flags ALL ALL -j DROP
#All of the bits are cleared
$IPT -A INPUT -p tcp --tcp-flags ALL NONE -j DROP
$IPT -A INPUT -p tcp --tcp-flags ALL FIN,URG,PSH -j DROP
#SYN and RST are both set
$IPT -A INPUT -p tcp --tcp-flags SYN,RST,SYN,RST -j DROP
#SYN and FIN are both set
$IPT -A INPUT -p tcp --tcp-flags SYN,FIN SYN,FIN -j DROP
#FIN and RST are both set
$IPT SYN -A INPUT -p tcp --tcp-flags FIN,RST FIN,RST -j DROP
#FIN is the only bit set,without the expected accompanying ACK
$IPT -A INPUT -p tcp --tcp-flags ACK,FIN FIN -j DROP
#PSH is the only bit set,without the expected accompanying ACK
$IPT -A INPUT -p tcp --tcp-flags ACK,PSH PSH -j DROP
#URG is the only bit set,without the expected accompanying ACK
$IPT -A INPUT -p tcp --tcp-flags ACK,URG PSH -j DROP
#second,port access rules
#nagios
$IPT -A INPUT -s 10.0.10.0/24 -p tcp --dport 5666 -j ACCEPT
$IPT -A INPUT -s 10.0.0.0/24 -p tcp --dport 5666 -j ACCEPT
#db
$IPT -A INPUT -s 10.0.0.0/24 -p tcp --dport 3306 -j ACCEPT
$IPT -A INPUT -s 10.0.0.0/24 -p tcp --dport 3307 -j ACCEPT
#SSH difference from other servers here.>>
$IPT -A INPUT -s 10.0.0.0/24 -p tcp --dport 52113 -j ACCEPT
$IPT -A INPUT -s 10.0.10.0/24 -p tcp --dport 52113 -j ACCEPT
$IPT -A INPUT -s 10.0.10.0/24 -p tcp --dport 22 -j ACCEPT
#http
$IPT -A INPUT -p tcp --dport 80 -j ACCEPT
#snmp
$IPT -A INPUT -s 10.0.0.0/24 -p udp --dport 161 -j ACCEPT
$IPT -A INPUT -s 10.0.0.10/24 -p udp --dport 161 -j ACCEPT
#rsync
$IPT -A INPUT -s 10.0.0.0/24 -m tcp --dport 873 -j ACCEPT
$IPT -A INPUT -s 10.0.0.10/24 -m rcp --dport 873 -j ACCEPT
#icmp
$IPT -A INPUT -p icmp -m icmp --icmp-type any -j ACCEPT
#others related
$IPT -A INPUT -m state --state ESTABLISHED,RELATED -j ACCEPT
$IPT -A OUTPUT -m state --state ESTABLISHED,RELATED -j ACCEPT
问题:企业硬件防火墙和iptables防火墙是否要同时用?
nat表的核心功能
nat表的核心功能: IP及端口的映射转换
1.共享上网
2.端口映射
试验环境准备
服务器网关B需要如下条件
1)物理条件是具备双网卡,建议eth0外网地址()这里是10.0.0.7,gw 10.0.0.254),eth1内网地址()这里是192.168.1.19,内网卡不配GW)
2)确保服务器网关B要可以上网,(B上网才能代理别的及其上网).可以通过ping
3)内核文件/etc/syscrl.conf里开启转发功能
在服务器网关B 192.168.1.19机器上开启路由转发功能,编辑/etc/sysctl.conf修改内容为net.ipv4.ip_forward=1,然后执行sysctl -p使修改生效..
4)iptables 的filter表的FORWARD链允许转发
5)不要filter防火墙功能,共享上网,因此,最好暂时停掉防火墙测试/etc/init.d/iptables stop
环境说明
网关B:
eth2 10.0.0.5 配上级网关 10.0.0.254
eth3 172.16.1.5 不配网关
服务器C:
eth1 172.16.1.8 网关172.16.1.5
加载内核参数
局域网的机器
1)局域网的机器有一块网卡即可,确保局域网的机器C,默认网关设置了网关服务器Bde eth1内网IP()
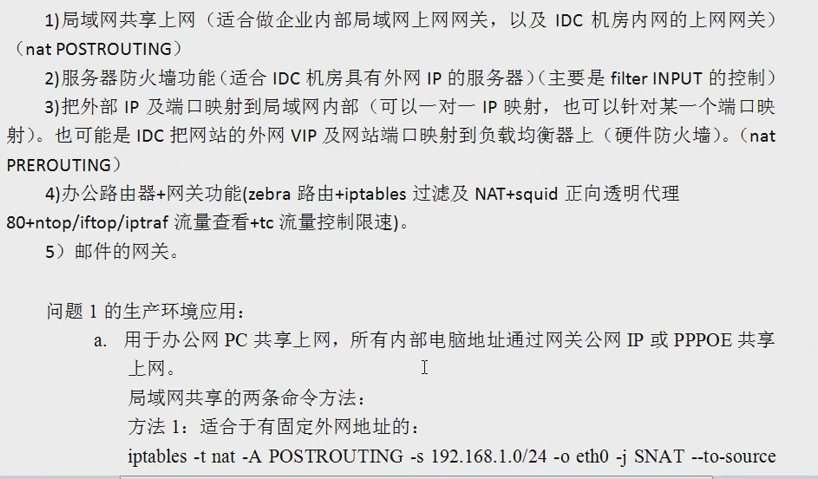
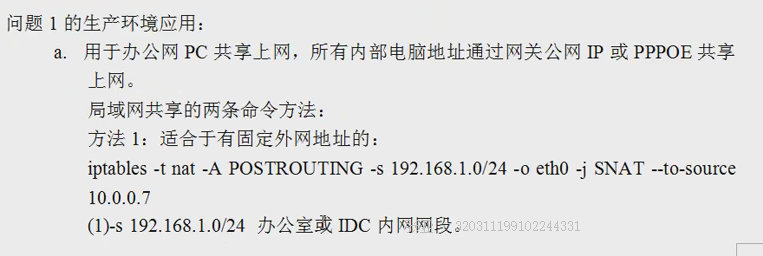
局域网共享上网项目案例
1.实现C可经过B,通过A上英特网
linux网关B:
局域网共享的两条命令方法:
方法1:适合于有固定外网地址的:
iptables -t nat -A POSTROUTING -s 192.168.1.0/24 -o eth0 -j SNAT --to-source 10.0.0.7
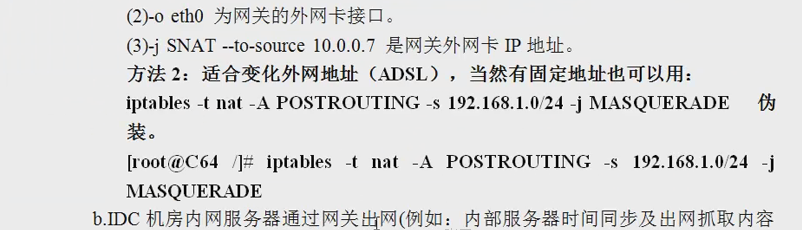
(1)-s 192.16.1.0/24 办公室或IDC内网网段
(2)-o eth0 为网关的外网卡接口
(3)-j SNAT --to-source 10.0.0.7 是网关外网卡IP地址
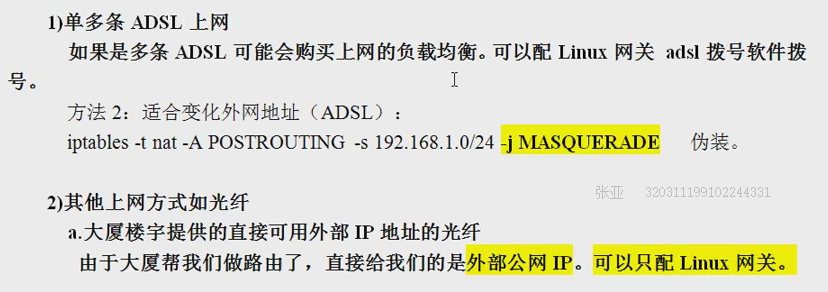
方法2:适合变化外网地址(ADSL)
iptables -t nat -A POSTROUTING -s 192.168.1.0/24 -j MASQURADE <--伪装
为什么用POSTROUTING?
企业共享上网:
1.办公上网
2.IDC内网机器上网
企业上网到底需不需要linux网关
解答:
1)如果由企业路由器的情况下,可以不需要上网网关,使用网关只是解决路由器无法解决的需要.
(例如:上网行为,IP及端口的映射)
2)IDC机房,大厦有固定外网IP的宽带,直接用网关解决上网及控制问题.
把外部IP地址及端口映射到内部服务器地址及端口(共享上网环境一样)
在10段主机可以通过访问B10.0.0.5:9000, 即可访问到172.16.1.8:80
NET PREROUTING
C配置WEB服务
解答:
(1)在172.16.1.8开启http服务监听9000端口,然后在网关服务器B可以访问
(2)具体转换命令
iptables -t nat -A PREROUTING -d 10.0.0.5 -p tcp --dport 9000 -j DNAT --to-destination 172.16.1.8:80
强调:有个别同学说网关服务器需要开启80服务,但不需要对外服务?
测试结果:网管开启httpd 80后
此时:来自80端口的请求转发依然会转发到后端的服务器,但是当iptables nat规则后,此时就到达了http服务监听的80端口,所以显示的是默认页面.
删除nat规则
iptables iptables -t nat -D PREROUTING -d 10.0.0.5 -p tcp --dport 9000 -j DNAT --to-destination 172.16.1.8:80
iptables常用企业案例
1.linux主机防火墙(表:FILTER 链:INPUT)
2.局域网机器共享上网(表:NAT 链:POSTROUTING)
iptables -t nat -A POSTROUTING -s 172.16.1.0/24 -o eth0 -j SNAT --to-source 10.0.0.5
3.外部地址和端口,映射为内部地址和端口(表: NAT 链:PREROUTING)
iptables -t nat -A POSTROUTING -d 10.0.0.5 -p tcp --dport 9000 -j DNAT --to-destination 172.16.1.8:80
实现10网段外网IP和内网172网段IP一对一映射
首先在路由网关上绑定124.42.34.112,可以是别名的方式
-A POSTROUTING -s 10.0.0.0/255.255.240.0 -d 124.42.34.112 -j SNAT --to-source 10.0.0.254
-A PREROUTING -d 124.42.34.112 -j DNAT --to-destination 10.0.0.8
-A POSTROUTING -s 10.0.0.8 -o eth0 -j SNAT --to-source 124.42.34.112
跨不同网段IP服务通信问题
(1)生产环境大于254台机器网段划分及路由解决方案详解01
http://v.youku.com/v_show/id_XNTAyMjAwMzI0.html
(2) linux route命令深入浅出与实战案例精讲
http://oldboy.blog.51cto.com/2561410/1119453
http://oldboy.blog.51cto.com/2561410/974194
必看3遍以上。
要实现的生产局域网共享上网案例架构图
http://oldboy.blog.51cto.com/2561410/974194
考试题一:linux下如何添加路由(百度面试题)
以上是原题,老男孩老师翻译成如下3道题。
a.如何用命令行方式给linux机器添加一个默认网关,假设网关地址为10.0.0.254?
b. 192.168.1.0网段, 192.168.1.1网关的某一服务器想连入172.16.1.0/24段,该如何添加路由(奇虎360)
iptables -A INPUT --dport 80 -j ACCEPT
iptables -P INPUT DROP
c.如果添加一个主机路由?
请分别解答。
解答:route -net 172.16.1.0/24 gw 192.168.1.1
iptables生产应用场景
映射多个外网IP上网
映射多个外网IP上网
iptables -t nat -A POSTROUTING -s 10.0.1.0/255.255.240.0 -o eth0 -j SNAT --to-source 124.42.60.11-124.42.60.16
iptables -t nat -A POSTROUTING -s 10.0.1.0/255.255.255.0 -o eth0 -j SNAT --to-source 124.42.60.11
iptables -t nat -A POSTROUTING -s 10.0.2.0/255.255.255.0 -o eth0 -j SNAT --to-source 124.42.60.12
问题:
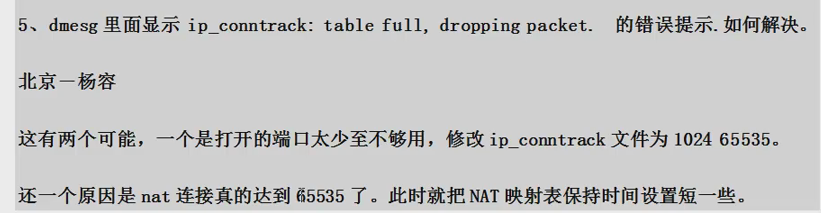
1.2000人.被封
2.65535端口资源有限
iptables 内核优化
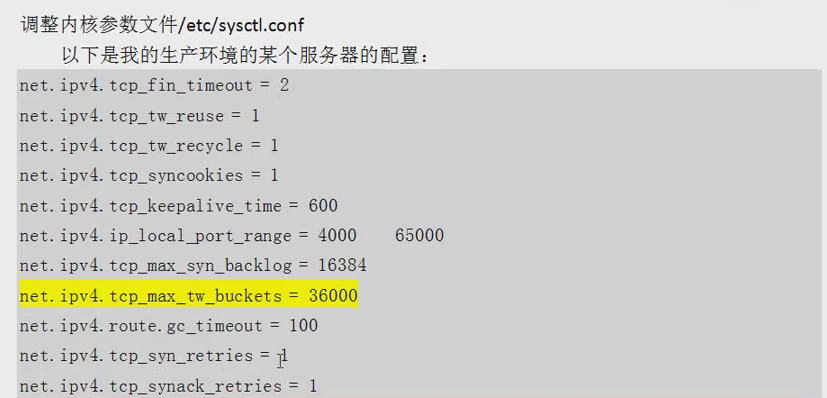

C64:
net.nf_conntrack_max = 25000000
net.netfilter.nf_conntrack_max = 25000000
net.netfilter.nf_conntrack_tcp_timeout_established = 180
net.netfilter.nf_conntrack_tcp_timeout_time_wait = 120
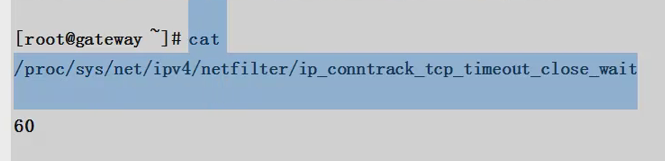
net.netfilter.nf_conntrack_tcp_timeout_close_wait = 60
net.netfilter.nf_conntrack_tcp_timeout_fin_wait = 120
企业上网的常见接入方式

配置zebra路由
Linux上配置zebra(quagga)路由:
client(config)#int eth0
client(config-if)#ip add 10.1.34.81 255.255.255.0
client(config-if)#int eth1
client(config-if)#ip add 110.233.24.96 255.255.255.224
client(config)#ip route 0.0.0.0 0.0.0.0 10.1.32.1
client(config)#ip route 110.233.24.96/27 eth1
