前言
上一篇中我们梳理了jobGraph提交过程中taskmanager、jobmanager、resourcemanager各组件的启动流程,本篇我们接着上一篇中的内容来分析一下从jobGraph生成ExecutionGraph的源码执行流程。
在DefaultScheduler构造时,它的父类SchedulerBase的构造器中有如下一段代码:
// 创建和恢复ExecutionGraphthis.executionGraph = createAndRestoreExecutionGraph(jobManagerJobMetricGroup, checkNotNull(shuffleMaster), checkNotNull(partitionTracker), checkNotNull(executionDeploymentTracker), initializationTimestamp);// 调度拓朴里有partition信息和pipelineRegion信息this.schedulingTopology = executionGraph.getSchedulingTopology();复制
本篇我们将聚焦这几行代码的执行逻辑来对ExecutionGraph的生成流程进行分析。
createAndRestoreExecutionGraph
闲话少说,直接上代码:
private ExecutionGraph createAndRestoreExecutionGraph(JobManagerJobMetricGroup currentJobManagerJobMetricGroup,ShuffleMaster<?> shuffleMaster,JobMasterPartitionTracker partitionTracker,ExecutionDeploymentTracker executionDeploymentTracker,long initializationTimestamp) throws Exception {ExecutionGraph newExecutionGraph = createExecutionGraph(currentJobManagerJobMetricGroup, shuffleMaster, partitionTracker, executionDeploymentTracker, initializationTimestamp);// checkpoint 协调器final CheckpointCoordinator checkpointCoordinator = newExecutionGraph.getCheckpointCoordinator();if (checkpointCoordinator != null) {// check whether we find a valid checkpointif (!checkpointCoordinator.restoreInitialCheckpointIfPresent(new HashSet<>(newExecutionGraph.getAllVertices().values()))) {// check whether we can restore from a savepointtryRestoreExecutionGraphFromSavepoint(newExecutionGraph, jobGraph.getSavepointRestoreSettings());}}return newExecutionGraph;}复制
这段代码主要处理的逻辑有两个:1. 创建ExecutionGraph;2. 如果设置了使用savepoint启动则尝试使用savepoint进行恢复。接下来我们分别来进行分析。
createExecutionGraph方法
我们先来看下代码信息:
private ExecutionGraph createExecutionGraph(JobManagerJobMetricGroup currentJobManagerJobMetricGroup,ShuffleMaster<?> shuffleMaster,final JobMasterPartitionTracker partitionTracker,ExecutionDeploymentTracker executionDeploymentTracker,long initializationTimestamp) throws JobExecutionException, JobException {// 任务布署监听器,用于记录布署过程中发生的动作ExecutionDeploymentListener executionDeploymentListener = new ExecutionDeploymentTrackerDeploymentListenerAdapter(executionDeploymentTracker);// 执行状态更新监听器ExecutionStateUpdateListener executionStateUpdateListener = (execution, newState) -> {if (newState.isTerminal()) {executionDeploymentTracker.stopTrackingDeploymentOf(execution);}};// 任务失败容错策略final FailoverStrategy.Factory failoverStrategy = legacyScheduling ?FailoverStrategyLoader.loadFailoverStrategy(jobMasterConfiguration, log) :// 不做处理new NoOpFailoverStrategy.Factory();// 构造ExecutionGraphreturn ExecutionGraphBuilder.buildGraph(null,jobGraph,jobMasterConfiguration,futureExecutor,ioExecutor,slotProvider,userCodeLoader,checkpointRecoveryFactory,rpcTimeout,restartStrategy,currentJobManagerJobMetricGroup,blobWriter,slotRequestTimeout,log,shuffleMaster,partitionTracker,failoverStrategy,executionDeploymentListener,executionStateUpdateListener,initializationTimestamp);}复制
一、入参
这个方法有几个入参,我们分别来分析一下这几个入参。
1. currentJobManagerJobMetricGroup
在JobMaster的构造方法上有一个参数:
JobManagerJobMetricGroupFactory jobMetricGroupFactory复制
这个参数的初始化发生在org.apache.flink.runtime.dispatcher.Dispatcher#createJobManagerRunner方法中,使用的是new DefaultJobManagerJobMetricGroupFactory(jobManagerMetricGroup)方法,主要用于记录jobmanager的metric信息。
2. shuffleMaster
用于协调处理任务中的shuffle操作。
shuffleMaster的初始化发生在DefaultJobManagerRunnerFactory#createJobManagerRunner方法中,初始化代码如下:
final ShuffleMaster<?> shuffleMaster = ShuffleServiceLoader.loadShuffleServiceFactory(configuration).createShuffleMaster(configuration);复制
这里是使用SPI的方式加载shuffleServiceFactory,用户可以添加自定义的实现,flink默认的实现是NettyShuffleServiceFactory。最后调用的是NettyShuffleServiceFactory#createShuffleMaster方法:
@Overridepublic NettyShuffleMaster createShuffleMaster(Configuration configuration) {return NettyShuffleMaster.INSTANCE;}复制
可以看到,这里返回的是一个单例对象。
3. partitionTracker
它用于跟踪执行任务的资源信息(即TaskManager信息)。
它的初始化在DefaultJobMasterServiceFactory#createJobMasterService中创建JobMaster时会创建PartitionTrackerFactory,代码如下图:
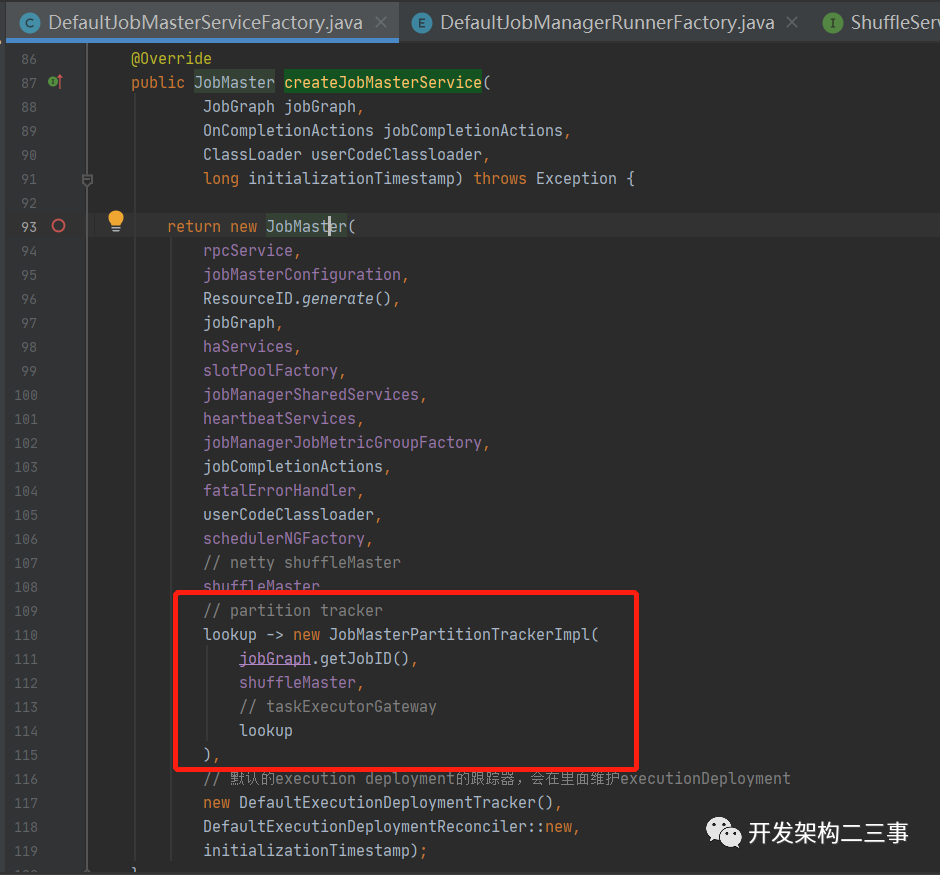
在JobMaster的构造方法中会为JobMaster创建partitionTracker,具体逻辑如下:
this.partitionTracker = checkNotNull(partitionTrackerFactory).create(resourceID -> {Tuple2<TaskManagerLocation, TaskExecutorGateway> taskManagerInfo = registeredTaskManagers.get(resourceID);if (taskManagerInfo == null) {return Optional.empty();}return Optional.of(taskManagerInfo.f1);});复制
partitionTrackerFactory的lookup逻辑是去registeredTaskManagers根据resourceID获取到对应的TaskManager的location信息。
4. executionDeploymentTracker
executionDeploymentTracker的创建位置在DefaultJobMasterServiceFactory#createJobMasterService方法中,直接以new DefaultExecutionDeploymentTracker()的方式创建的。它用于维护并追踪任务执行部署的链路信息。
5. initializationTimestamp
initializationTimestamp为进入org.apache.flink.runtime.dispatcher.Dispatcher#runJob方法的时间戳。
接下来,我们直接来看ExecutionGraphBuilder#buildGraph方法,由于方法较长,我们采取分割式分析的方法逐步来看。
二、buildGraph方法
1. 创建ExecutionGraph对象
final String jobName = jobGraph.getName();final JobID jobId = jobGraph.getJobID();// jobInformation中包括序列化配置,job配置,用户jar包在blobStore中的blobKey,classpath信息等final JobInformation jobInformation = new JobInformation(jobId,jobName,jobGraph.getSerializedExecutionConfig(),jobGraph.getJobConfiguration(),jobGraph.getUserJarBlobKeys(),jobGraph.getClasspaths());// 历史上保留的最大执行尝试数final int maxPriorAttemptsHistoryLength =jobManagerConfig.getInteger(JobManagerOptions.MAX_ATTEMPTS_HISTORY_SIZE);// intermediate result partitions释放策略工厂,决定intermediate result partitions何时释放final PartitionReleaseStrategy.Factory partitionReleaseStrategyFactory =PartitionReleaseStrategyFactoryLoader.loadPartitionReleaseStrategyFactory(jobManagerConfig);// create a new execution graph, if none exists so farfinal ExecutionGraph executionGraph;try {// 创建executionGraphexecutionGraph = (prior != null) ? prior :new ExecutionGraph(jobInformation,futureExecutor,ioExecutor,rpcTimeout,restartStrategy,maxPriorAttemptsHistoryLength,failoverStrategyFactory,slotProvider,classLoader,blobWriter,allocationTimeout,partitionReleaseStrategyFactory,shuffleMaster,partitionTracker,jobGraph.getScheduleMode(),executionDeploymentListener,executionStateUpdateListener,initializationTimestamp);} catch (IOException e) {throw new JobException("Could not create the ExecutionGraph.", e);}复制
ExecutionGraph由很多属性和方法组成,如JobInformation、RestartStrategy、ClassLoader、PartitionReleaseStrategy、DefaultExecutionTopology、SlotProviderStrategy、JobMasterPartitionTracker、ResultPartitionAvailabilityChecker、CheckpointCoordinator、ShuffleMaster等,也维护着需要执行的所有任务信息,部分罗列如下:
/** All job vertices that are part of this graph. */private final Map<JobVertexID, ExecutionJobVertex> tasks;/** All vertices, in the order in which they were created. **/private final List<ExecutionJobVertex> verticesInCreationOrder;/** All intermediate results that are part of this graph. */private final Map<IntermediateDataSetID, IntermediateResult> intermediateResults;/** The currently executed tasks, for callbacks. */private final Map<ExecutionAttemptID, Execution> currentExecutions;复制
在ExecutionGraph的构造方法中对这些基础信息进行了初始化操作,在后续的过程中会用jobGraph中的信息来对这些属性进行填充。
2. 向ExecutionGraph填充jsonPlan
直接上代码:
executionGraph.setJsonPlan(JsonPlanGenerator.generatePlan(jobGraph));复制
这里会直接使用jobGraph来生成json格式的执行计划。
3. 遍历JobVertex初始化需要在master上的执行逻辑
直接上代码:
for (JobVertex vertex : jobGraph.getVertices()) {String executableClass = vertex.getInvokableClassName();if (executableClass == null || executableClass.isEmpty()) {throw new JobSubmissionException(jobId,"The vertex " + vertex.getID() + " (" + vertex.getName() + ") has no invokable class.");}try {vertex.initializeOnMaster(classLoader);}复制
vertex.initializeOnMaster方法是一个预留的模板方法,用户可以自己嵌一些需要在jobmaster上执行的逻辑。
4. 生成ExecutionGraph的topology
// topologically sort the job vertices and attach the graph to the existing one// jobGraph的taskVertices为map结构,里面都是无序的,这个方法的作用是将这些无序的转成有序列表List<JobVertex> sortedTopology = jobGraph.getVerticesSortedTopologicallyFromSources();if (log.isDebugEnabled()) {log.debug("Adding {} vertices from job graph {} ({}).", sortedTopology.size(), jobName, jobId);}// 创建ExecutionJobVertex和IntermediateResultexecutionGraph.attachJobGraph(sortedTopology);复制
这里会使用jobGraph来生成ExecutionGraph里的拓朴结构,我们直接来看attachJobGraph方法:
public void attachJobGraph(List<JobVertex> topologiallySorted) throws JobException {assertRunningInJobMasterMainThread();LOG.debug("Attaching {} topologically sorted vertices to existing job graph with {} " +"vertices and {} intermediate results.",topologiallySorted.size(),tasks.size(),intermediateResults.size());final ArrayList<ExecutionJobVertex> newExecJobVertices = new ArrayList<>(topologiallySorted.size());final long createTimestamp = System.currentTimeMillis();for (JobVertex jobVertex : topologiallySorted) {if (jobVertex.isInputVertex() && !jobVertex.isStoppable()) {this.isStoppable = false;}// 将jobGraph的顶点转化成ExecutionJobVertex// create the execution job vertex and attach it to the graphExecutionJobVertex ejv = new ExecutionJobVertex(this,jobVertex,1,maxPriorAttemptsHistoryLength,rpcTimeout,globalModVersion,createTimestamp);// 连接ExecutionJobVertex与intermediateResult之间,all_to_all point wise 创建ExecuteEdge信息并与上下游节点建立连接ejv.connectToPredecessors(this.intermediateResults);ExecutionJobVertex previousTask = this.tasks.putIfAbsent(jobVertex.getID(), ejv);if (previousTask != null) {throw new JobException(String.format("Encountered two job vertices with ID %s : previous=[%s] / new=[%s]",jobVertex.getID(),ejv,previousTask));}for (IntermediateResult res : ejv.getProducedDataSets()) {IntermediateResult previousDataSet = this.intermediateResults.putIfAbsent(res.getId(),res);if (previousDataSet != null) {throw new JobException(String.format("Encountered two intermediate data set with ID %s : previous=[%s] / new=[%s]",res.getId(),res,previousDataSet));}}this.verticesInCreationOrder.add(ejv);this.numVerticesTotal += ejv.getParallelism();newExecJobVertices.add(ejv);}// 创建执行拓扑,并指定上下游的生产和消费partition// the topology assigning should happen before notifying new vertices to failoverStrategyexecutionTopology = DefaultExecutionTopology.fromExecutionGraph(this);failoverStrategy.notifyNewVertices(newExecJobVertices);partitionReleaseStrategy = partitionReleaseStrategyFactory.createInstance(getSchedulingTopology());}复制
这里会通过遍历排好序的JobVertex列表生成ExecutionJobVertex列表和executionTopology信息。这里我们分两部分分别来看。
由JobVertex生成ExecutionJobVertex
这部分的代码如下:
// 将jobGraph的顶点转化成ExecutionJobVertex// create the execution job vertex and attach it to the graphExecutionJobVertex ejv = new ExecutionJobVertex(this,jobVertex,1,maxPriorAttemptsHistoryLength,rpcTimeout,globalModVersion,createTimestamp);// 连接ExecutionJobVertex与intermediateResult之间,all_to_all point wise 创建ExecuteEdge信息并与上下游节点建立连接ejv.connectToPredecessors(this.intermediateResults);ExecutionJobVertex previousTask = this.tasks.putIfAbsent(jobVertex.getID(), ejv);if (previousTask != null) {throw new JobException(String.format(---------));}for (IntermediateResult res : ejv.getProducedDataSets()) {IntermediateResult previousDataSet = this.intermediateResults.putIfAbsent(res.getId(),res);if (previousDataSet != null) {throw new JobException(---)}}this.verticesInCreationOrder.add(ejv);this.numVerticesTotal += ejv.getParallelism();newExecJobVertices.add(ejv);复制
从上面的代码中可以看出,JobVertex与ExecutionJobVertex是一对一的关系,和JobVertex中的IntermediateDataSet列表一样,在ExecutionJobVertex内部也维护着一个IntermediateResult列表,IntermediateResult列表的数量和JobVertex中的IntermediateDataSet列表的数量是一样的。
ExecutionJobVertex
接下来我们进入到ExecutionJobVertex的构造方法,由于方法较长,我们分段来看:
1.subTask的数量是由什么决定的?
// 获取jobVertex的并行度,如果没有设置则会使用默认的并行度int vertexParallelism = jobVertex.getParallelism();// 确定subTask的数量int numTaskVertices = vertexParallelism > 0 ? vertexParallelism : defaultParallelism;// 最大并行度final int configuredMaxParallelism = jobVertex.getMaxParallelism();this.maxParallelismConfigured = (VALUE_NOT_SET != configuredMaxParallelism);// 如果jobVertex没有配置最大并行度,则会计算一个默认值// if no max parallelism was configured by the user, we calculate and set a defaultsetMaxParallelismInternal(maxParallelismConfigured ?configuredMaxParallelism : KeyGroupRangeAssignment.computeDefaultMaxParallelism(numTaskVertices));复制
从上面的代码中可以看到numTaskVertices即subTask的数量是由JobVertex的并行度决定的,关于并行度的取值在上面的代码中也介绍得比较清晰了,这里就不过多去分析了。
2.IntermediateResult列表的来源是哪里?
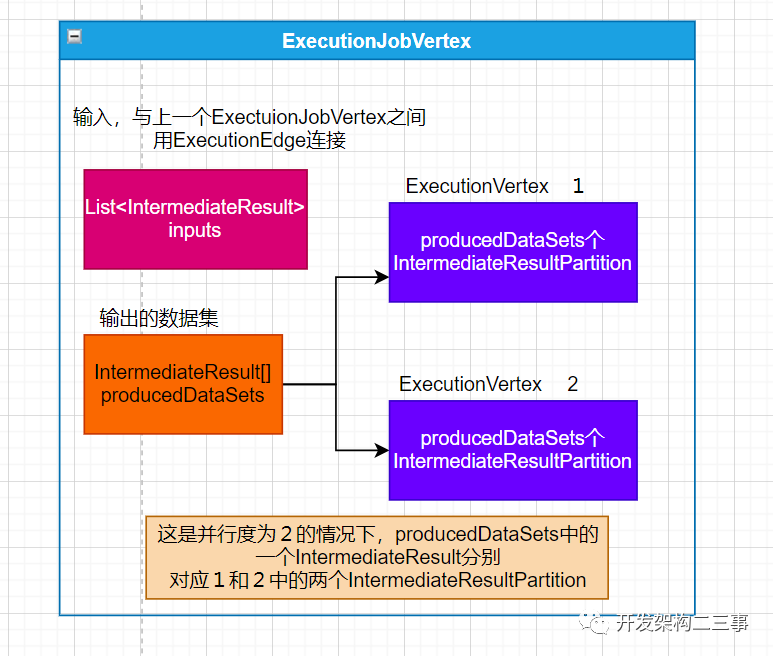
// 当前节点产生的中间结果,可能它的下游对应多个分区(一对多)// create the intermediate resultsthis.producedDataSets = new IntermediateResult[jobVertex.getNumberOfProducedIntermediateDataSets()];for (int i = 0; i < jobVertex.getProducedDataSets().size(); i++) {final IntermediateDataSet result = jobVertex.getProducedDataSets().get(i);// 当前节点产生中间数据的列表this.producedDataSets[i] = new IntermediateResult(result.getId(),this,numTaskVertices,result.getResultType());}
从代码中可以看出,IntermediateResult与JobVertex中的IntermediateDataSet是一一对应的关系,即JobVertex中的producedDataSets列表中的一个IntermediateDataSet会在ExecutionJobVertex中对应producedDataSets列表中的一个IntermediateResult。而IntermediateResult会和subTask中的partition是一对多的关系,这种对应关系是由连接方式是all_to_all还是point_wise决定的。
3.ExecutionJobVertex与ExecutionVertex的对应关系是怎么样的?
// create all task verticesfor (int i = 0; i < numTaskVertices; i++) {// 根据并行度创建多个ExecutionVertex,每个ExecutionVertex对应一个subTask。多个subTask共用producedDataSetsExecutionVertex vertex = new ExecutionVertex(this,i,producedDataSets,timeout,initialGlobalModVersion,createTimestamp,maxPriorAttemptsHistoryLength);this.taskVertices[i] = vertex;}复制
单纯从这段代码上可以看出ExecutionJobVertex与ExecutionVertex是一对多的关系,每个ExecutionJobVertex中ExecutionVertex的个数是由上面讲过的subTask的数量决定的。
ExecutionVertex
我们接着来看ExecutionVertex的构造方法,我们仍然分段来看下具体的实现逻辑。
1.IntermediateResultPartition
this.resultPartitions = new LinkedHashMap<>(producedDataSets.length, 1);for (IntermediateResult result : producedDataSets) {// 中间结果分区,每个IntermediateResult对应一个IntermediateResultPartition,然后每个ExecutionVertex对象对应不同的subTaskIndex,// 每个subTaskIndex都会与producedDataSets中所有的IntermediateResult对应的一个IntermediateResultPartition形成映射IntermediateResultPartition irp = new IntermediateResultPartition(result, this, subTaskIndex);// 在IntermediateResult中有一个partitions数组result.setPartition(subTaskIndex, irp);resultPartitions.put(irp.getPartitionId(), irp);}复制
在这里的逻辑比较清晰了,首先producedDataSets在上面有分析过,它是每个ExectuionJobVertex中维护的一个IntermediateResult列表。然后在每一个ExecutionVertex构造方法的内部会遍历producedDataSets,对其中的每一个IntermediateResult都生成一个IntermediateResultPartition,并按照subTaskIndex的顺序放入到IntermediateResult的IntermediateResultPartition数组中。并将IntermediateResultPartition按照partitionId与IntermediateResultPartition映射形式放到resultPartitions中去。
2. ExecutionVertex与ExecutionEdge的关系
this.inputEdges = new ExecutionEdge[jobVertex.getJobVertex().getInputs().size()][];复制
ExecutionVertex中维护着一个inputEdges数组,即上一个ExecutionJobVertex中ExecutionVertex中的IntermediateResultPartition的输出边。
我们来看下IntermediateResultPartition的结构:
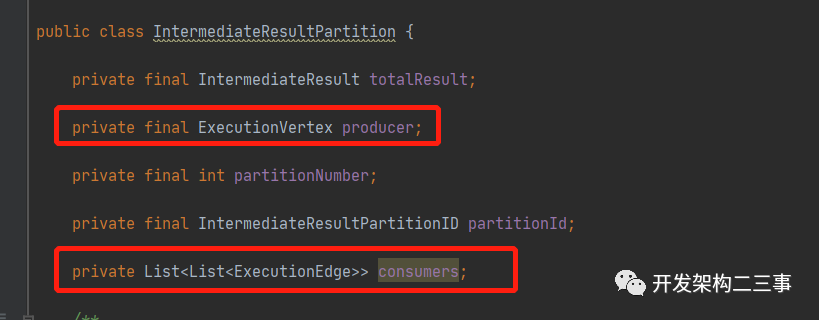
可以看到,它里面维护着生产数据的producer为ExecutionVertex类型的,一个consumers列表为这个分区的输出边,同时也是下游的ExecutionVertex的输入边。
我们再回过头来看ExecutionGraph的attachJobGraph方法中的一段代码:

图中标红的代码发生在ExecutionJobVertex构造完成后的动作,会先执行1处的逻辑。由于上面是对有序的JobVertex列表进行的遍历,也就是说先创建的是Source节点的ExecutionJobVertex,进行到1中会因为没有前继节点而直接跳过,进入到2处会把Source节点放到intermediateResults中,依次类推。
ExecutionJobVertex#connectToPredecessors方法中的逻辑这里就不再进行分析了,主要是遍历当前jobVertex的所有输入边,然后按照JobVertex的并行度,将当前ExecutionJobVertex中的ExecutionVertex与输入的ExecutionEdge建立连接,这些ExecutionEdge列表作为下游ExecutionVertex的inputEdges,同时作为上游ExecutionVertex的IntermediateResultPartition的consumers。这里需要注意的是输入的JobEdge的DistributionPattern决定了IntermediateResultPartition与ExecutionEdge之间的连接方式。

Execution
Execution是最终用于运行subTask时使用的可执行的实例,它在ExecutionVertex的构造方法内创建,我们来看下代码:
// 创建execution,一个顶点的一次执行。虽然{@link ExecutionVertex}可以执行多次(用于恢复、重新计算、重新配置),但该类跟踪顶点和资源的单个执行状态。this.currentExecution = new Execution(getExecutionGraph().getFutureExecutor(),this,0,initialGlobalModVersion,createTimestamp,timeout);复制
这是创建Execution的入口,我们来看Execution的构造方法:
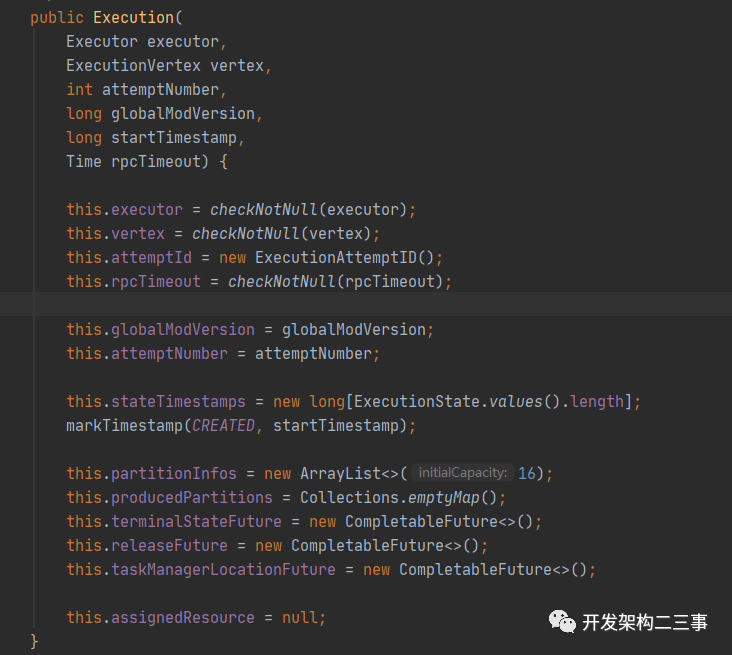
可以看到这其中有executor信息、关联的ExecutionVertex信息、分区信息、申请的资源信息等,都是subTask执行时需要用到的。在Execution申请到资源后会进行分区信息的注册和资源信息的填入。
DefaultExecutionTopology的生成
生成逻辑在ExecutionGraph#attachJobGraph方法中,直接上代码:
// 创建执行拓扑,并指定上下游的生产和消费partition// the topology assigning should happen before notifying new vertices to failoverStrategyexecutionTopology = DefaultExecutionTopology.fromExecutionGraph(this);复制
DefaultExecutionTopology#formExecutionGraph方法的代码逻辑如下:
public static DefaultExecutionTopology fromExecutionGraph(ExecutionGraph executionGraph) {// 默认的执行拓朴final DefaultExecutionTopology topology = new DefaultExecutionTopology(executionGraph);// 生成流水线regionsfinal List<DefaultSchedulingPipelinedRegion> pipelinedRegions = generatePipelinedRegions(topology);topology.setPipelinedRegions(pipelinedRegions);ensureCoLocatedVerticesInSameRegion(pipelinedRegions, executionGraph);return topology;}复制
这里会根据executionGraph生成DefaultExecutionTopology,然后对topology进行pipeline region的划分。
细心的可以发现PipelinedRegionComputeUtil#computePipelinedRegions方法在jobGraph生成时也有过调用,内部的连通器算法主要用于对图的连通进行合理的规划。
DefaultExecutionTopology为一个用于调度执行的拓朴,内部维护着执行时需要的任务拓朴信息。具体内部的细节后续再专门进行分析,到这里ExecutionGraph的部分我们就先结束了。
总结
对于ExecutionGraph的组成还是相当复杂的,本文只能从整体流程上进行了一些分析,当然也没办法做到面面俱到。后续再专门针对本文中忽略的一些细节进行分析。
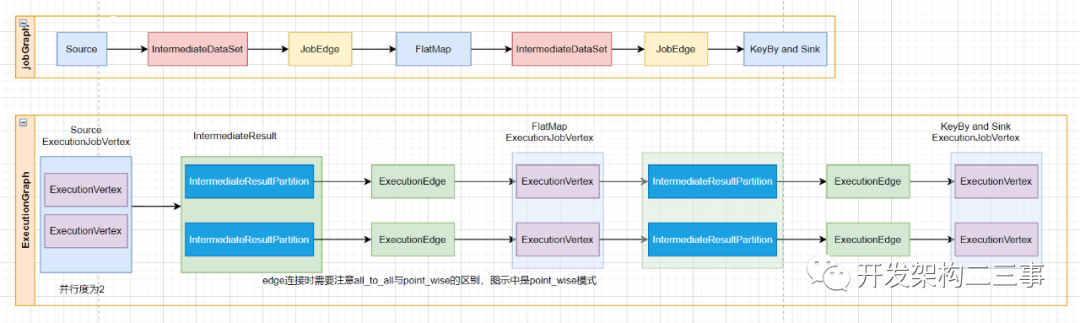
WordCount程序从JobGraph到ExecutionGraph的转变过程我们以下面一张图来进行最后的总结说明: