1. TiDB 的参数配置
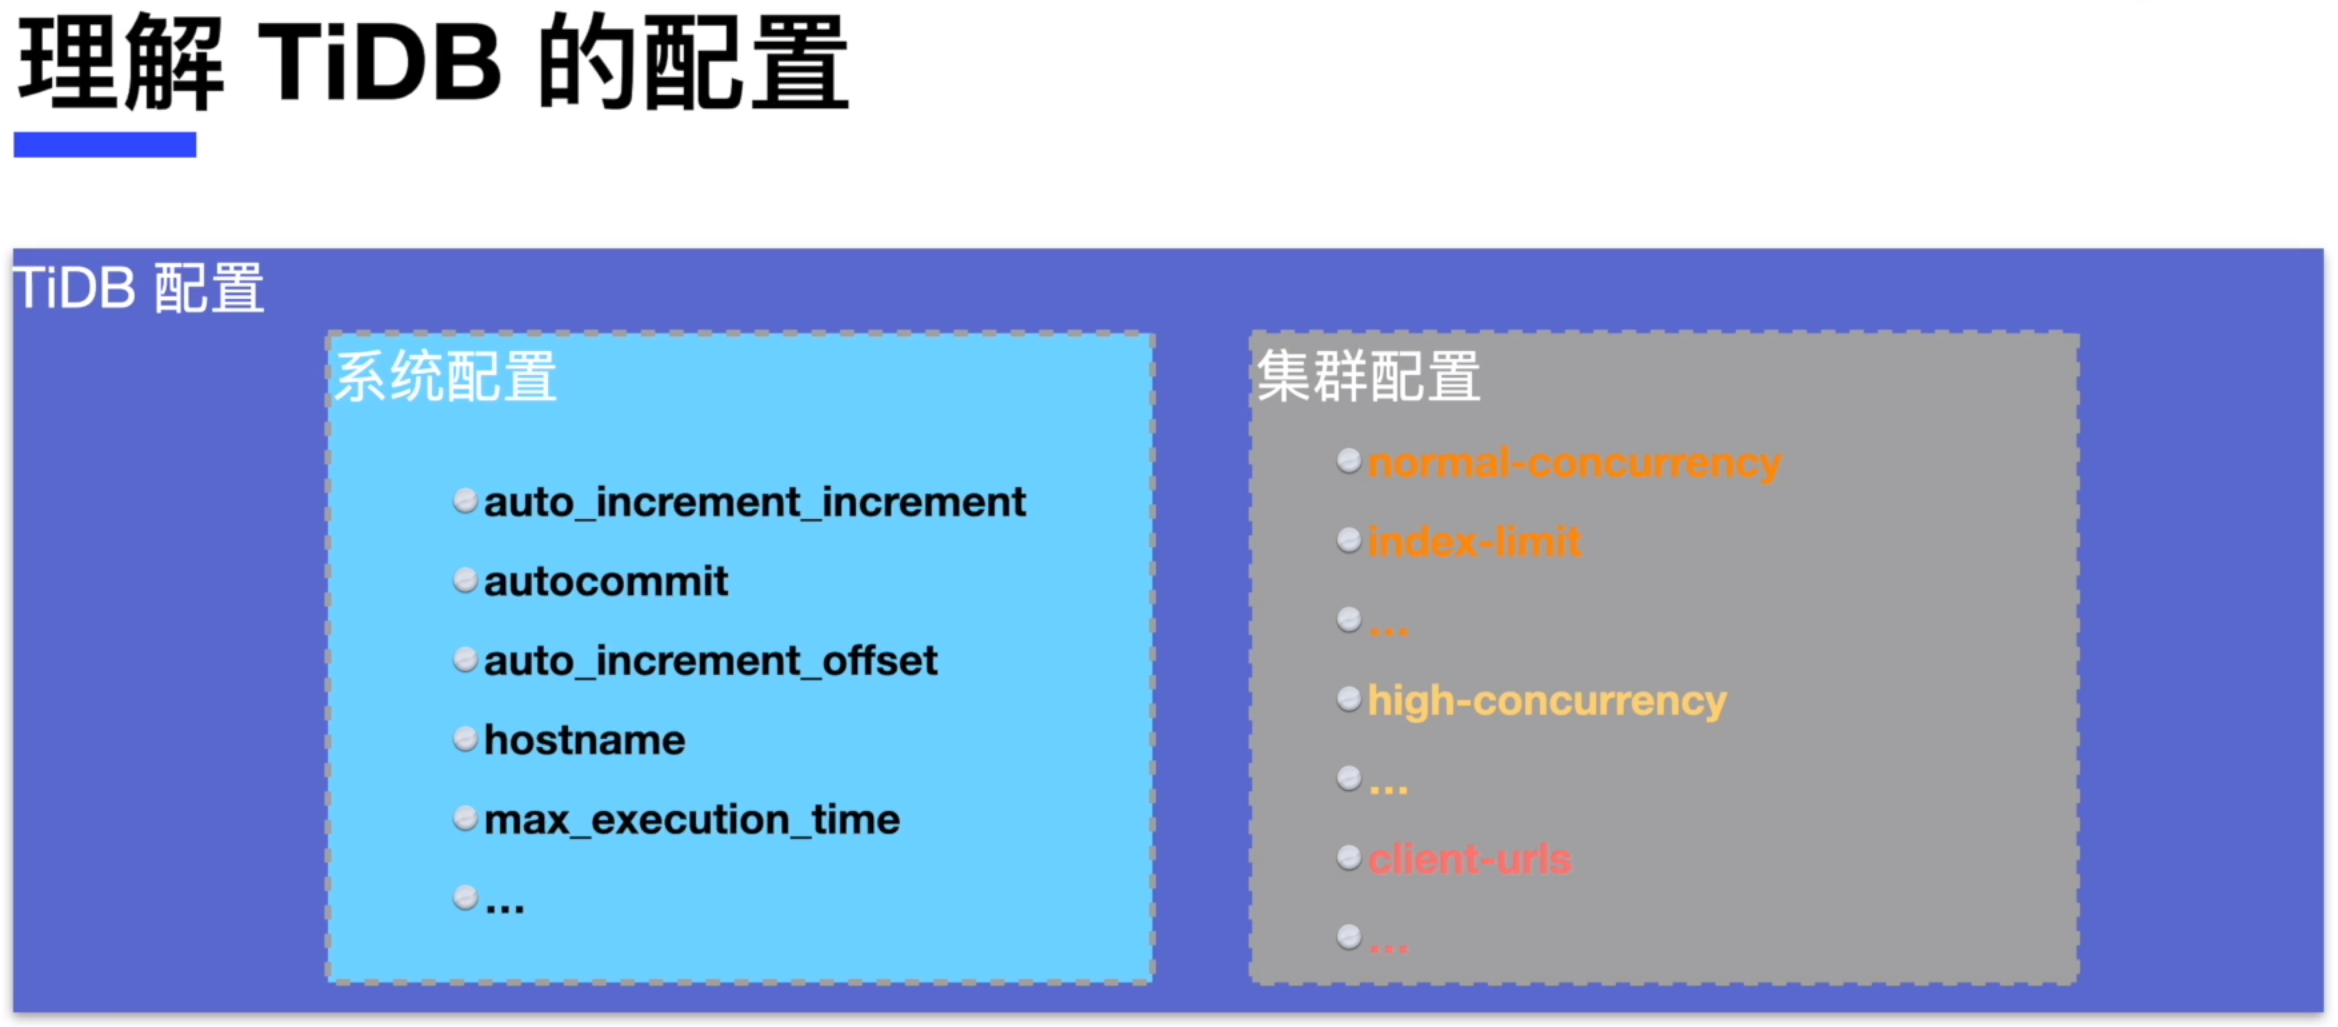
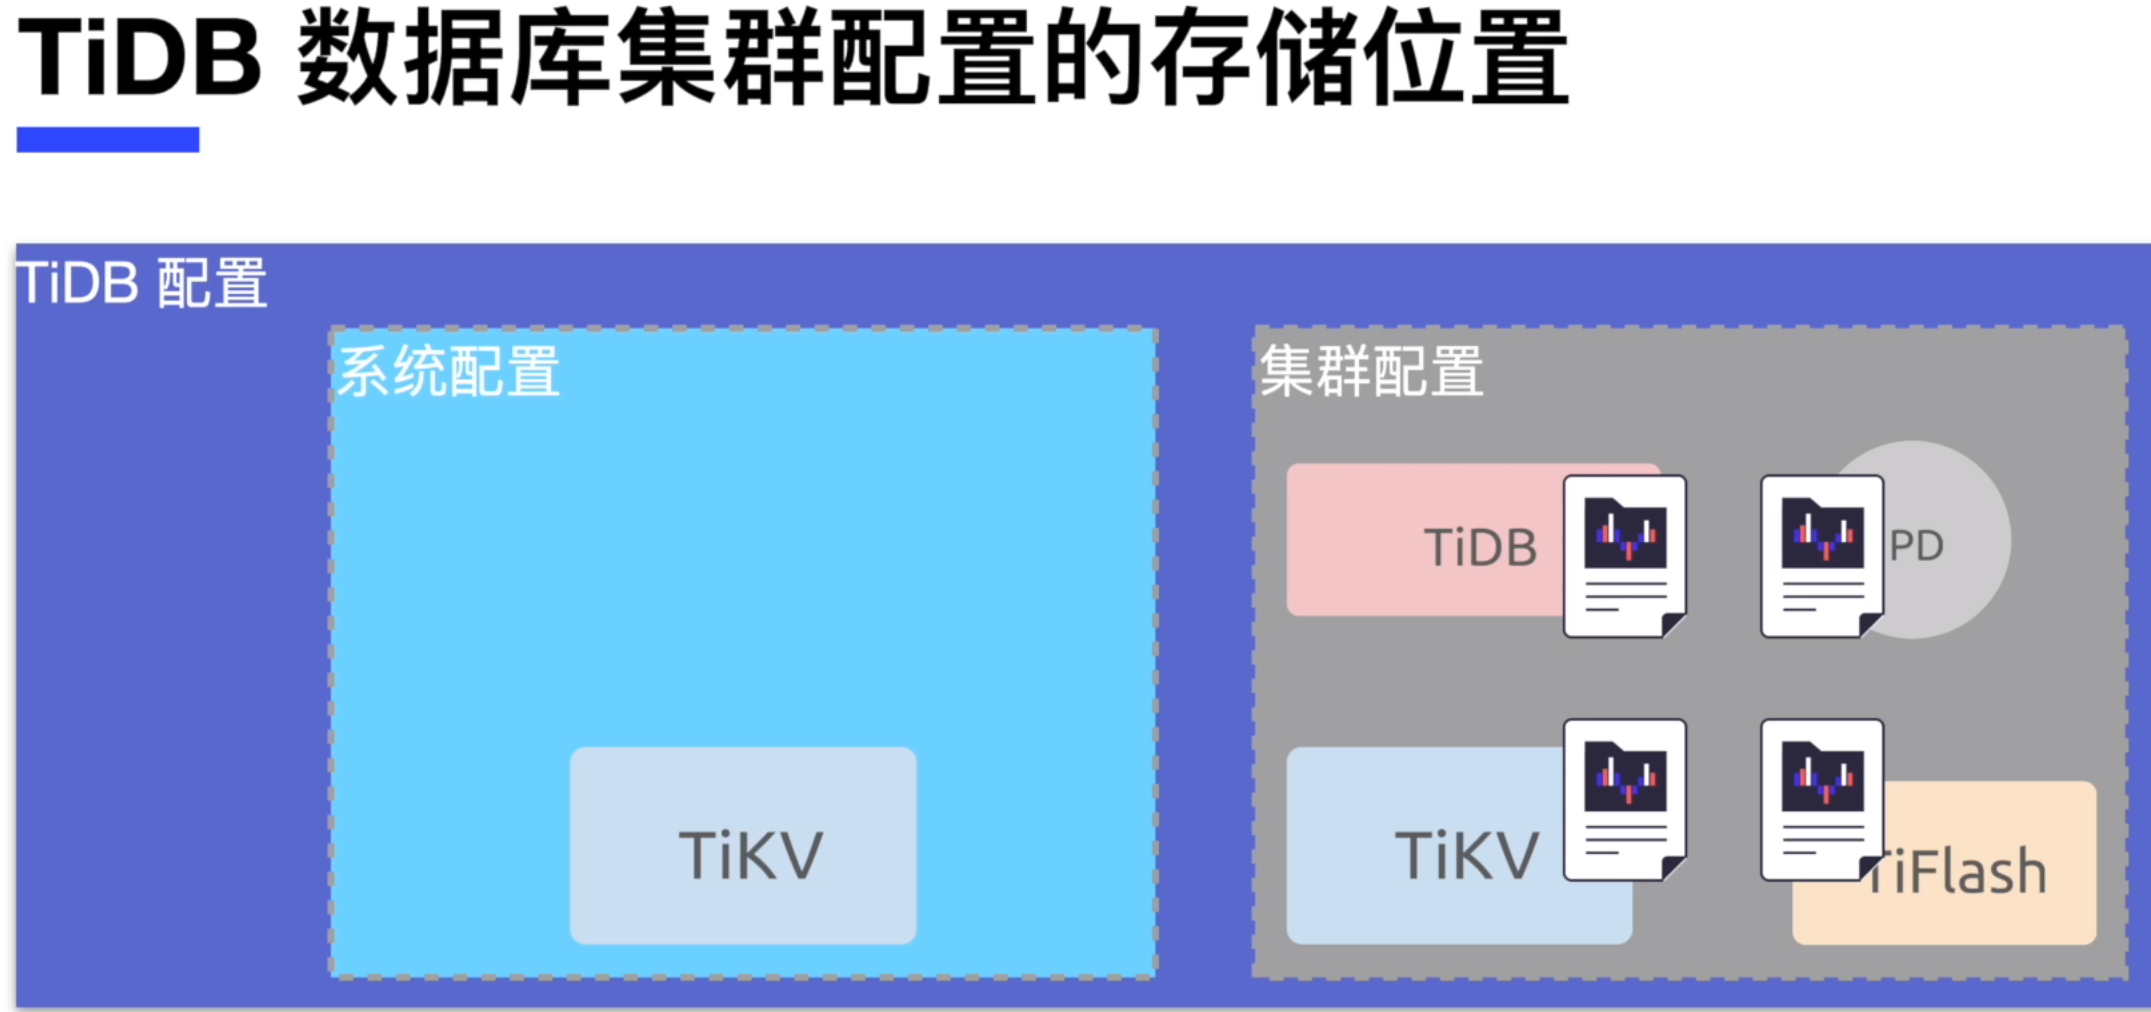
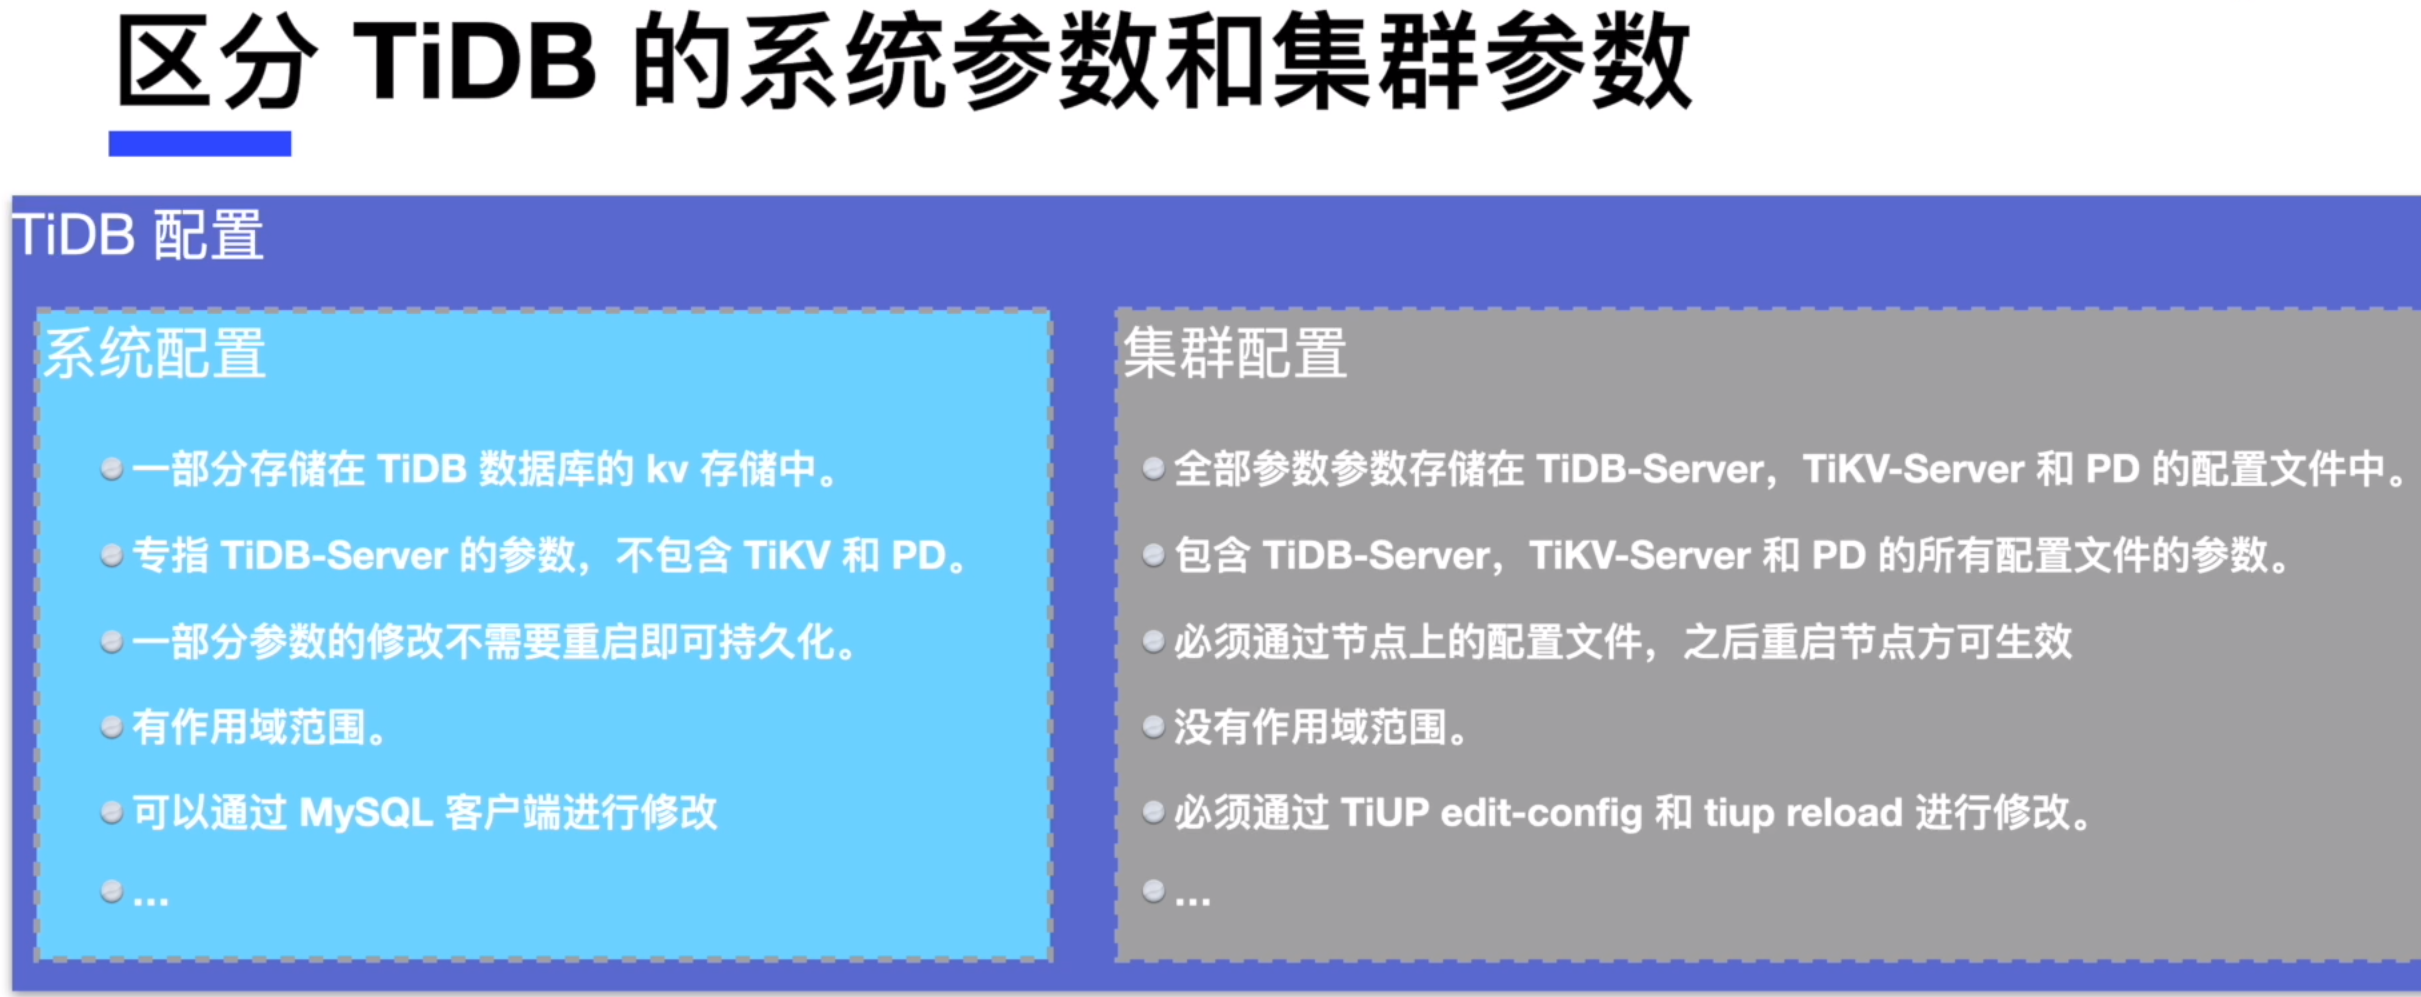
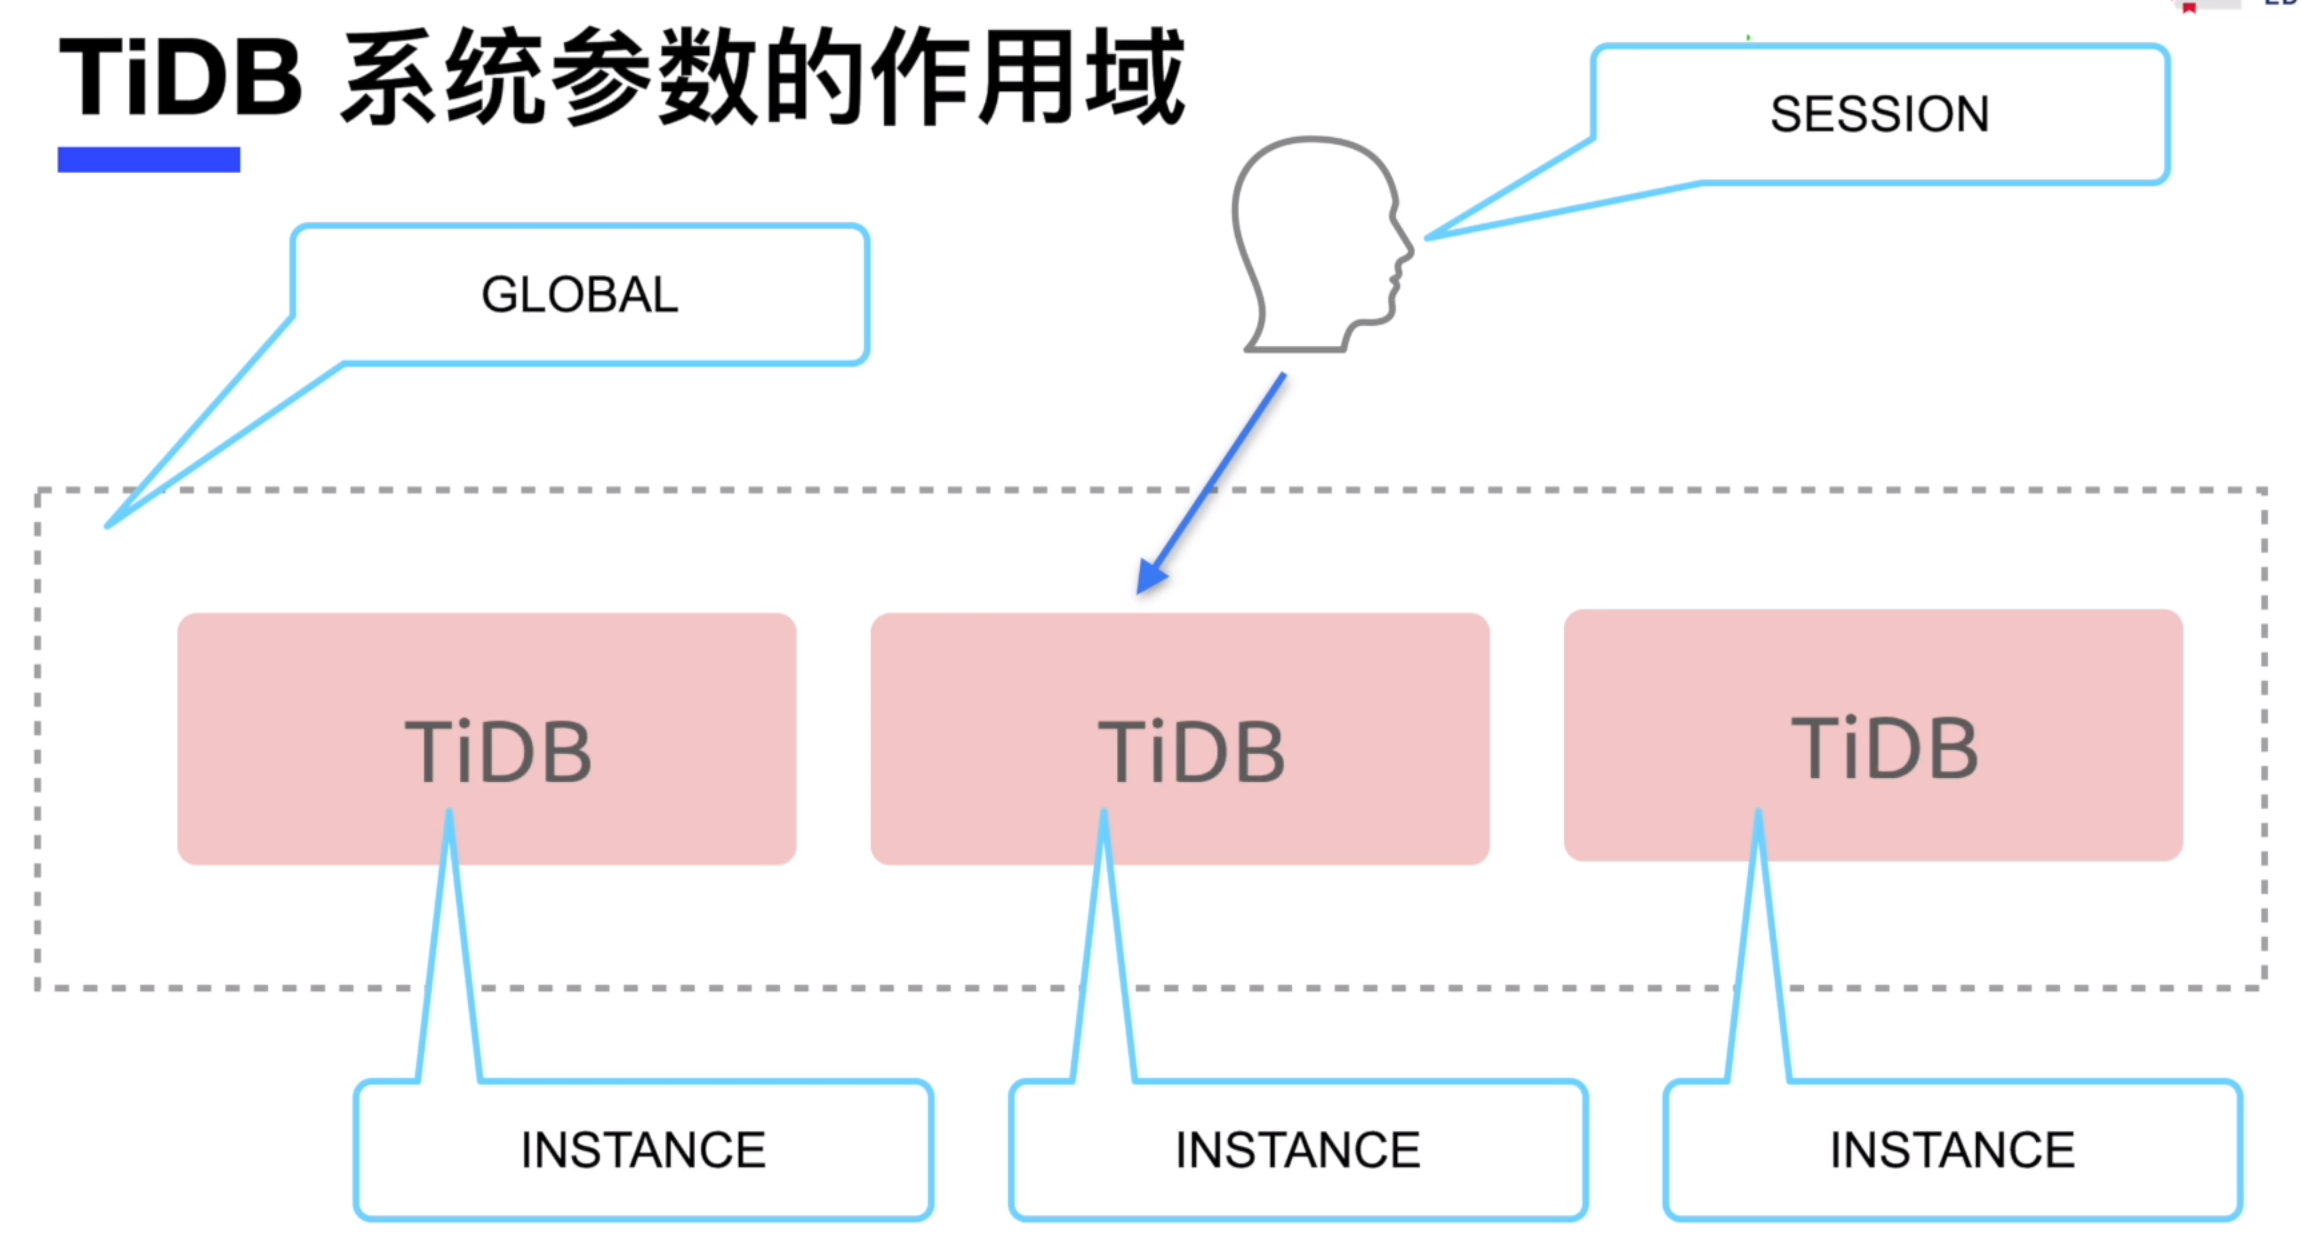
在不同作用域修改 TiDB 数据库的系统参数
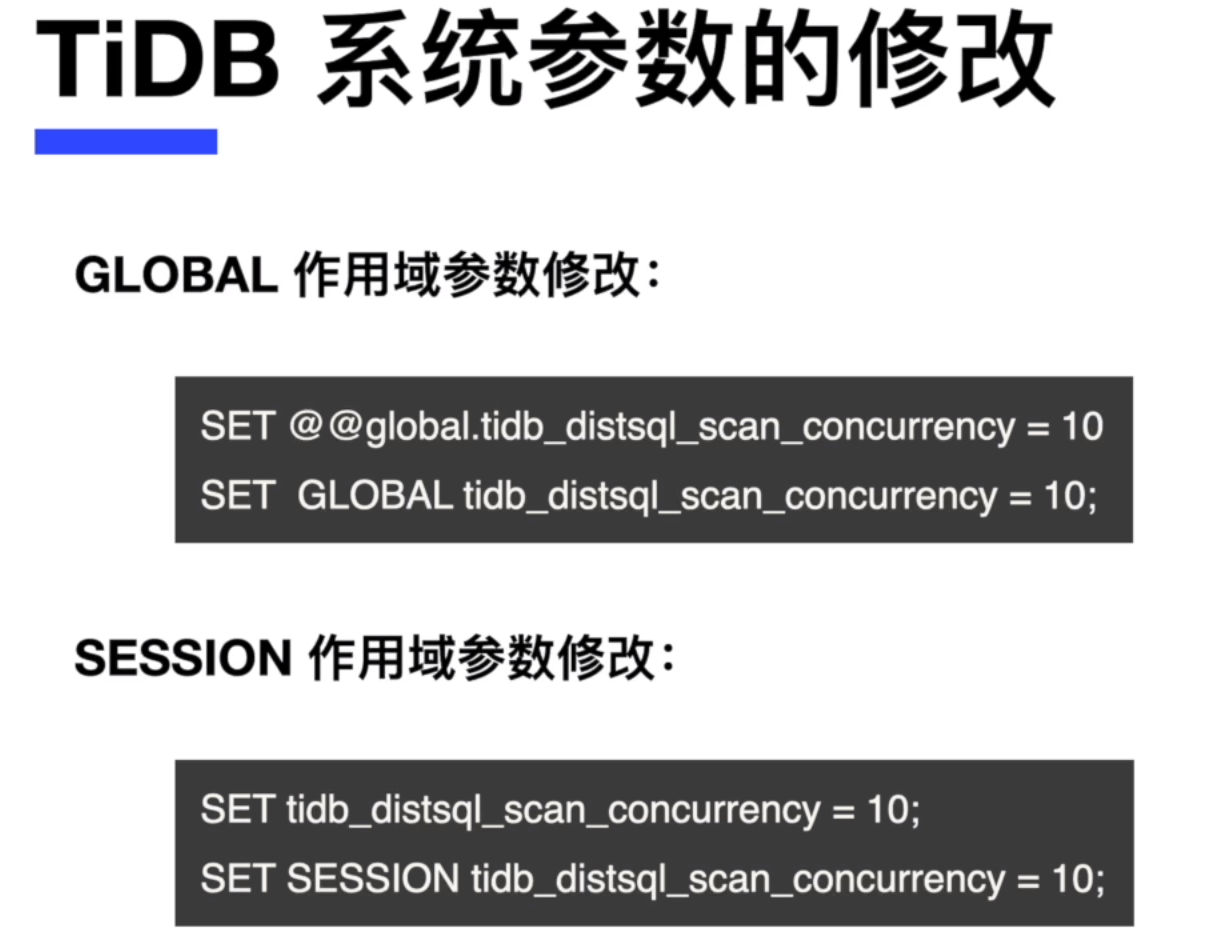
- 首先连接到 TiDB , 用户为 root:进入 test 数据库
[root@db1 ~]# mysql -h 192.168.0.97 -P 4000 -uroot
Welcome to the MySQL monitor.  Commands end with ; or \g.
Your MySQL connection id is 13
Server version: 5.7.25-TiDB-v5.0.0 TiDB Server (Apache License 2.0) Community Edition, MySQL 5.7 compatible

Copyright (c) 2000, 2022, Oracle and/or its affiliates.

Oracle is a registered trademark of Oracle Corporation and/or its
affiliates. Other names may be trademarks of their respective
owners.

Type 'help;' or '\h' for help. Type '\c' to clear the current input statement.

mysql> use test;
Database changed
复制- 创建测试表 t1(t1 表只有一列 a,并且是自增主键列):
mysql> CREATE TABLE t1 (a int not null primary key auto_increment);
Query OK, 0 rows affected (0.09 sec)
复制- 查看系统参数 auto_increment_increment(auto_increment_increment 默认值为 1.)
mysql> show session variables like 'auto_increment_increment';
+--------------------------+-------+
| Variable_name            | Value |
+--------------------------+-------+
| auto_increment_increment | 1     |
+--------------------------+-------+
1 row in set (0.62 sec)
复制- 插入 2 行测试数据(增量变为 1)
mysql> insert into t1 values ();
Query OK, 1 row affected (0.02 sec)

mysql> insert into t1 values ();
Query OK, 1 row affected (0.00 sec)

mysql> select * from t1;
+---+
| a |
+---+
| 1 |
| 2 |
+---+
2 rows in set (0.00 sec)
复制- 在会话级别修改参数auto_increment_increment为10
mysql> set auto_increment_increment = 10;
Query OK, 0 rows affected (0.00 sec)
复制- 继续插入 2 行测试数据(增量变为10)
mysql> insert into t1 values ();
Query OK, 1 row affected (0.00 sec)

mysql> insert into t1 values ();
Query OK, 1 row affected (0.01 sec)

mysql> select * from t1;
+----+
| a  |
+----+
|  1 |
|  2 |
| 11 |
| 21 |
+----+
4 rows in set (0.00 sec)
复制- 另外启动一个终端窗口(称为终端2),连接 TiDB 数据库
[root@db1 ~]# mysql -h 192.168.0.97 -P 4000 -uroot
Welcome to the MySQL monitor.  Commands end with ; or \g.
Your MySQL connection id is 15
Server version: 5.7.25-TiDB-v5.0.0 TiDB Server (Apache License 2.0) Community Edition, MySQL 5.7 compatible

Copyright (c) 2000, 2022, Oracle and/or its affiliates.

Oracle is a registered trademark of Oracle Corporation and/or its
affiliates. Other names may be trademarks of their respective
owners.

Type 'help;' or '\h' for help. Type '\c' to clear the current input statement.

mysql> use test;
Reading table information for completion of table and column names
You can turn off this feature to get a quicker startup with -A

Database changed
复制- 在终端2查看参数auto_increment_increment (默认值依然为1)
mysql> show variables like 'auto_increment_increment';
+--------------------------+-------+
| Variable_name            | Value |
+--------------------------+-------+
| auto_increment_increment | 1     |
+--------------------------+-------+
1 row in set (0.60 sec)
复制- 在终端2插入 2 行测试数据(增量为1)
mysql> insert into t1 values ();
Query OK, 1 row affected (0.00 sec)

mysql> insert into t1 values ();
Query OK, 1 row affected (0.00 sec)

mysql> select * from t1;
+----+
| a  |
+----+
|  1 |
|  2 |
| 11 |
| 21 |
| 22 |
| 23 |
+----+
6 rows in set (0.00 sec)
复制- 将第一个会话退出, 再次连接会话,并进入 test 数据库:
mysql> exit
Bye
[root@db1 ~]# mysql -h 192.168.0.97 -P 4000 -uroot
Welcome to the MySQL monitor.  Commands end with ; or \g.
Your MySQL connection id is 17
Server version: 5.7.25-TiDB-v5.0.0 TiDB Server (Apache License 2.0) Community Edition, MySQL 5.7 compatible

Copyright (c) 2000, 2022, Oracle and/or its affiliates.

Oracle is a registered trademark of Oracle Corporation and/or its
affiliates. Other names may be trademarks of their respective
owners.

Type 'help;' or '\h' for help. Type '\c' to clear the current input statement.

mysql> use test
Reading table information for completion of table and column names
You can turn off this feature to get a quicker startup with -A

Database changed
复制- 查询参数auto_increment_increment(默认值变为 1)
mysql> show session variables like 'auto_increment_increment';
+--------------------------+-------+
| Variable_name            | Value |
+--------------------------+-------+
| auto_increment_increment | 1     |
+--------------------------+-------+
1 row in set (0.67 sec)
复制- 继续插入 2 行测试数据(增量为 1)
mysql> insert into t1 values ();
Query OK, 1 row affected (0.00 sec)

mysql> insert into t1 values ();
Query OK, 1 row affected (0.01 sec)

mysql> select * from t1;
+----+
| a  |
+----+
|  1 |
|  2 |
| 11 |
| 21 |
| 22 |
| 23 |
| 24 |
| 25 |
+----+
8 rows in set (0.00 sec)
复制
通过刚才的实验,我们发现在 SESSION 级别修改参数,只会影响到当前会话,当其他会话或者本会话退出后,对于参数的修改就无效了。
下面让我们看一看 GLOBAL 级别的参数,GLOBAL 级别的参数,对于当前会话无效,但是对于新的会话是起作用的。
- 在 GLOBAL 范围进行修改
mysql> set global auto_increment_increment=10;
Query OK, 0 rows affected (0.01 sec)
复制- 在当前会话查询会话级别,查询参数auto_increment_increment
mysql> show session variables like 'auto_increment_increment';
+--------------------------+-------+
| Variable_name            | Value |
+--------------------------+-------+
| auto_increment_increment | 1     |
+--------------------------+-------+
1 row in set (0.00 sec)
复制
发现并没有改变。得出结论,参数auto_increment_increment在 GLOBAL 范围进行修改,并不会影响当前会话。
- 启动一个终端窗口(称为终端3),连接 TiDB 数据库,并进入test库
[root@db1 ~]# mysql -h 192.168.0.97 -P 4000 -uroot
Welcome to the MySQL monitor.  Commands end with ; or \g.
Your MySQL connection id is 19
Server version: 5.7.25-TiDB-v5.0.0 TiDB Server (Apache License 2.0) Community Edition, MySQL 5.7 compatible

Copyright (c) 2000, 2022, Oracle and/or its affiliates.

Oracle is a registered trademark of Oracle Corporation and/or its
affiliates. Other names may be trademarks of their respective
owners.

Type 'help;' or '\h' for help. Type '\c' to clear the current input statement.

mysql> use test;
Reading table information for completion of table and column names
You can turn off this feature to get a quicker startup with -A

Database changed
复制- 在终端3查看参数auto_increment_increment(默认值变为 10)
mysql> show variables like 'auto_increment_increment';
+--------------------------+-------+
| Variable_name            | Value |
+--------------------------+-------+
| auto_increment_increment | 10    |
+--------------------------+-------+
1 row in set (0.59 sec)
复制- 继续插入 2 行测试数据(增量为10)
mysql> insert into t1 values ();
Query OK, 1 row affected (0.01 sec)

mysql> insert into t1 values ();
Query OK, 1 row affected (0.01 sec)

mysql> select * from t1;
+----+
| a  |
+----+
|  1 |
|  2 |
| 11 |
| 21 |
| 22 |
| 23 |
| 24 |
| 25 |
| 31 |
| 41 |
+----+
10 rows in set (0.01 sec)
复制
得出结论,参数auto_increment_increment在 GLOBAL 范围进行修改,会影响新连接会话。
- 回到终端1,退出会话再次登录(发现变量auto_increment_increment为10.)
mysql> exit
Bye
[root@db1 ~]# mysql -h 192.168.0.97 -P 4000 -uroot
Welcome to the MySQL monitor.  Commands end with ; or \g.
Your MySQL connection id is 21
Server version: 5.7.25-TiDB-v5.0.0 TiDB Server (Apache License 2.0) Community Edition, MySQL 5.7 compatible

Copyright (c) 2000, 2022, Oracle and/or its affiliates.

Oracle is a registered trademark of Oracle Corporation and/or its
affiliates. Other names may be trademarks of their respective
owners.

Type 'help;' or '\h' for help. Type '\c' to clear the current input statement.

mysql> use test
Reading table information for completion of table and column names
You can turn off this feature to get a quicker startup with -A

Database changed
mysql> show session variables like 'auto_increment_increment';
+--------------------------+-------+
| Variable_name            | Value |
+--------------------------+-------+
| auto_increment_increment | 10    |
+--------------------------+-------+
1 row in set (0.58 sec)
复制- 重启 tidb 数据库, 验证GLOBAL范围的参数修改是否会被持久化
[root@db1 ~]# tiup cluster stop tidb-test
[root@db1 ~]# tiup cluster start tidb-test
[root@db1 ~]# mysql -h 192.168.0.97 -P 4000 -uroot
Welcome to the MySQL monitor.  Commands end with ; or \g.
Your MySQL connection id is 5
Server version: 5.7.25-TiDB-v5.0.0 TiDB Server (Apache License 2.0) Community Edition, MySQL 5.7 compatible

Copyright (c) 2000, 2022, Oracle and/or its affiliates.

Oracle is a registered trademark of Oracle Corporation and/or its
affiliates. Other names may be trademarks of their respective
owners.

Type 'help;' or '\h' for help. Type '\c' to clear the current input statement.

mysql> show session variables like 'auto_increment_increment';
+--------------------------+-------+
| Variable_name            | Value |
+--------------------------+-------+
| auto_increment_increment | 10    |
+--------------------------+-------+
1 row in set (0.58 sec)
复制
修改集群配置
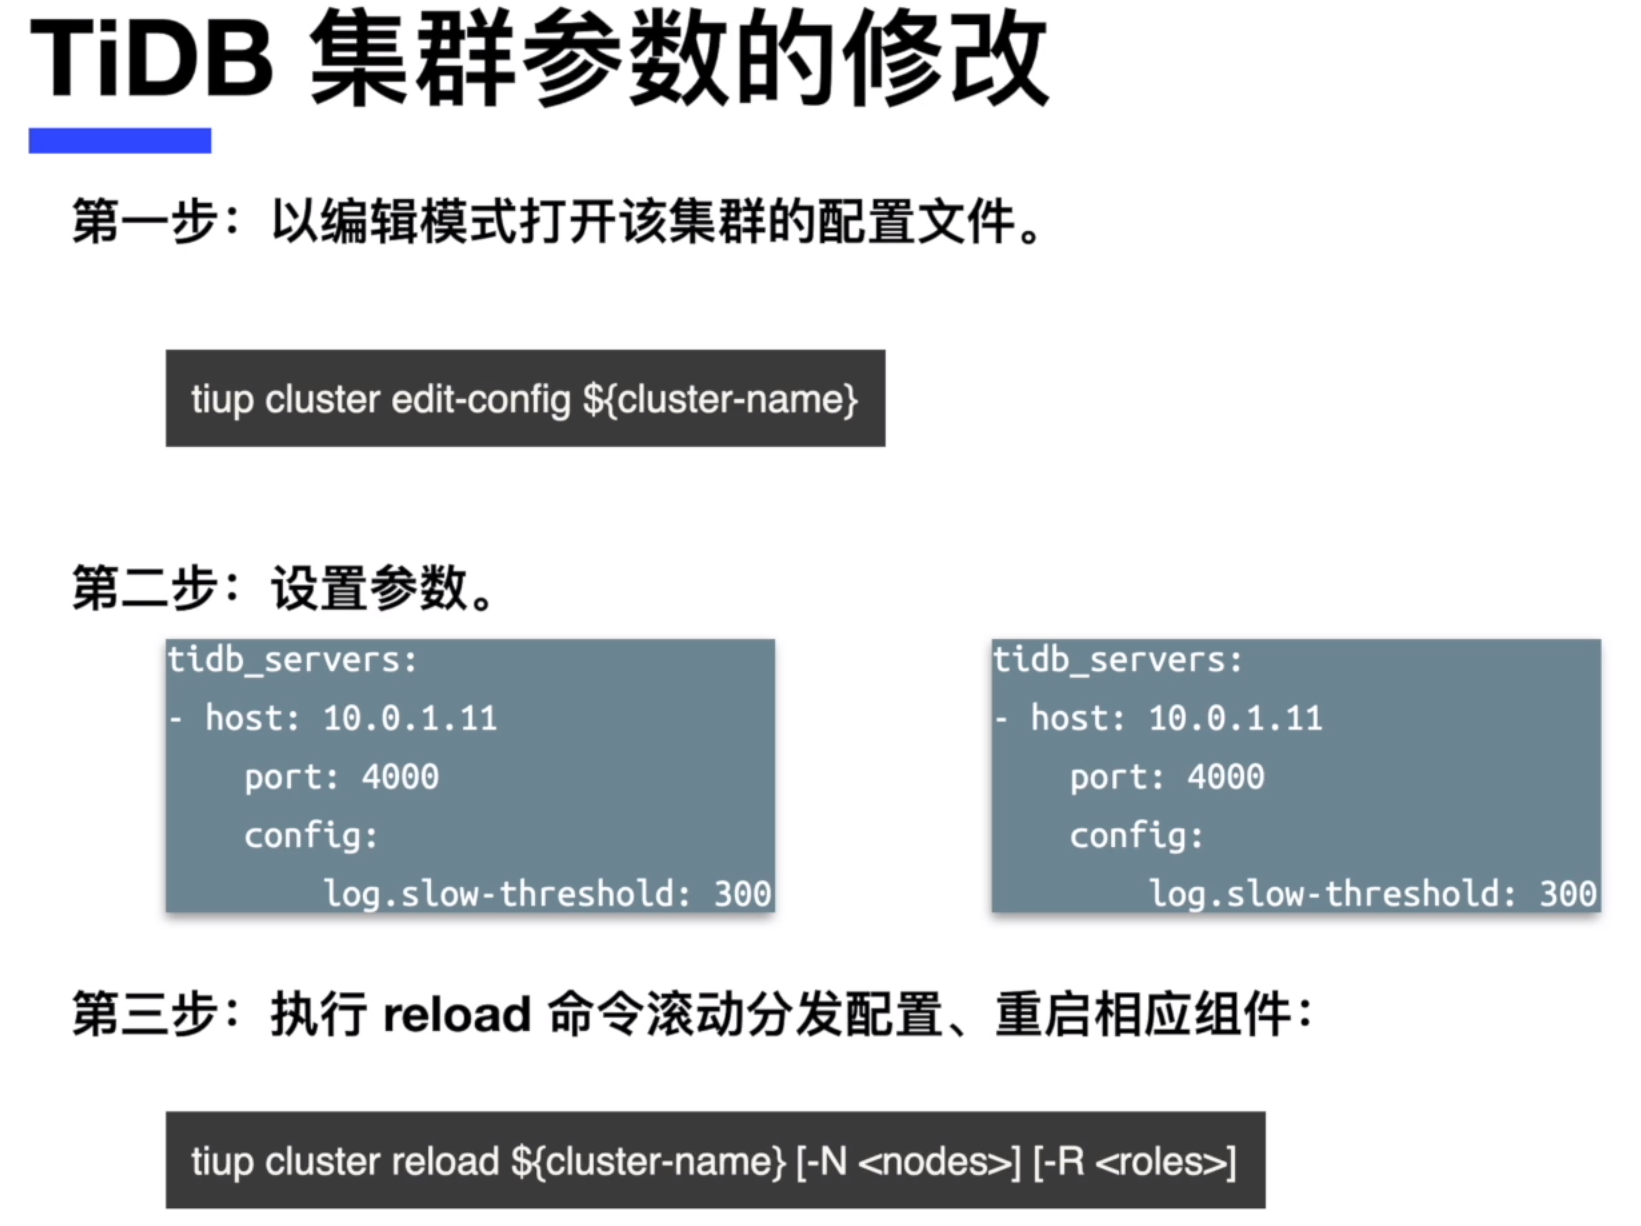
我们使用 tiup config 和 tiup reload 修改所有 TiKV 节点的配置,我们修改的配置参数名为 log-level,其默认值为 info,我们将其修改为 warning。
- 进入 TiKV-Server,打开配置文件,一般位置为 /tidb-deploy/tikv-20160/conf (注意:tikv-20160 可能不同),打开文件 tikv.toml
[root@tikv1 ~]# cd /tidb-deploy/tikv-20160/conf/
[root@tikv1 conf]# ls
tikv.toml
[root@tikv1 conf]# cat tikv.toml
# WARNING: This file is auto-generated. Do not edit! All your modification will be overwritten!
# You can use 'tiup cluster edit-config' and 'tiup cluster reload' to update the configuration
# All configuration items you want to change can be added to:
# server_configs:
#   tikv:
#     aa.b1.c3: value
#     aa.b2.c4: value
[root@tikv1 conf]#
复制- 进入到安装 tiup 的中控机或者节点,执行配置文件编辑命令
[root@db1 ~]# tiup cluster edit-config tidb-test
复制- 输入 i ,进入编辑模式
server_configs:
  tidb: {}
  tikv:
    log-level: warning
复制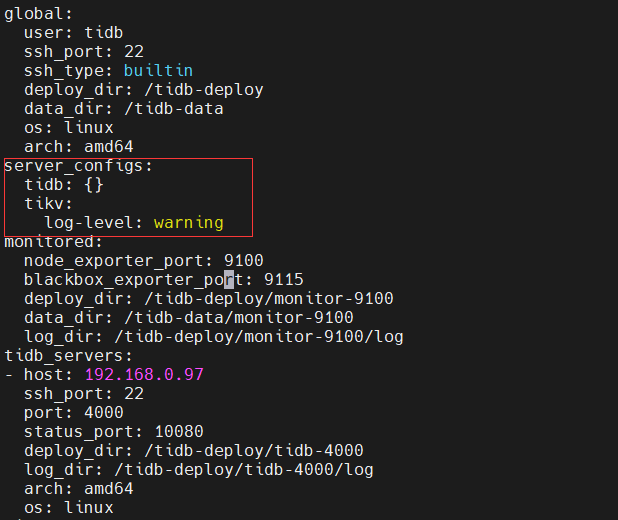
- 输入 ESC 键,输入:qw,出现提示如下,输入y继续

- 使用 tiup cluster reload 命令来载入修改的参数(这一步会重启所有 TiKV 节点)
[root@db1 ~]# tiup cluster reload tidb-test
复制
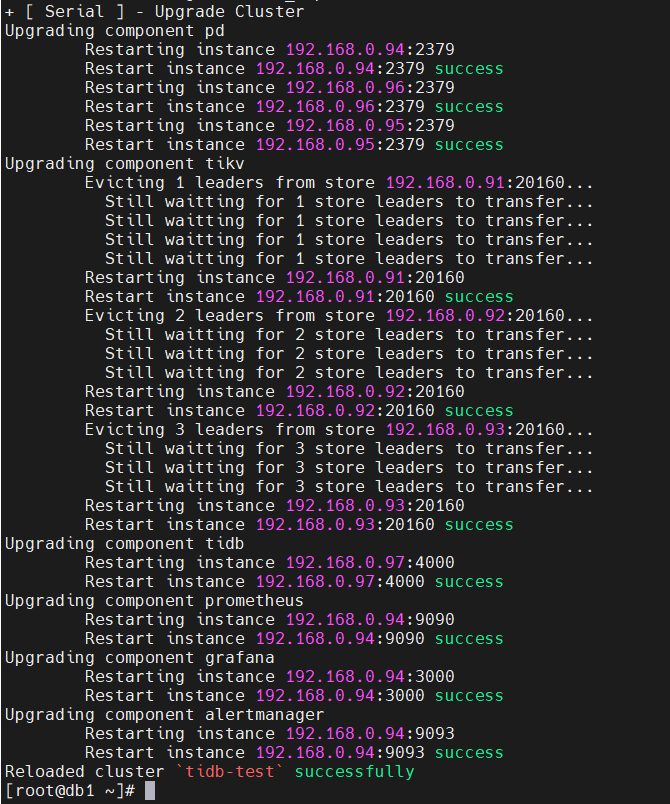
- 再次进入TiKV-Server,打开配置文件,一般位置为 /tidb-deploy/tikv-20160/conf(注意:tikv-20160 可能不同),打开文件 tikv.toml,发现 log-level = “warning” 配
置已经被持久化到配置文件中

2. TiDB 的用户管理与安全
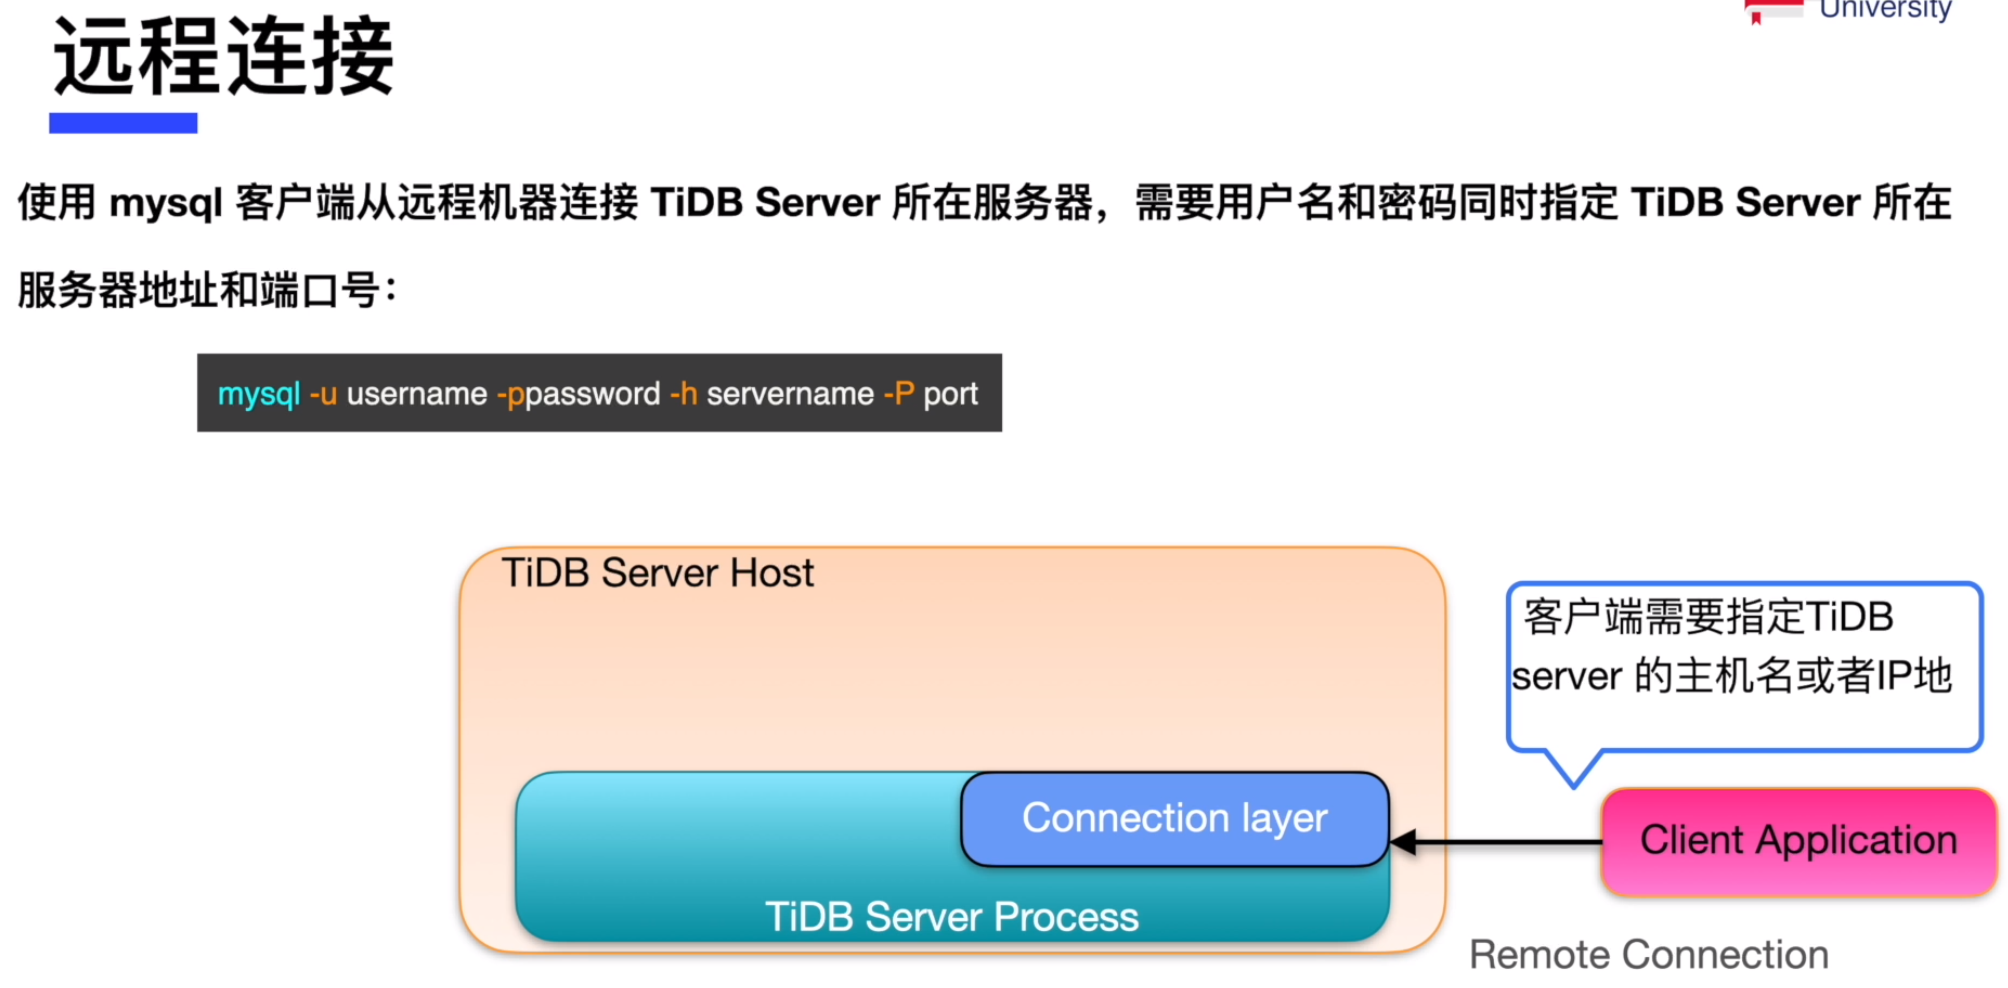
创建用户和角色
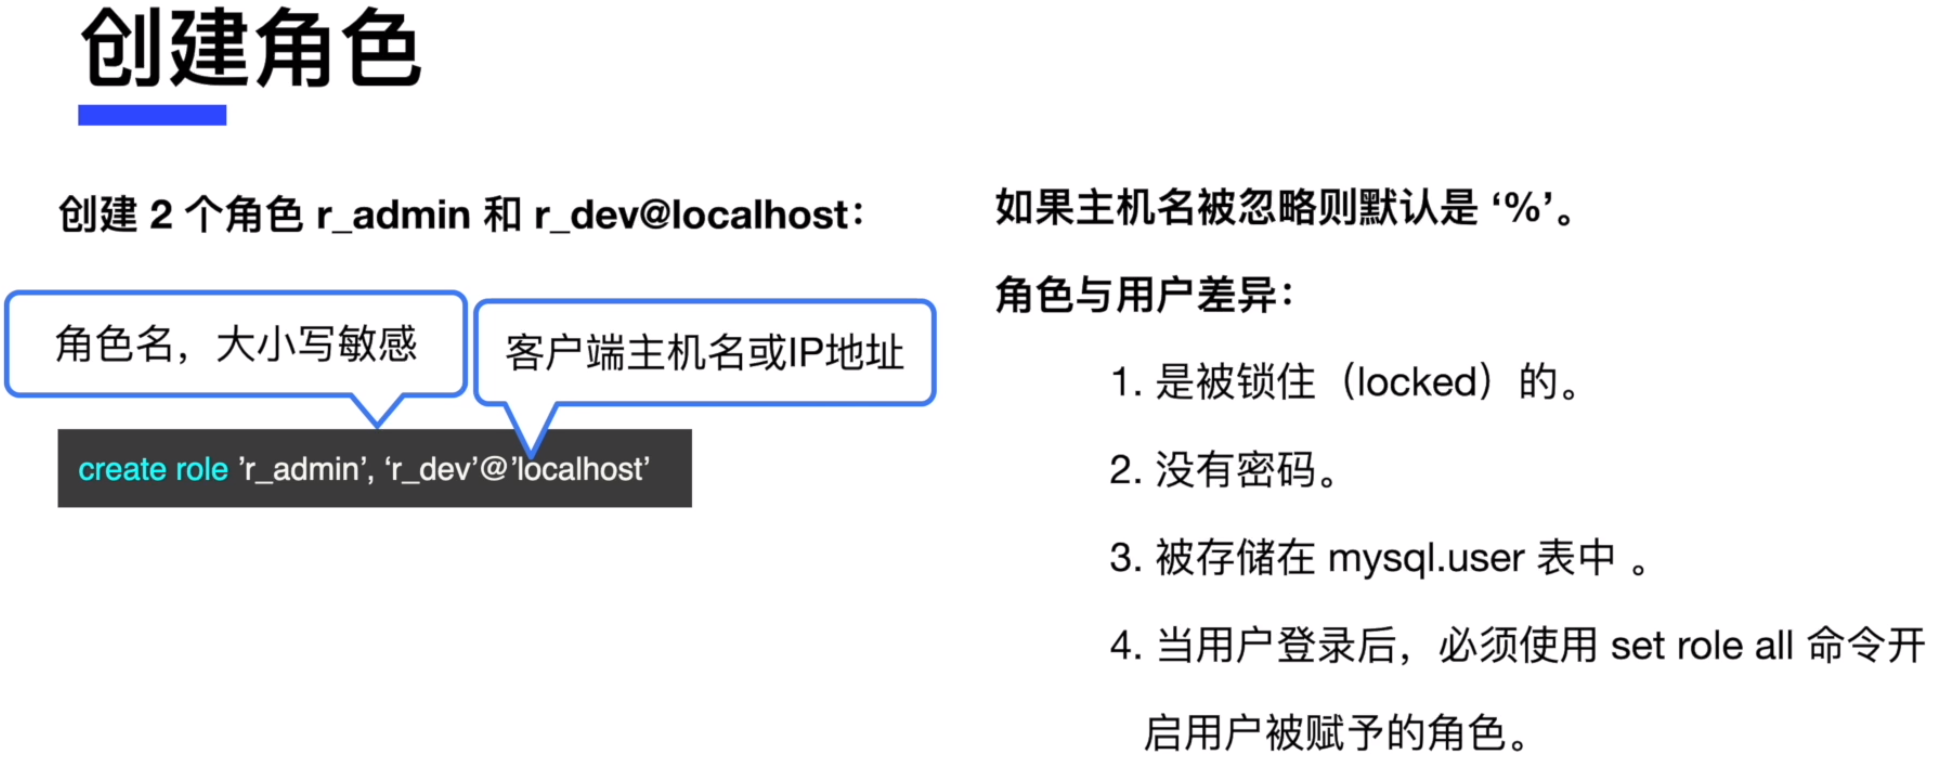
- 启动一个 mysql 客户端会话
[root@db1 ~]# mysql -h 192.168.0.97 -P 4000 -uroot
复制- 创建用户名为’jack’@‘192.168.0.97’
mysql> create user'jack'@'192.168.0.97' identified by 'pingcap';
Query OK, 0 rows affected (0.03 sec)
复制- 创建 2 个新的角色,名为 r_manager 和 r_staff
mysql> create role r_manager, r_staff;
Query OK, 0 rows affected (0.02 sec)
复制- 查询 mysql.user 表的 user, host 和 authentication_string 列 ,确认新的用户和角色已经被创建了
mysql> select user, host, authentication_string from mysql.user\G;
*************************** 1. row ***************************
                 user: root
                 host: %
authentication_string:
*************************** 2. row ***************************
                 user: jack
                 host: 192.168.0.97
authentication_string: *926E4B88EB93FD344DF0870EE025D6EB153C02DE
*************************** 3. row ***************************
                 user: r_manager
                 host: %
authentication_string:
*************************** 4. row ***************************
                 user: r_staff
                 host: %
authentication_string:
4 rows in set (0.01 sec)

ERROR:
No query specified
复制
这里我们可以注意到:
(1)用户和角色都被存储在 mysql.user 表中。
(2)角色是没有密码的。
- 在 mysql.user 表中查询角色 r_staff 的详细信息
mysql> select * from mysql.user where user='r_staff'\G;
*************************** 1. row ***************************
                  Host: %
                  User: r_staff
 authentication_string:
           Select_priv: N
           Insert_priv: N
           Update_priv: N
           Delete_priv: N
           Create_priv: N
             Drop_priv: N
          Process_priv: N
            Grant_priv: N
       References_priv: N
            Alter_priv: N
          Show_db_priv: N
            Super_priv: N
 Create_tmp_table_priv: N
      Lock_tables_priv: N
          Execute_priv: N
      Create_view_priv: N
        Show_view_priv: N
   Create_routine_priv: N
    Alter_routine_priv: N
            Index_priv: N
      Create_user_priv: N
            Event_priv: N
          Trigger_priv: N
      Create_role_priv: N
        Drop_role_priv: N
        Account_locked: Y
         Shutdown_priv: N
           Reload_priv: N
             FILE_priv: N
           Config_priv: N
Create_Tablespace_Priv: N
       Repl_slave_priv: N
      Repl_client_priv: N
1 row in set (0.00 sec)

ERROR:
No query specified
复制
我们会发现角色的特点:
(1)角色是被锁定的(Account_locked: Y)
(2)角色没有密码(authentication_string 为空)
- 修改 ‘jack’@‘192.168.0.97’ 的密码为 tidb
mysql> alter user 'jack'@'192.168.0.97' identified by 'tidb';
Query OK, 0 rows affected (0.03 sec)
复制- 使用用户’jack’@'192.168.0.97’的新密码重新连接,验证密码是否修改成功
[root@db1 ~]# mysql -h192.168.0.97 -P 4000 -ujack -ptidb
mysql: [Warning] Using a password on the command line interface can be insecure.
Welcome to the MySQL monitor.  Commands end with ; or \g.
Your MySQL connection id is 9
Server version: 5.7.25-TiDB-v5.0.0 TiDB Server (Apache License 2.0) Community Edition, MySQL 5.7 compatible

Copyright (c) 2000, 2022, Oracle and/or its affiliates.

Oracle is a registered trademark of Oracle Corporation and/or its
affiliates. Other names may be trademarks of their respective
owners.

Type 'help;' or '\h' for help. Type '\c' to clear the current input statement.

mysql>
复制- 以 root 用户登录数据库,删除角色 r_staff 和 r_manager,删除用户 ‘jack’@'192.168.0.97’, 并且通过mysql.user表进行确认
[root@db1 ~]# mysql -h 192.168.0.97 -P 4000 -uroot

mysql> drop role r_staff;
Query OK, 0 rows affected (0.03 sec)

mysql> select user, host from mysql.user where user='r_staff';
Empty set (0.00 sec)

mysql> drop role r_manager;
Query OK, 0 rows affected (0.03 sec)

mysql> select user, host from mysql.user where user='r_manager';
Empty set (0.01 sec)

mysql> drop user 'jack'@'192.168.0.97';
Query OK, 0 rows affected (0.03 sec)

mysql> select user, host from mysql.user where user='jack';
Empty set (0.00 sec)
复制
权限管理
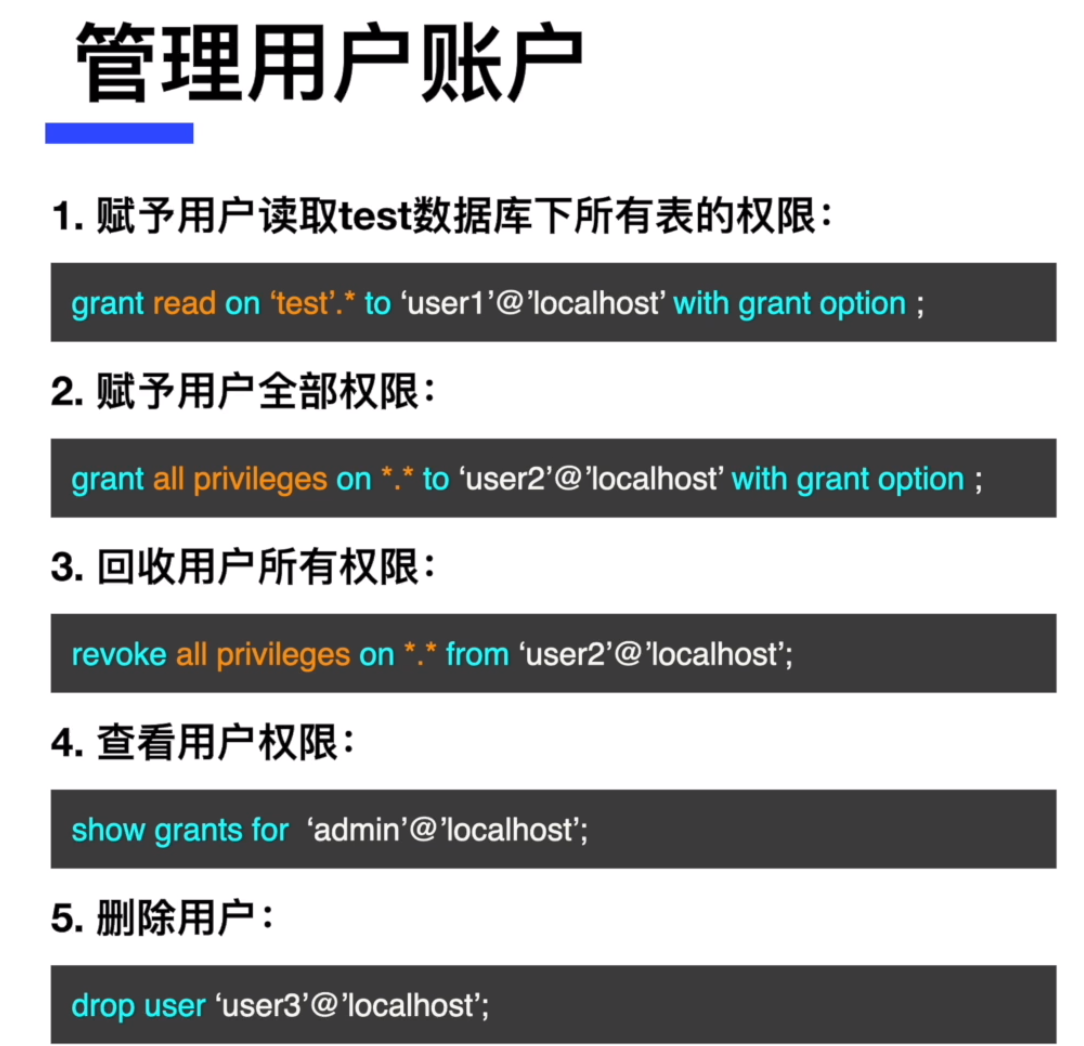
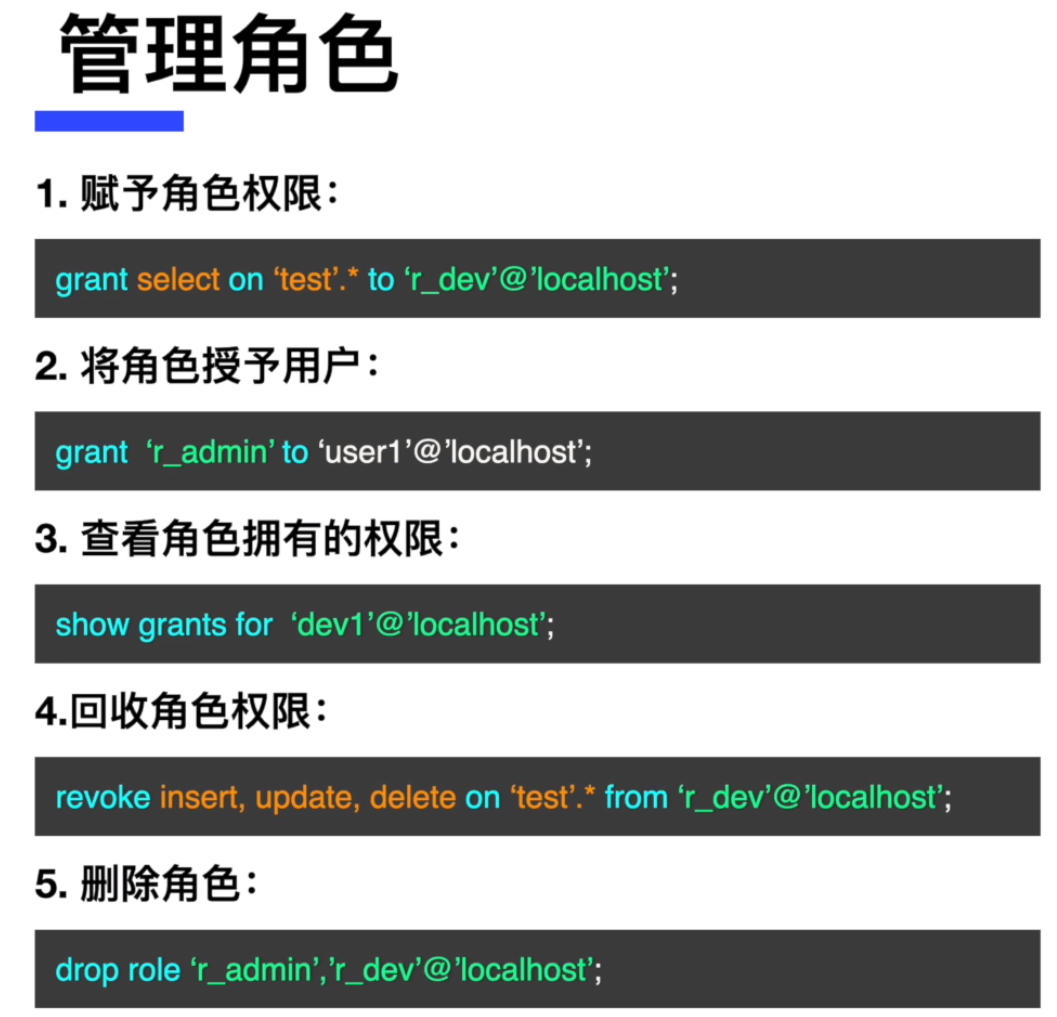
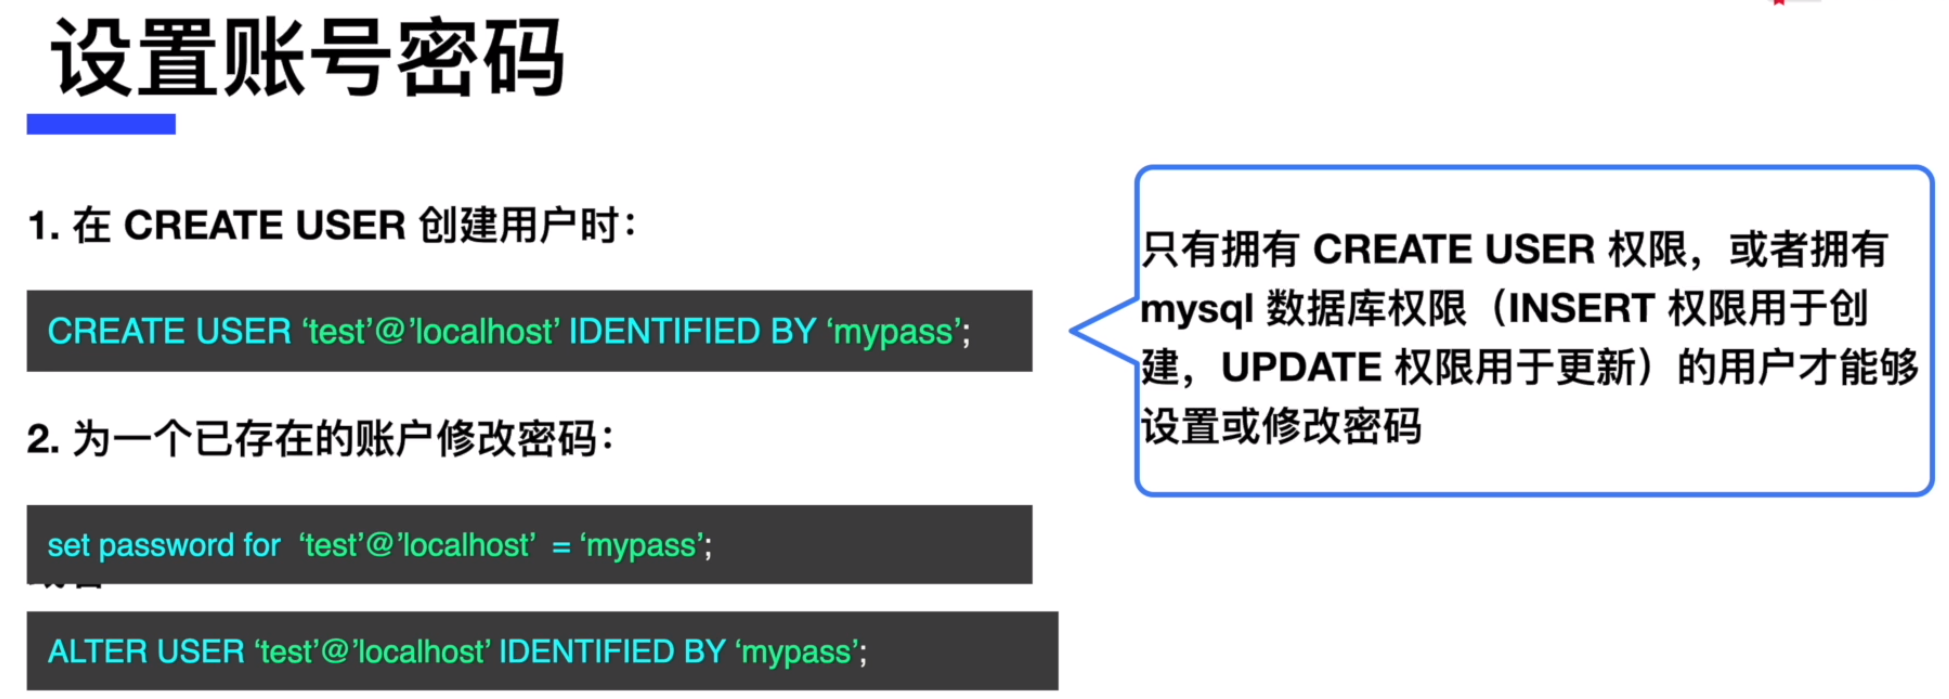
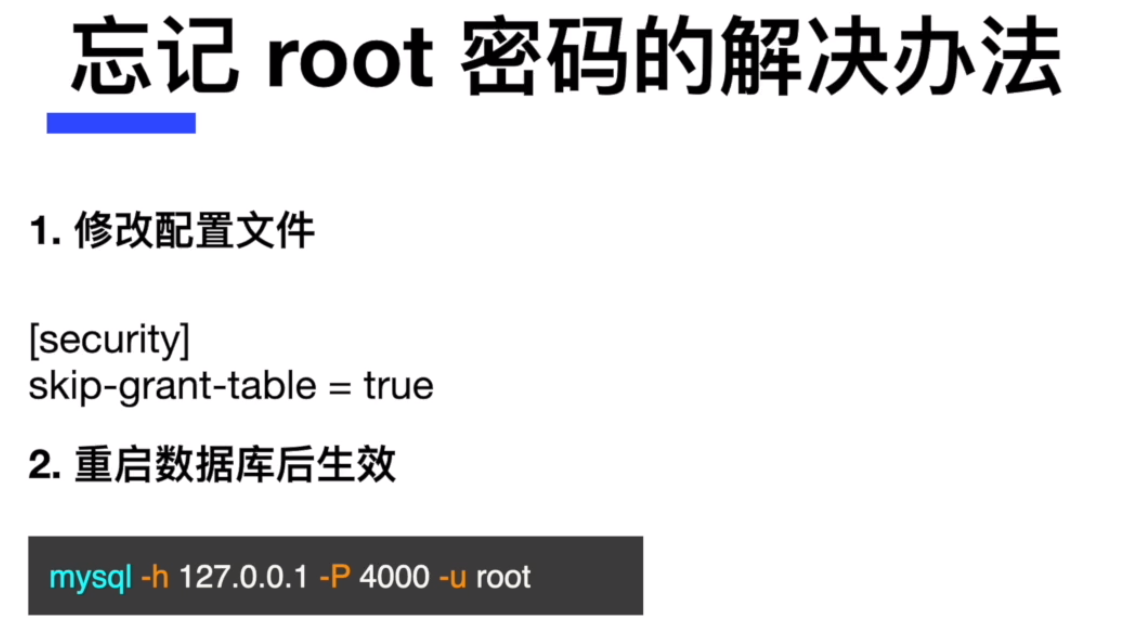
- 以 root 用户登录,创建 test 库下测试表 emp,插入数据,创建用户和角色
[root@db1 ~]# mysql -h 192.168.0.97 -P 4000 -uroot

mysql> use test
Reading table information for completion of table and column names
You can turn off this feature to get a quicker startup with -A

Database changed
mysql> create table emp(id int, name varchar(20));
Query OK, 0 rows affected (0.09 sec)

mysql> insert into emp values(1,'tom');
Query OK, 1 row affected (0.01 sec)

mysql> insert into emp values(2,'jack');
Query OK, 1 row affected (0.01 sec)

mysql> create user 'jack'@'192.168.0.97' identified by 'pingcap';
Query OK, 0 rows affected (0.02 sec)

mysql> create role r_mgr, r_emp;
Query OK, 0 rows affected (0.04 sec)
复制- 将对 test 库下的表 emp 的读权限赋权给角色 r_emp
mysql> grant select on test.emp to r_emp;
Query OK, 0 rows affected (0.03 sec)
复制- 将对 test 库下的所有表的 insert, update 和 delete 权限赋权给角色 r_mgr
mysql> grant insert, update, delete on test.* to r_mgr;
Query OK, 0 rows affected (0.02 sec)
复制- 将角色 r_emp 赋予 角色 r_mgr 和 用户 ‘jack’@'192.168.0.97’
mysql> grant r_emp to r_mgr, 'jack'@'192.168.0.97';
Query OK, 0 rows affected (0.05 sec)
复制- 以 root 用户登录,创建 test 库下测试表 dept
[root@db1 ~]# mysql -h 192.168.0.97 -P 4000 -uroot

mysql> use test
Reading table information for completion of table and column names
You can turn off this feature to get a quicker startup with -A

Database changed
mysql> create table dept(id int, dname varchar(20));
Query OK, 0 rows affected (0.09 sec)

mysql> insert into dept values(1, 'dev');
Query OK, 1 row affected (0.02 sec)

mysql> insert into dept values(2, 'sales');
Query OK, 1 row affected (0.00 sec)
复制- 将对 test 库下的 dept 表的 select 权限赋予用户 ‘jack’@‘192.168.0.97’:
mysql> grant select on test.dept to 'jack'@'192.168.0.97';
Query OK, 0 rows affected (0.03 sec)
复制- 开启新的会话,以用户 ‘jack’@‘192.168.0.97’ 连接数据库
[root@db1 ~]# mysql -h192.168.0.97 -P4000 -ujack -ppingcap
mysql: [Warning] Using a password on the command line interface can be insecure.
Welcome to the MySQL monitor.  Commands end with ; or \g.
Your MySQL connection id is 17
Server version: 5.7.25-TiDB-v5.0.0 TiDB Server (Apache License 2.0) Community Edition, MySQL 5.7 compatible

Copyright (c) 2000, 2022, Oracle and/or its affiliates.

Oracle is a registered trademark of Oracle Corporation and/or its
affiliates. Other names may be trademarks of their respective
owners.

Type 'help;' or '\h' for help. Type '\c' to clear the current input statement.

mysql>
复制- 切换当前数据库到 test,之后查询表 emp 的第一行和 表 dept 的第一行
mysql> use test
Reading table information for completion of table and column names
You can turn off this feature to get a quicker startup with -A

Database changed
mysql> select * from emp limit 1;
ERROR 1142 (42000): SELECT command denied to user 'jack'@'192.168.0.97' for table 'emp'
mysql> select * from dept limit 1;
+------+-------+
| id   | dname |
+------+-------+
|    1 | dev   |
+------+-------+
1 row in set (0.01 sec)
复制
结论是:
(1) 用户 ‘jack’@‘192.168.0.97’ 无法查询表 emp ,因为权限是通过角色 r_emp赋予的,但是这个角色并没有在会话中开启。
(2) 用户 ‘jack’@‘192.168.0.97’ 可以查询表 dept,因为权限是直接赋予用户的。
- 检查用户 ‘jack’@‘192.168.0.97’ 所在会话的权限
mysql> select current_role();
+----------------+
| current_role() |
+----------------+
|                |
+----------------+
1 row in set (0.00 sec)

mysql> show grants;
+----------------------------------------------------+
| Grants for User                                    |
+----------------------------------------------------+
| GRANT USAGE ON *.* TO 'jack'@'192.168.0.97'        |
| GRANT Select ON test.dept TO 'jack'@'192.168.0.97' |
| GRANT 'r_emp'@'%' TO 'jack'@'192.168.0.97'         |
+----------------------------------------------------+
3 rows in set (0.00 sec)
复制
我们发现:
(1)会话没有开启任何角色。
(2)用户虽然被赋予了角色 r_emp, 但是这个角色并没有开启。
- 我们接下来为用户 ‘jack’@‘192.168.0.97’ 开启角色 r_emp, 命令如下
mysql> set role all;
Query OK, 0 rows affected (0.00 sec)

mysql> select current_role();
+----------------+
| current_role() |
+----------------+
| `r_emp`@`%`    |
+----------------+
1 row in set (0.00 sec)

mysql> show grants;
+----------------------------------------------------+
| Grants for User                                    |
+----------------------------------------------------+
| GRANT USAGE ON *.* TO 'jack'@'192.168.0.97'        |
| GRANT Select ON test.emp TO 'jack'@'192.168.0.97'  |
| GRANT Select ON test.dept TO 'jack'@'192.168.0.97' |
| GRANT 'r_emp'@'%' TO 'jack'@'192.168.0.97'         |
+----------------------------------------------------+
4 rows in set (0.00 sec)
复制
我们看到,当开启角色后,show grants 的结果显示了用户 ‘jack’@‘192.168.0.97’ 所有的权限,包括通过角色赋予的权限。
- 接下来继续查询 test 库下面的表 emp 的第一行
mysql> select * from emp limit 1 ;
+------+------+
| id   | name |
+------+------+
|    1 | tom  |
+------+------+
1 row in set (0.00 sec)
复制
我们发现用户 ‘jack’@‘192.168.0.97’ 通过角色 r_emp 赋予了查询 test 库下面的表 emp 的第一行的权限。
- 尝试删除 test 库下的表 emp 的第一行
mysql> delete from emp where id=1;
ERROR 8121 (HY000): privilege check fail
复制
发现用户 ‘jack’@‘192.168.0.97’ 并没有删除权限。
3. TiDB 文件与日志管理
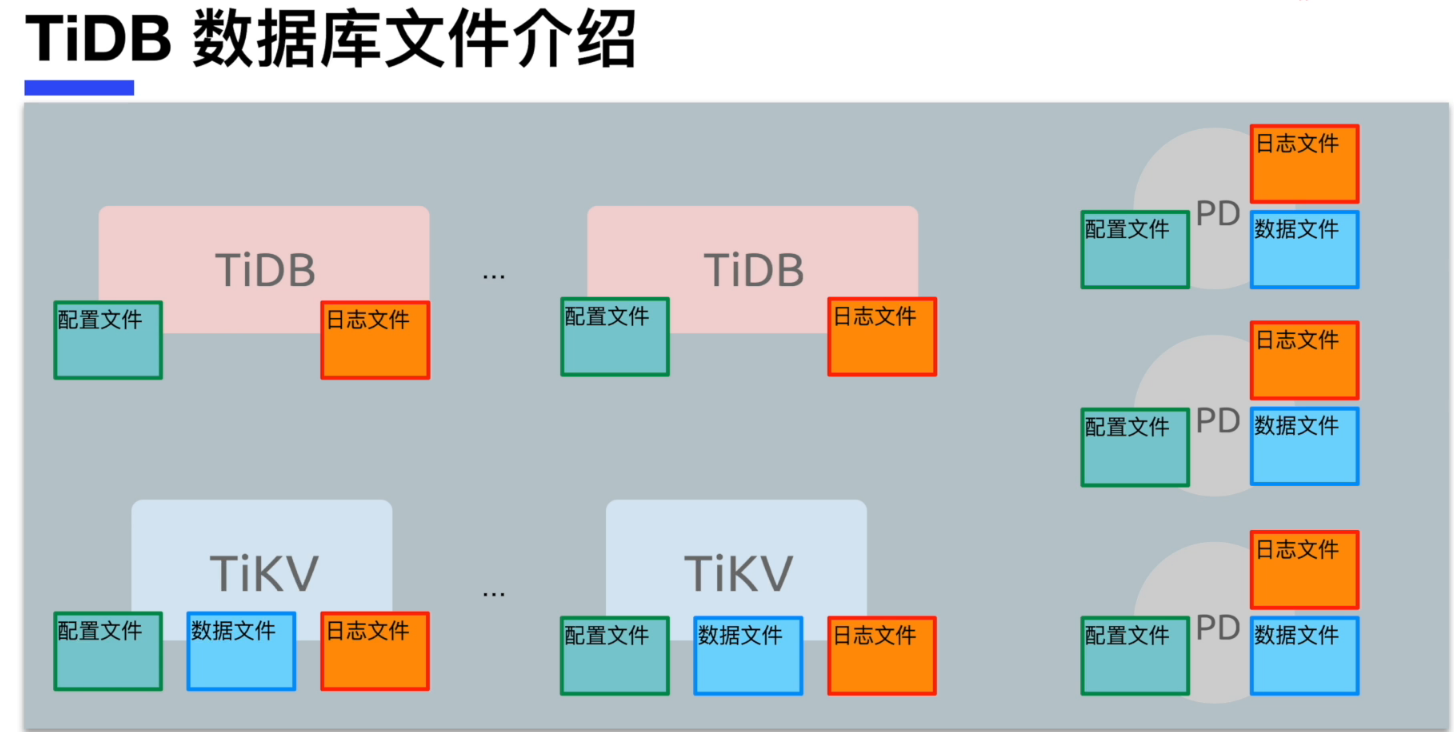
查看 TiDB 各个节点的数据文件、日志文件和配置文件
- 登录到部署了 TiUP 的节点,执行 tiup cluster edit-config tidb-test, 查看集群配置文件汇总
[root@db1 ~]# tiup cluster edit-config tidb-test
复制
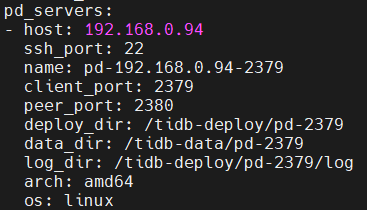
在结果中找到:tidb_servers, tikv_servers 和 pd_servers 三个选项,我们可以看到每个选项下面有文件夹 deploy_dir 和 data_dir。其中文件夹deploy_dir表示节点的软件目录,data_dir表示节点的数据目录。
- 参考 tidb_servers 的目录,连接入其中一个 tidb 节点,查看里面的软件目录和数据目录
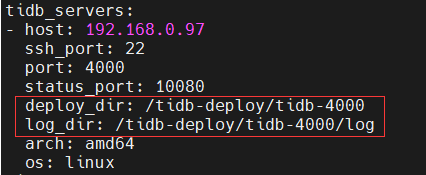
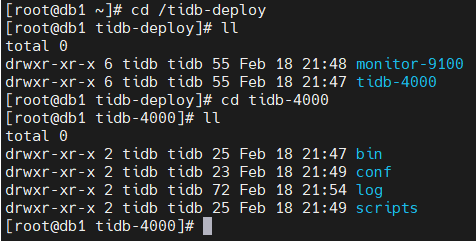
其中,/tidb-deploy/tidb-4000/conf 目录下的文件 tidb.toml 为配置文件; /tidb-deploy/tidb-4000/log 目录下的文件为日志文件。
查看 tidb 节点的数据目录,发现只有监控数据,数据库数据不存储在 tidb 节点上。

- 参考 tikv_servers 的目录,连接入其中一个 tikv 节点,查看里面的软件目录和数据目录
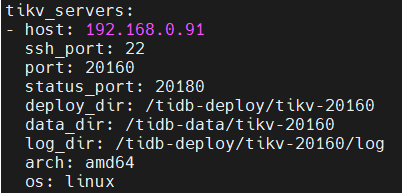
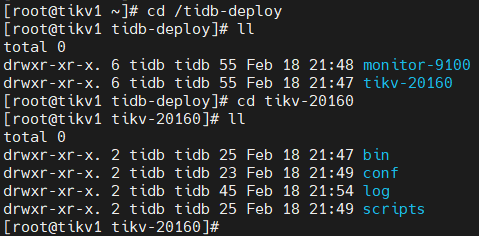
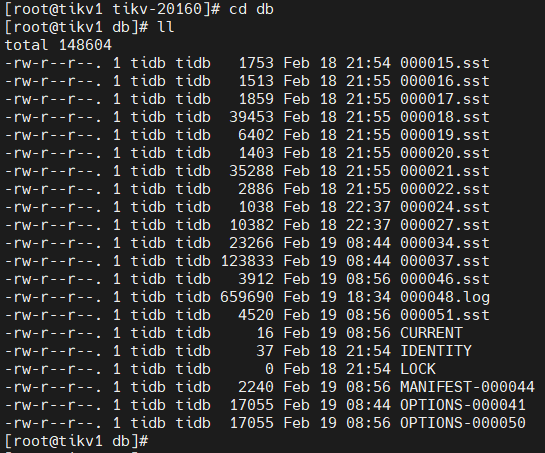
其中,/tidb-deploy/tikv-20160/conf 目录下的文件 tikv.toml 为配置文件; /tidb-deploy/tikv-20160/log 目录下的文件为日志文件。
查看 tikv 节点的数据目录:
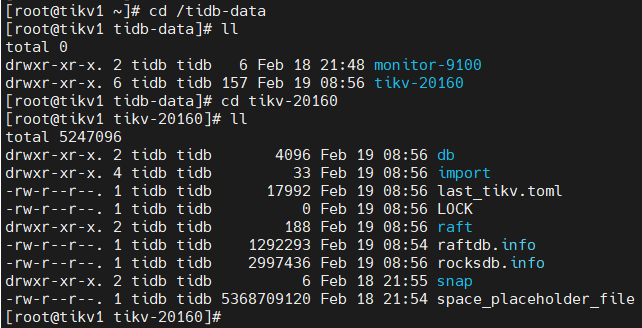
其中 db 目录下为数据文件:
- 参考 pd_servers 的目录,连接入其中一个 pd 节点,查看里面的软件目录和数据目录:
查看 pd 节点的软件目录
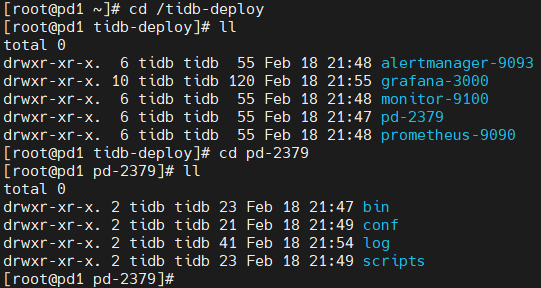
其中,/tidb-deploy/pd-2379/conf 目录下的文件 pd.toml 为配置文件; /tidb-deploy/pd-2379/log 目录下的文件为日志文件。
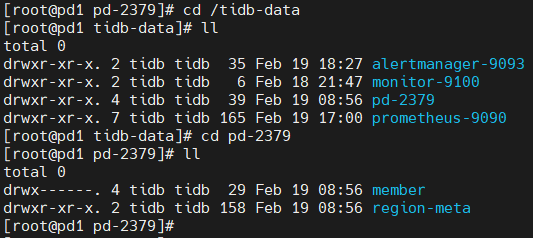
查看 pd 节点的数据目录
评论
 点赞
点赞


