TiDB Binlog
TiDB Binlog 工具可以收集TiDB数据库的日志(Binlog) ,并且提供数据同步和准实时备份功能。
TiDB 5.0 以后很多功能已经不适用 TiDB Binlog,建议使用 TiCDC 来代替 TiDB Binlog。
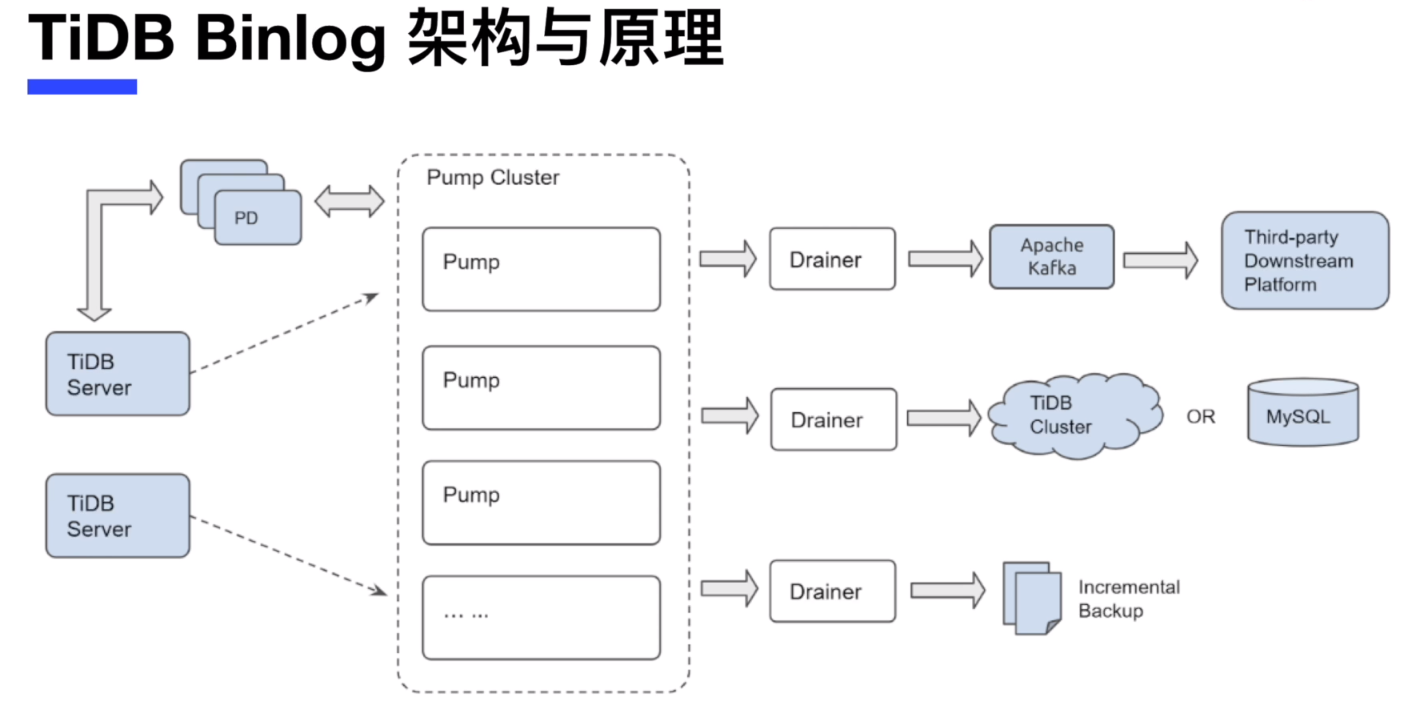


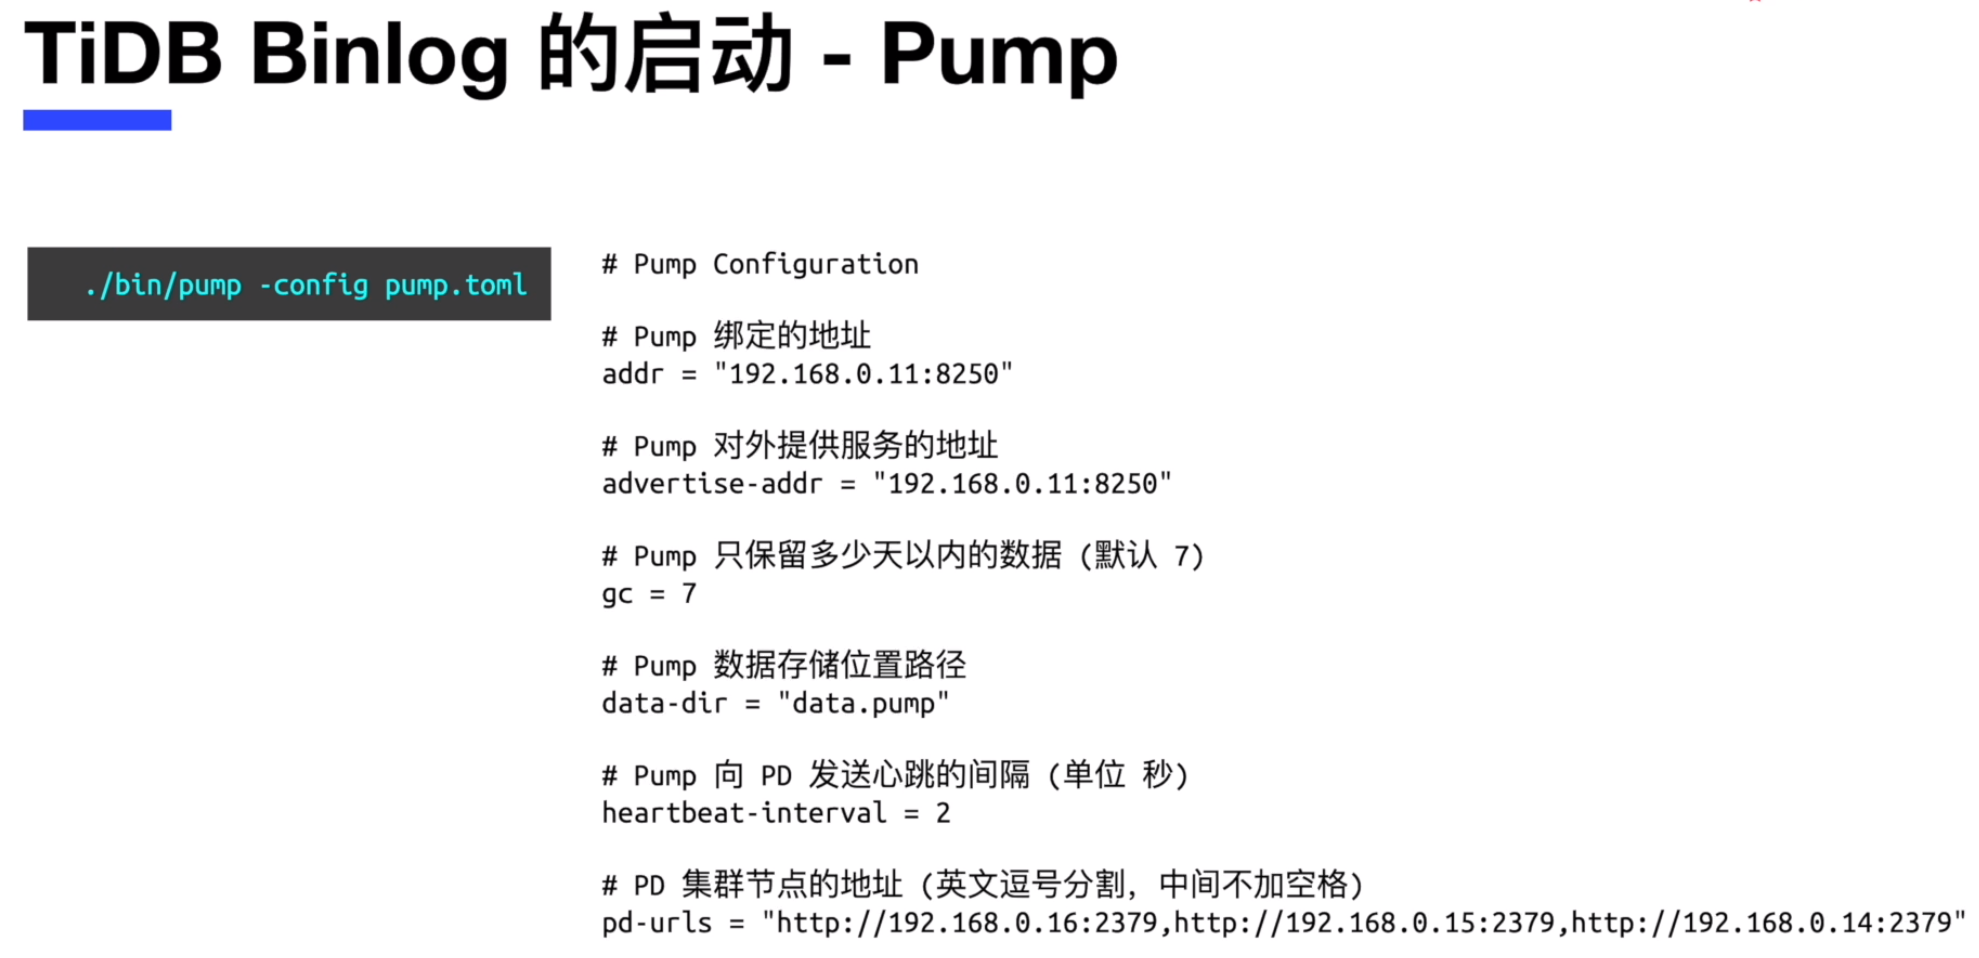

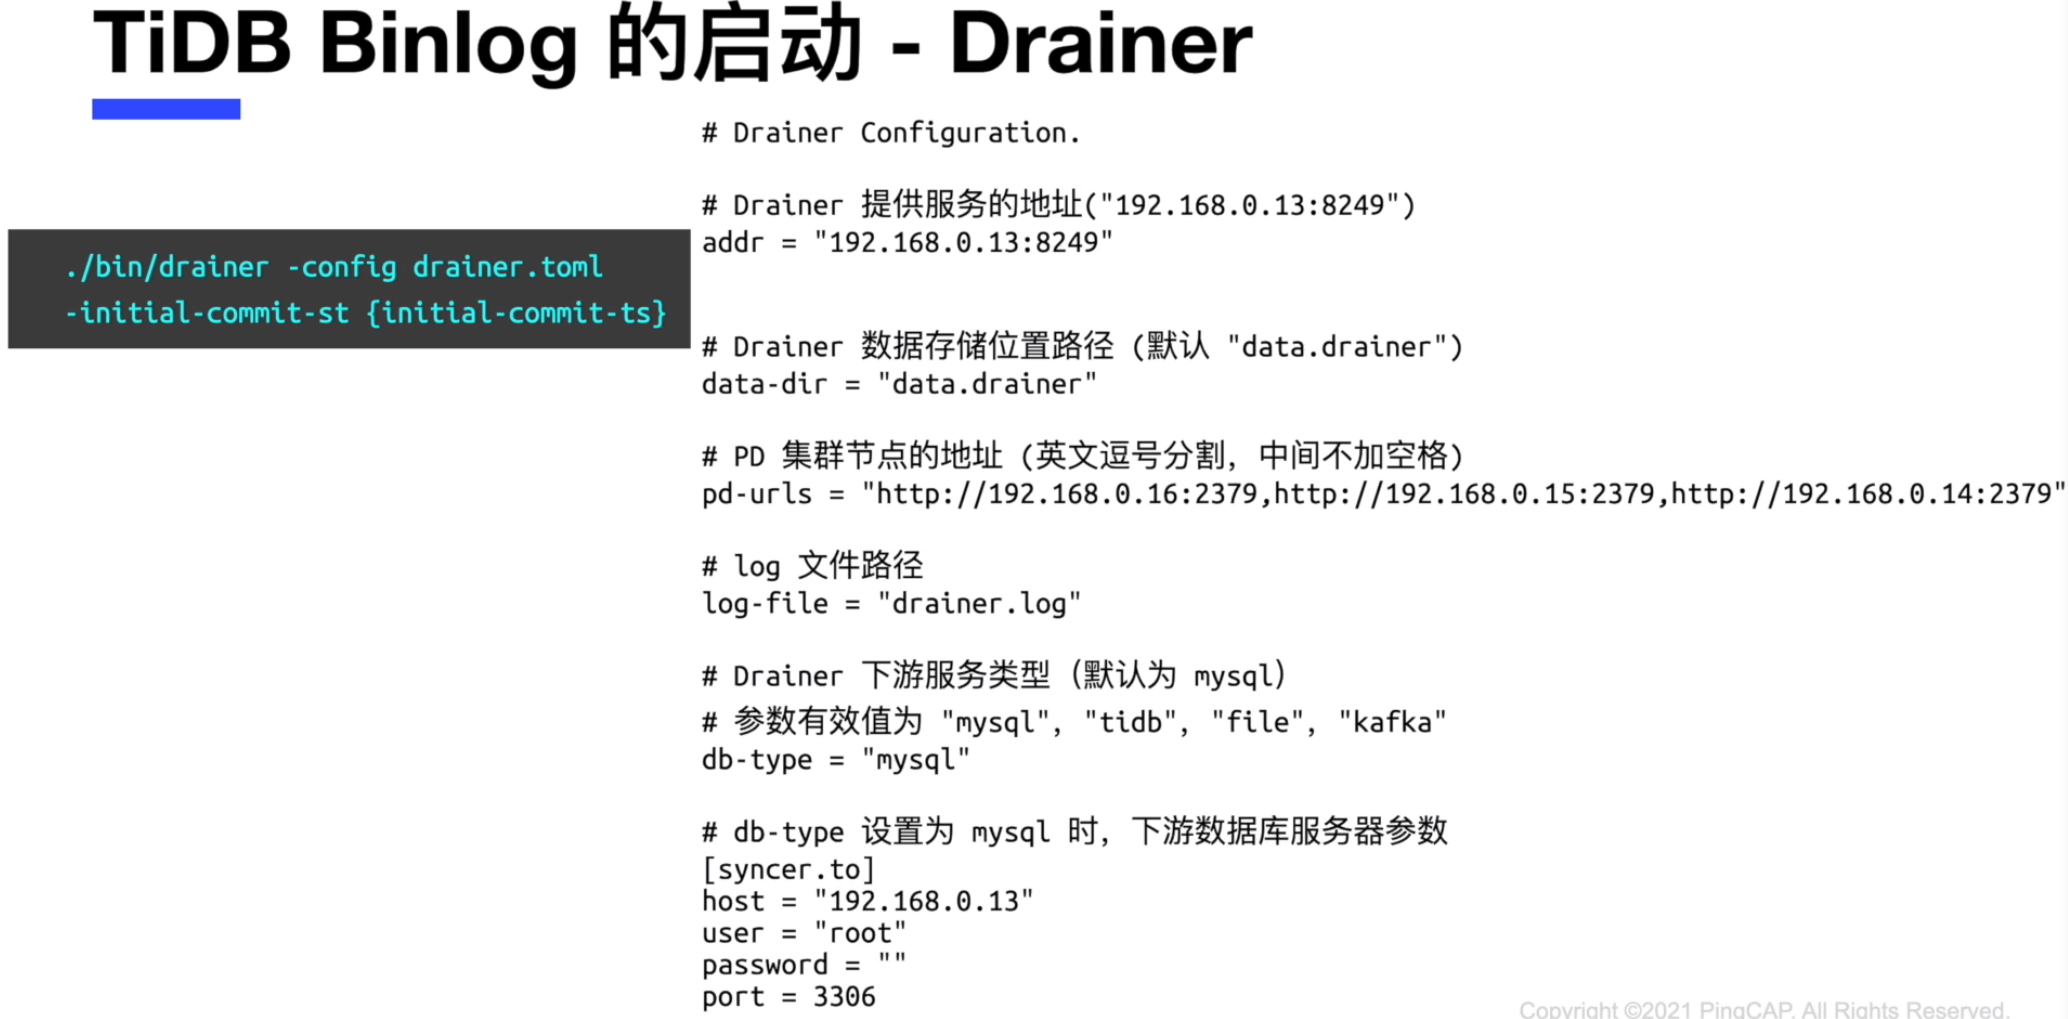
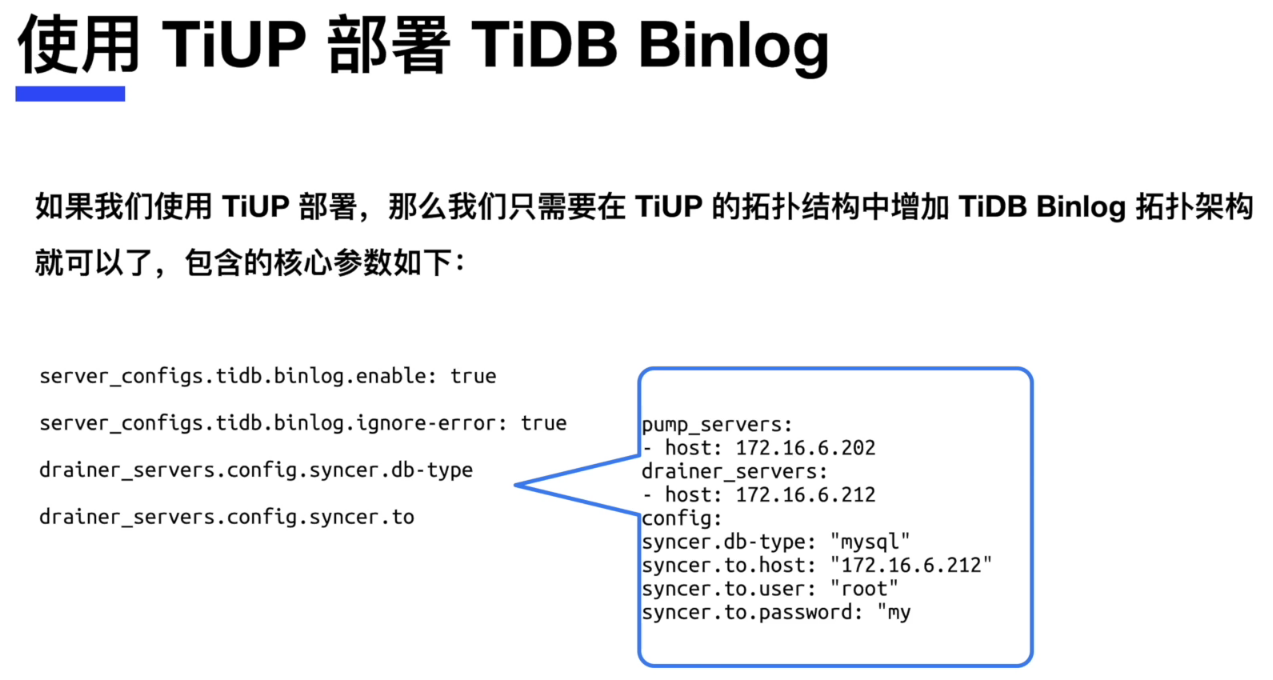
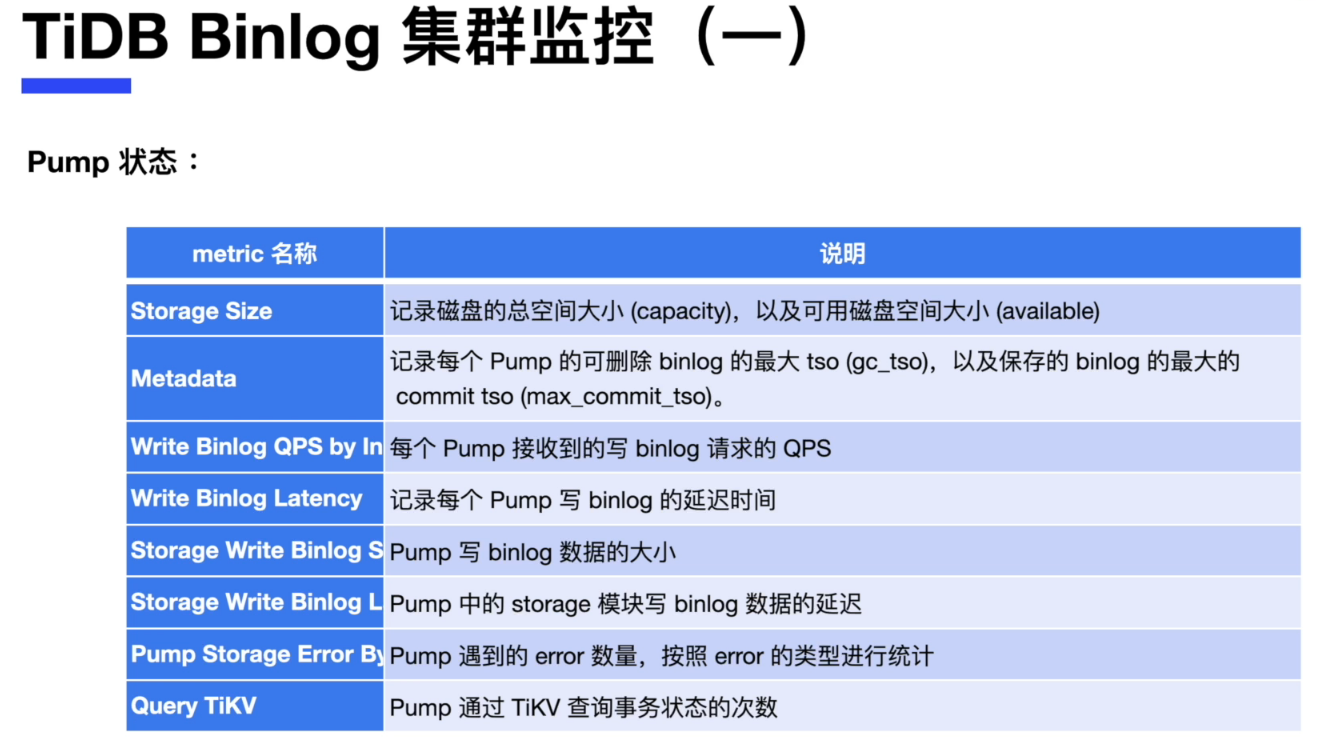
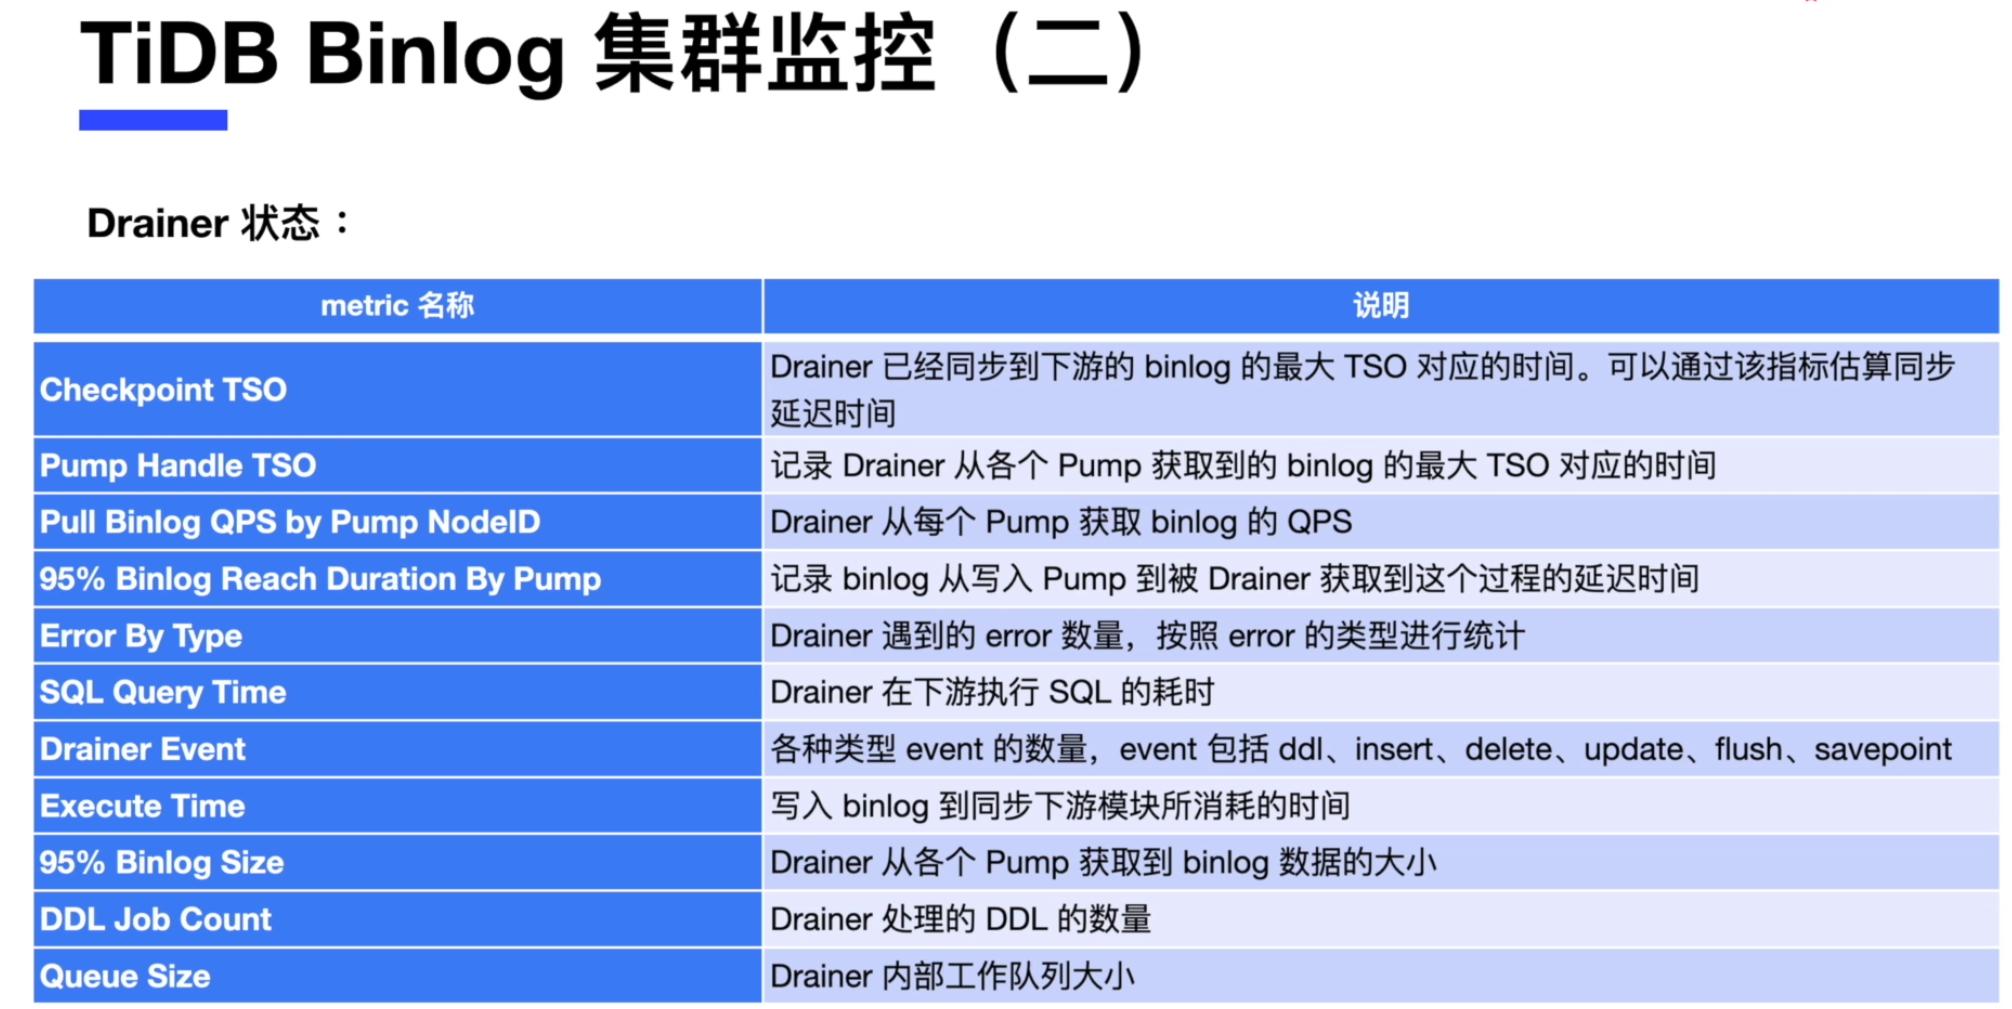
部署 TiDB Binlog
在本练习中,您将用 TiUP 工具为现有的 TiDB 数据库集群扩容出一个 pump 节点和 drainer 节点,为后面的数据同步复制做准备。
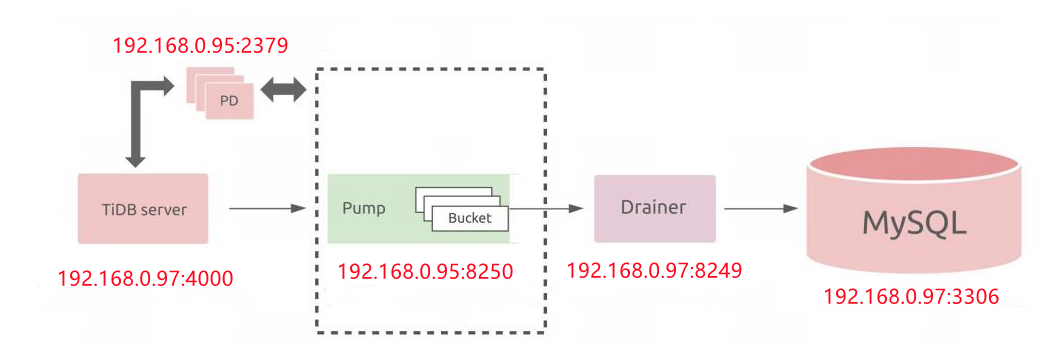
准备下游 MySQL 数据库,在 mysql 数据库中需要创建用户
[root@db1 ~]# yum -y install http://dev.mysql.com/get/mysql57-community-release-el7-10.noarch.rpm
[root@db1 ~]# rpm --import https://repo.mysql.com/RPM-GPG-KEY-mysql-2022
[root@db1 ~]# yum install -y mysql-server
[root@db1 ~]# systemctl start mysqld
[root@db1 ~]# grep password /var/log/mysqld.log
2022-02-21T06:35:48.116302Z 1 [Note] A temporary password is generated for root@localhost: S.D!8a)EhRDL
2022-02-21T06:35:52.990968Z 2 [Note] Access denied for user 'root'@'localhost' (using password: YES)
[root@db1 ~]# mysql -uroot -p'S.D!8a)EhRDL' -h127.0.0.1 -P3306
mysql> ALTER USER 'root'@'localhost' IDENTIFIED BY '!QAZ2wsx';
mysql> create user 'root'@'192.168.0.97' identified by '!QAZ2wsx';
mysql> grant all privileges on *.* to 'root'@'192.168.0.97';
mysql> exit
复制
[root@db1 ~]# mysql -uroot -p'!QAZ2wsx' -h127.0.0.1 -P3306
mysql> drop user 'root'@'192.168.0.95';
Query OK, 0 rows affected (0.01 sec)
mysql> create user 'root'@'192.168.0.95' identified by '!QAZ2wsx';
Query OK, 0 rows affected (0.00 sec)
mysql> grant all privileges on *.* to 'root'@'192.168.0.95';
Query OK, 0 rows affected (0.00 sec)
复制准备数据,为验证做准备
- 登录到 TiDB 数据库, 在 test 数据库中创建表 T
[root@db1 ~]# mysql -h 192.168.0.97 -P 4000 -uroot

mysql> create database test;
Query OK, 0 rows affected (0.08 sec)

mysql> use test
Database changed

mysql> create table T(id int primary key, name varchar(20));
Query OK, 0 rows affected (0.11 sec)

mysql> insert into T values(1,'Tom');
Query OK, 1 row affected (0.01 sec)

mysql> insert into T values(2,'Jack');
Query OK, 1 row affected (0.00 sec)

mysql> insert into T values(3,'Frank');
Query OK, 1 row affected (0.00 sec)

mysql> select * from T;
+----+-------+
| id | name  |
+----+-------+
|  1 | Tom   |
|  2 | Jack  |
|  3 | Frank |
+----+-------+
3 rows in set (0.00 sec)
复制- 登录到 MySQL 数据库,在 test 数据库中创建表 T
[root@db1 ~]# mysql -uroot -p'!QAZ2wsx' -h127.0.0.1 -P3306

mysql> create database test;
Query OK, 0 rows affected (0.08 sec)

mysql> use test
Database changed

mysql> create table T(id int primary key, name varchar(20));
Query OK, 0 rows affected (0.11 sec)

mysql> insert into T values(1,'Tom');
Query OK, 1 row affected (0.01 sec)

mysql> insert into T values(2,'Jack');
Query OK, 1 row affected (0.00 sec)

mysql> insert into T values(3,'Frank');
Query OK, 1 row affected (0.00 sec)

mysql> select * from T;
+----+-------+
| id | name  |
+----+-------+
|  1 | Tom   |
|  2 | Jack  |
|  3 | Frank |
+----+-------+
3 rows in set (0.00 sec)
复制
使用 tiup 组件对现有 tidb 数据库进行扩容,增加 pump 和 drainer 节点
- 编辑扩容文件
[root@db1 ~]# cat scale-out-binlog.yaml
pump_servers:
  - host: 192.168.0.95
drainer_servers:
  - host: 192.168.0.97
    config:
      syncer.db-type: "mysql"
      syncer.to.host: "192.168.0.97"
      syncer.to.user: "root"
      syncer.to.password: "!QAZ2wsx"
      syncer.to.port: 3306
复制- 查看扩容前的集群状态
[root@db1 ~]# tiup cluster display tidb-test
复制
- 开始扩容
[root@db1 ~]# tiup cluster scale-out tidb-test scale-out-binlog.yaml -uroot -p
复制
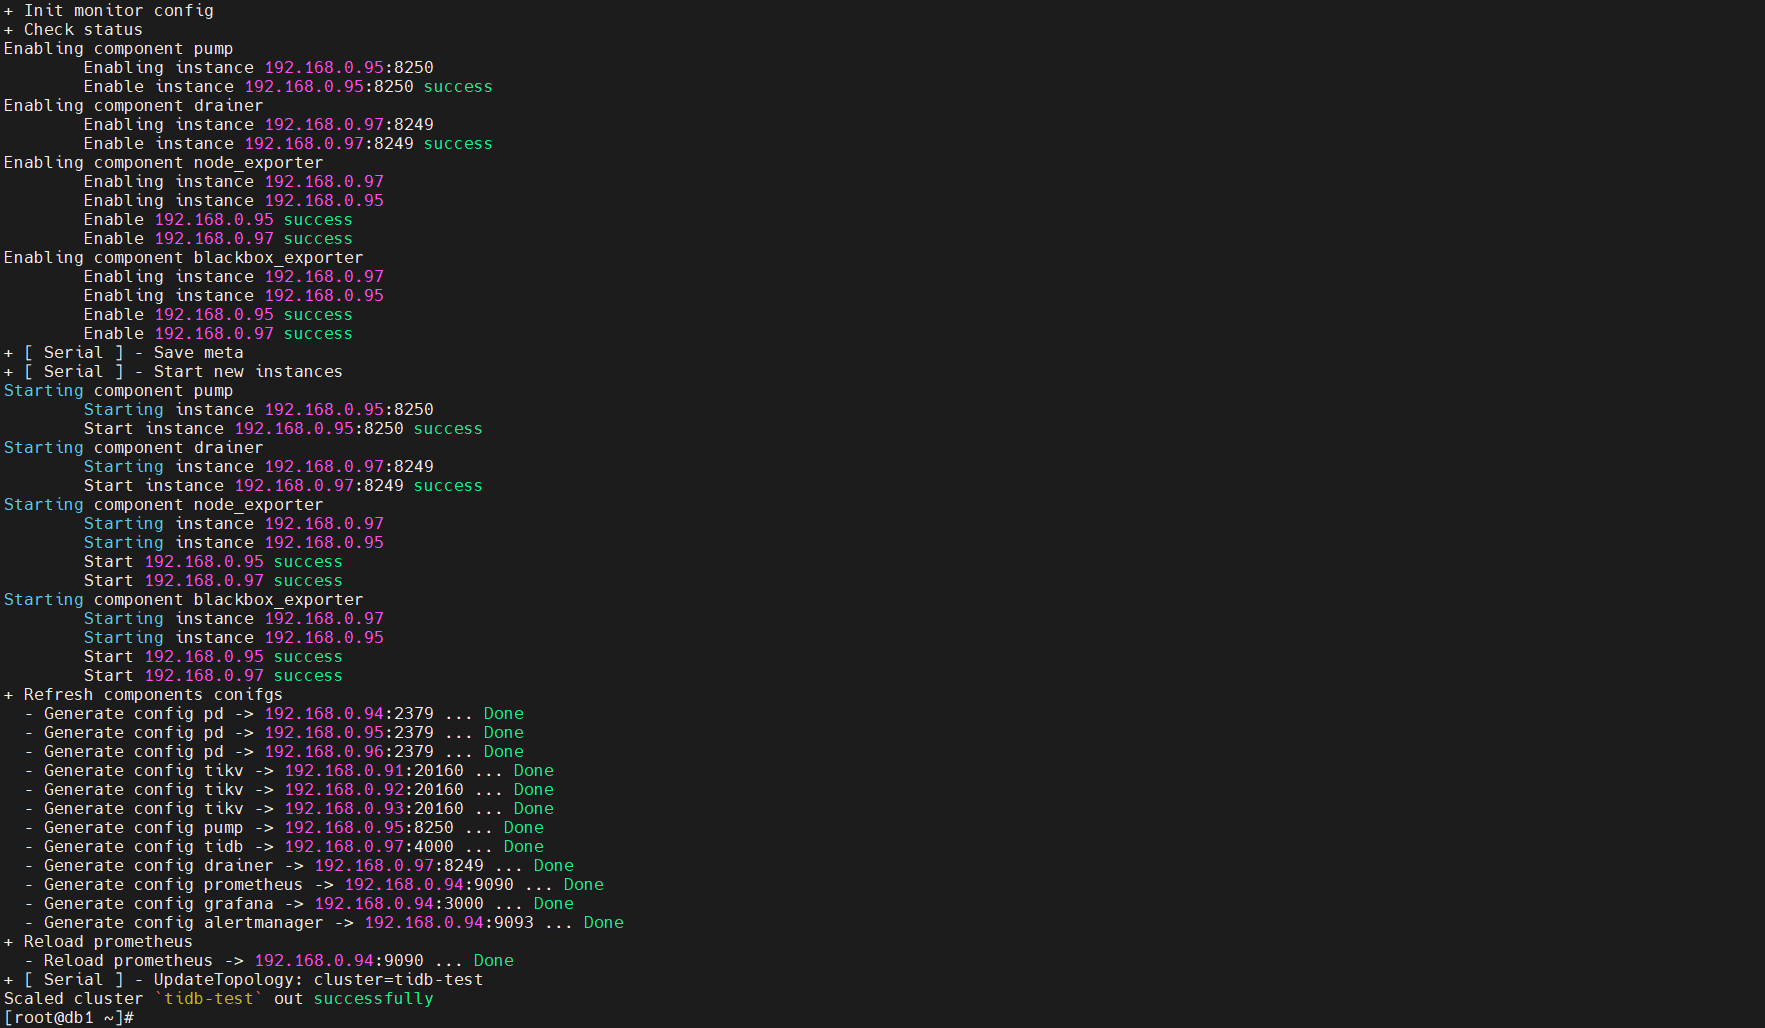
- 扩容结束后,查看 TiDB 数据库集群
[root@db1 ~]# tiup cluster display tidb-test
复制
可以看到,当前的 TiDB 数据库集群增加了 pump 节点 192.168.0.95:8250 和 drainer 节点 192.168.0.97:8249, 并且状态都为 UP。
开启 TiDB 数据库的 binlog 日志
- 登录到 TiDB 数据库, 查看 binlog 开启状态
[root@db1 ~]# mysql -h 192.168.0.97 -P 4000 -uroot

mysql> show variables like "log_bin";
+---------------+-------+
| Variable_name | Value |
+---------------+-------+
| log_bin       | OFF   |
+---------------+-------+
1 row in set (0.62 sec)
复制- 启动 pump 节点和 drainer 节点后, 我们需要开启 TiDB 数据库的 binlog 日志, 我们使用 tiup cluster edit-config 命令来编辑系统变量 binlog.enable: true 和 binlog.ignore-error: true
[root@db1 ~]# tiup cluster edit-config tidb-test

server_configs:
  tidb:
    binlog.enable: true
    binlog.ignore-error: true
复制
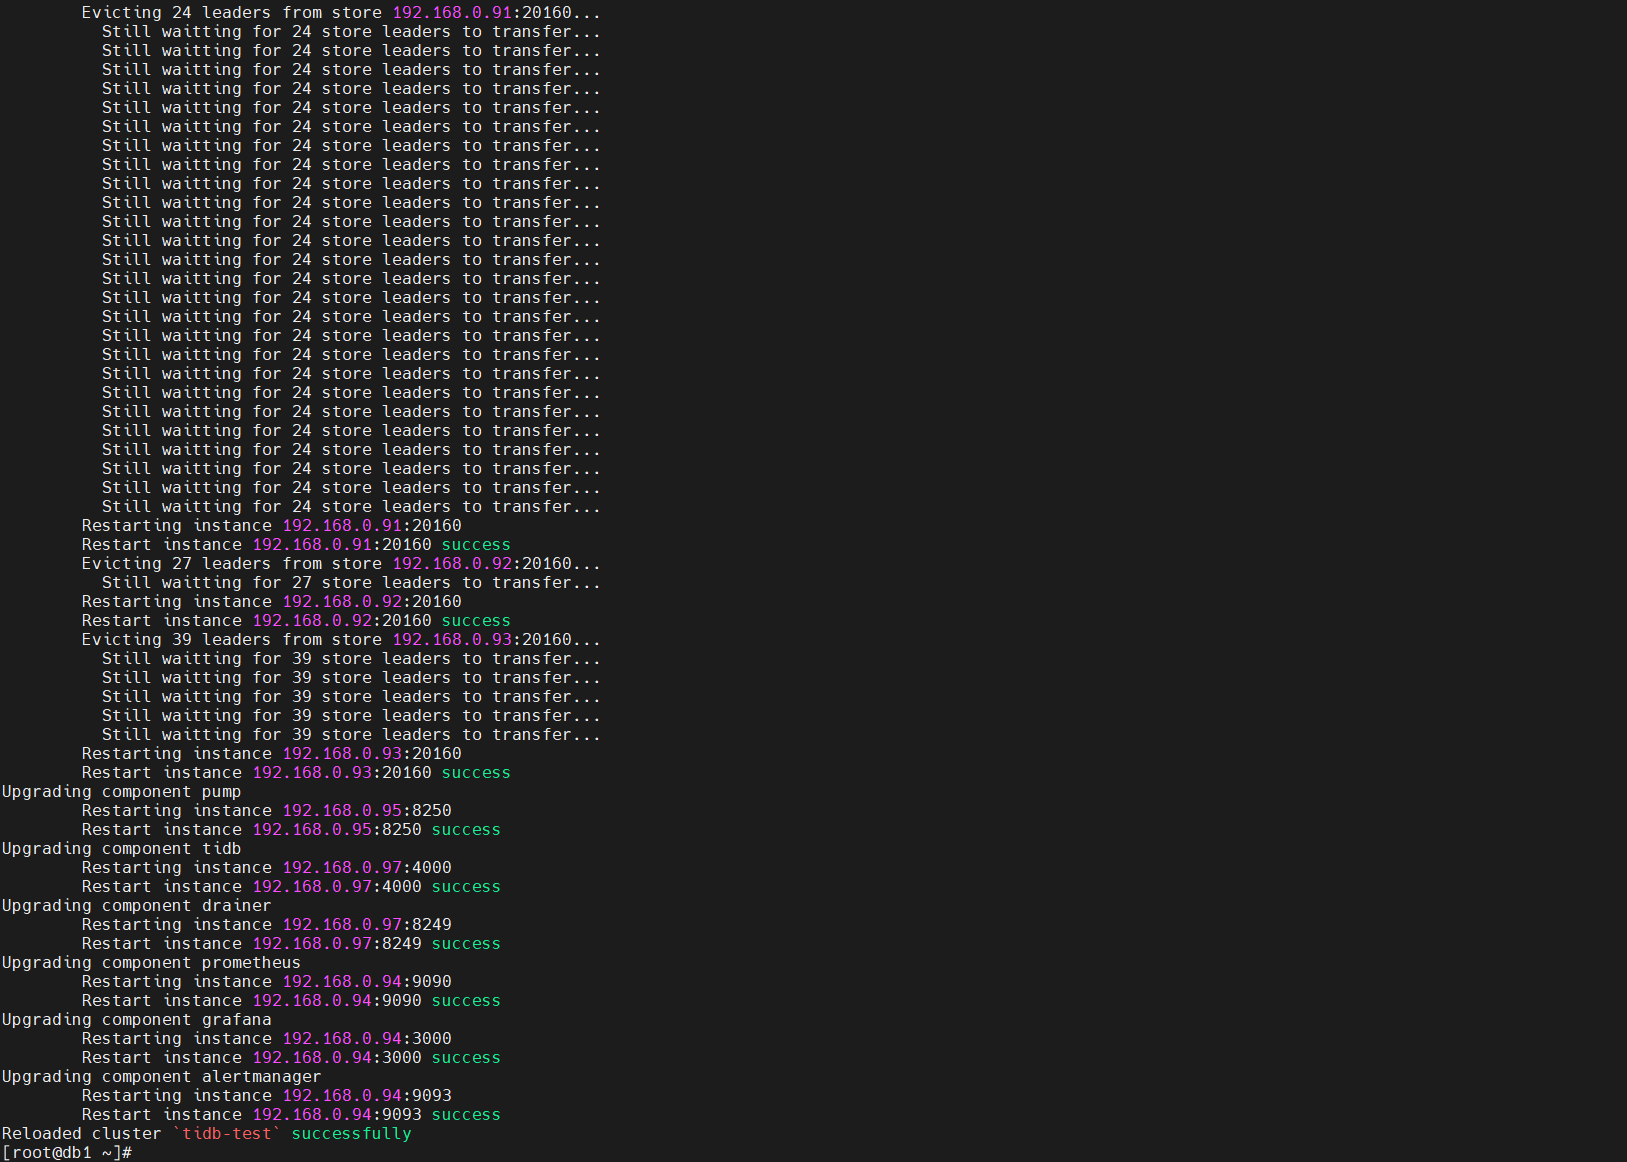
- 使用命令 tiup cluster reload 来载入新的配置
[root@db1 ~]# tiup cluster reload tidb-test
复制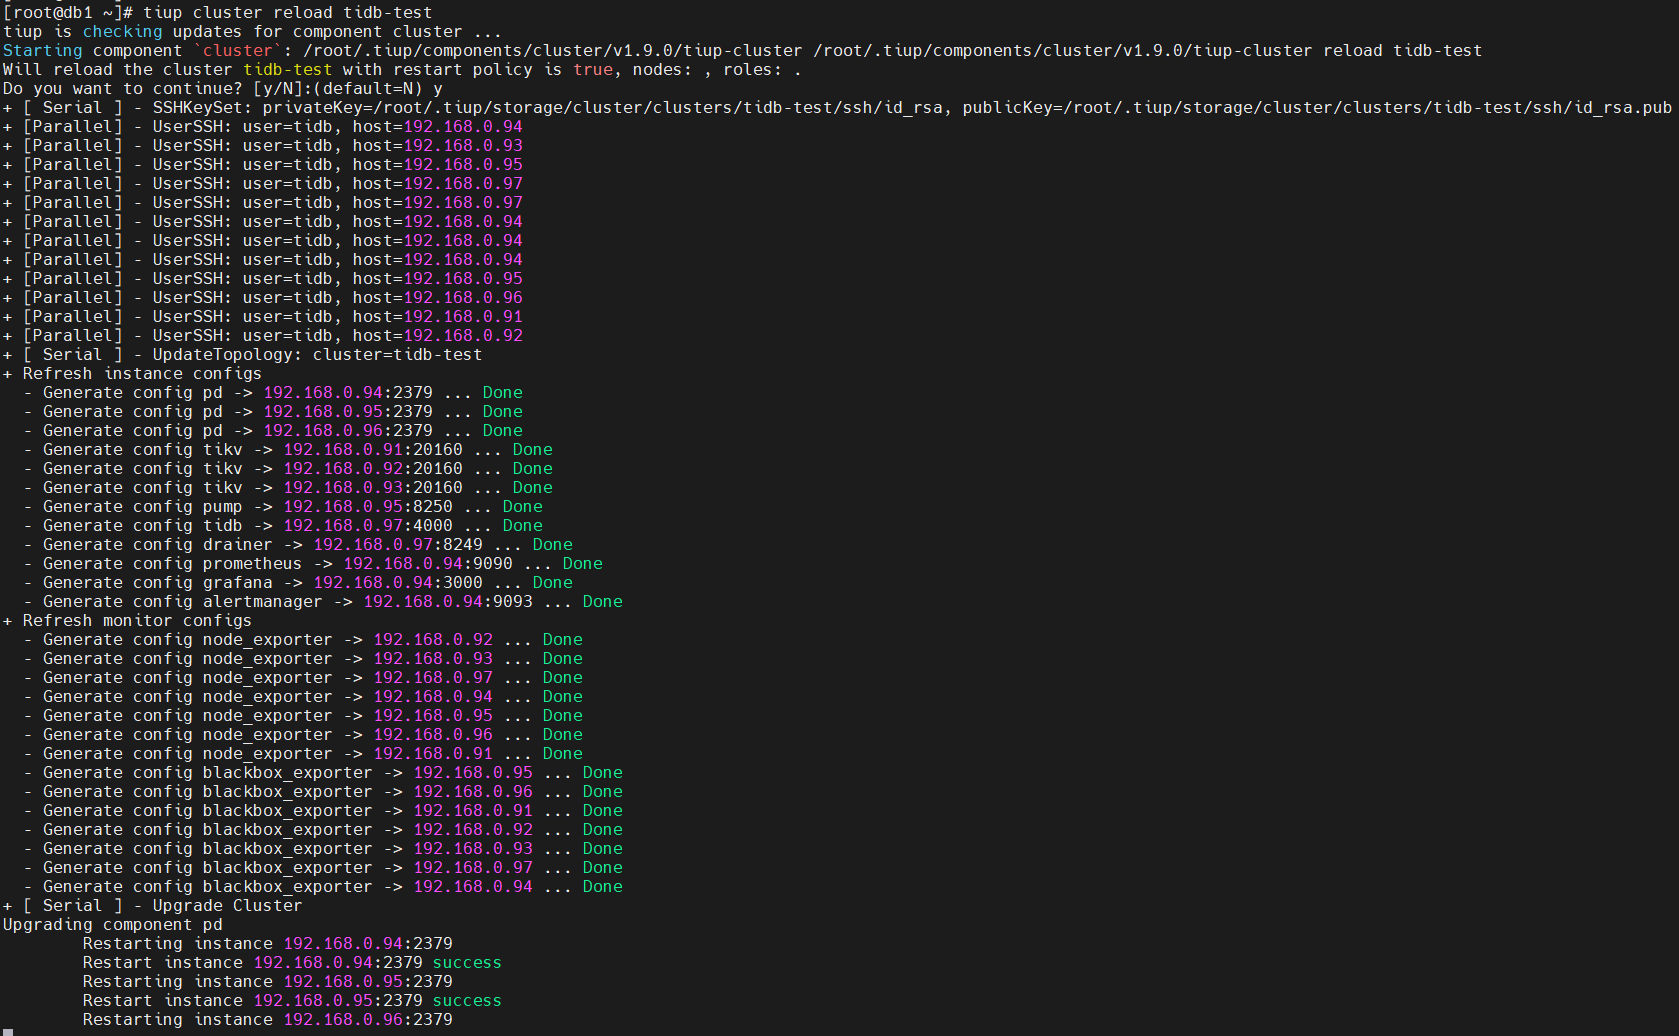

- 登录到 TiDB 数据库,查看 binlog 是否已经开启
[root@db1 ~]# mysql -h 192.168.0.97 -P 4000 -uroot

mysql> show variables like "log_bin";
+---------------+-------+
| Variable_name | Value |
+---------------+-------+
| log_bin       | ON   |
+---------------+-------+
1 row in set (0.62 sec)
复制
登录到 TiDB 数据库,查看 pump 节点和 drainer 节点是否正常
[root@db1 ~]# mysql -h 192.168.0.97 -P 4000 -uroot

mysql> show pump status;
+-------------------+-------------------+--------+--------------------+---------------------+
| NodeID            | Address           | State  | Max_Commit_Ts      | Update_Time         |
+-------------------+-------------------+--------+--------------------+---------------------+
| 192.168.0.95:8250 | 192.168.0.95:8250 | online | 431388681190768641 | 2022-02-23 19:53:43 |
+-------------------+-------------------+--------+--------------------+---------------------+
1 row in set (0.01 sec)

mysql> show drainer status;
+-------------------+-------------------+--------+--------------------+---------------------+
| NodeID            | Address           | State  | Max_Commit_Ts      | Update_Time         |
+-------------------+-------------------+--------+--------------------+---------------------+
| 192.168.0.97:8249 | 192.168.0.97:8249 | online | 431388681977200641 | 2022-02-23 19:53:50 |
+-------------------+-------------------+--------+--------------------+---------------------+
1 row in set (0.01 sec)
复制
在上面结果中,我们会看到 pump 和 drainer 的状态都为 online。
使用 TiDB Binlog 进行数据同步复制
在这个练习中,您将使用 TiDB Binlog 进行 TiDB 数据库到 MySQL 数据库的同步复制。
在启动TiDB Binlog之前我们需要保证上游和下游数据一致。
确认复制数据准备完毕
- 登录到 TiDB 数据库,查询 test 数据库下表 T
[root@db1 ~]# mysql -h 192.168.0.97 -P 4000 -uroot

mysql> use test
Reading table information for completion of table and column names
You can turn off this feature to get a quicker startup with -A

Database changed
mysql> select * from T;
+----+-------+
| id | name  |
+----+-------+
|  1 | Tom   |
|  2 | Jack  |
|  3 | Frank |
+----+-------+
3 rows in set (0.00 sec)
复制- 登录到 MySQL 数据库,查询 test 数据库下表 T
[root@db1 ~]# mysql -uroot -p'!QAZ2wsx' -h127.0.0.1 -P3306

mysql> use test
Reading table information for completion of table and column names
You can turn off this feature to get a quicker startup with -A

Database changed
mysql> select * from T;
+----+-------+
| id | name  |
+----+-------+
|  1 | Tom   |
|  2 | Jack  |
|  3 | Frank |
+----+-------+
3 rows in set (0.00 sec)
复制
进行复制数据确认
- 登录到 TiDB 数据库,并插入一行数据
[root@db1 ~]# mysql -h 192.168.0.97 -P 4000 -uroot

mysql> use test
Reading table information for completion of table and column names
You can turn off this feature to get a quicker startup with -A

Database changed
mysql> insert into T select 4, 'Tony';
Query OK, 1 row affected (0.01 sec)
Records: 1  Duplicates: 0  Warnings: 0

mysql> select * from T;
+----+-------+
| id | name  |
+----+-------+
|  1 | Tom   |
|  2 | Jack  |
|  3 | Frank |
|  4 | Tony  |
+----+-------+
4 rows in set (0.01 sec)
复制- 登录到 MySQL 数据库,确认数据行是否插入
[root@db1 ~]# mysql -uroot -p'!QAZ2wsx' -h127.0.0.1 -P3306

mysql> use test
Reading table information for completion of table and column names
You can turn off this feature to get a quicker startup with -A

Database changed
mysql> select * from T;
+----+-------+
| id | name  |
+----+-------+
|  1 | Tom   |
|  2 | Jack  |
|  3 | Frank |
|  4 | Tony  |
+----+-------+
4 rows in set (0.00 sec)
复制
通过实验, 我们验证了 TiDB 数据库的数据变更已经复制到了 MySQL 数据库中。
管理 TiDB Binlog 复制
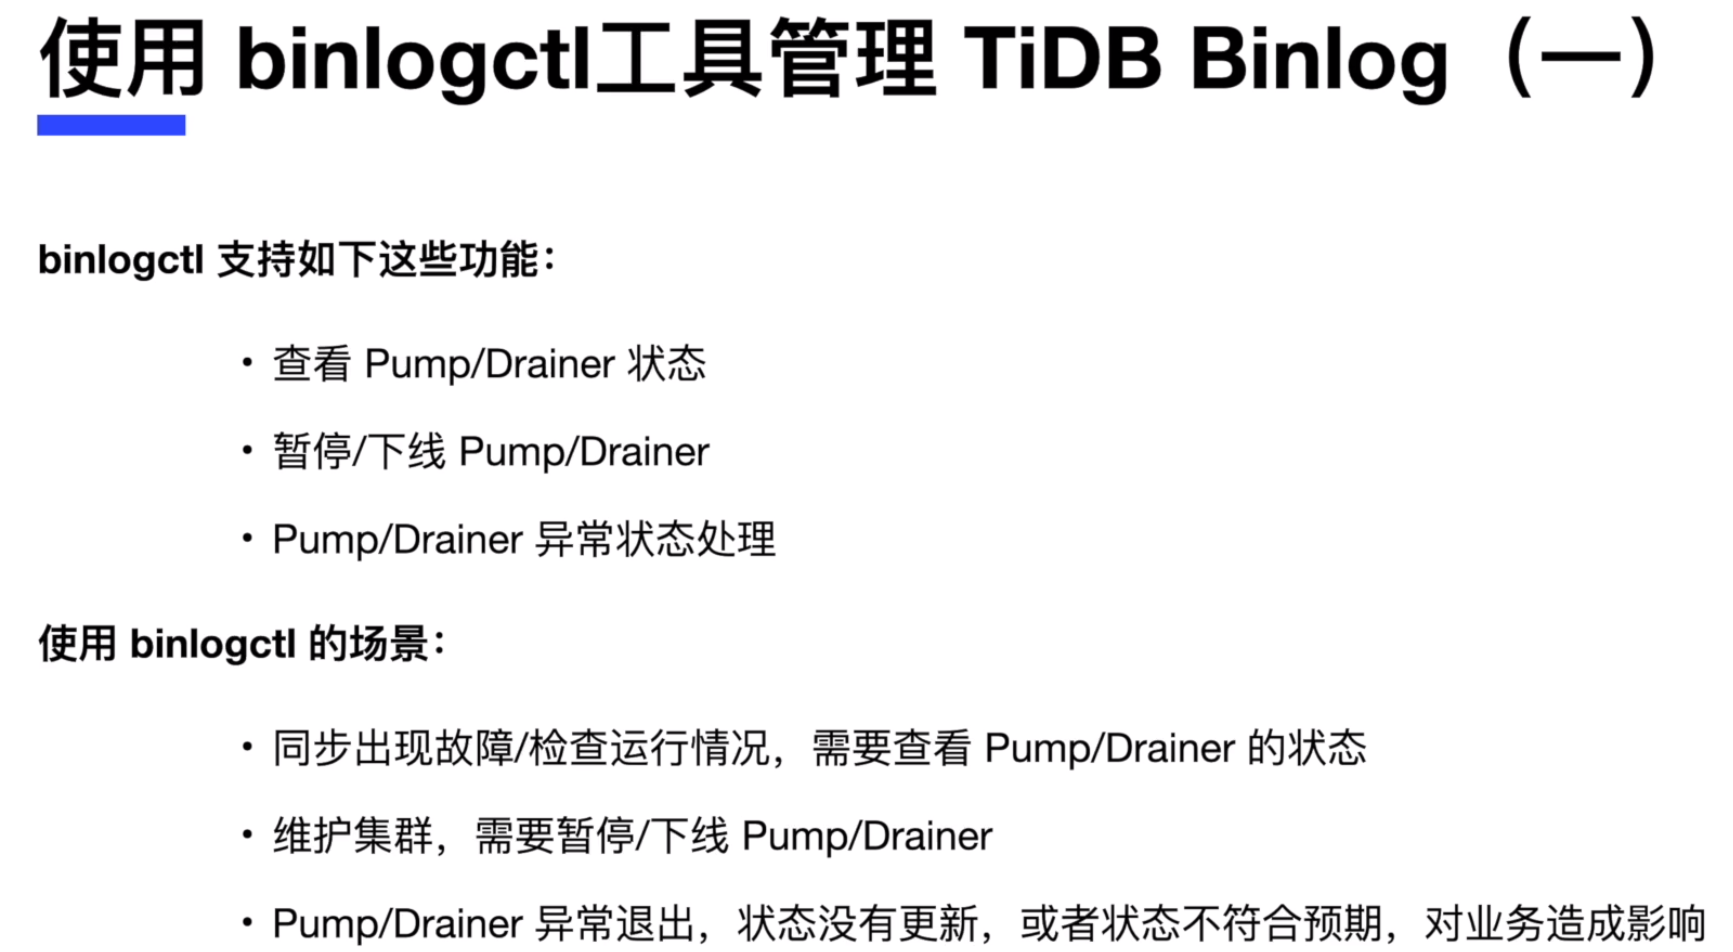
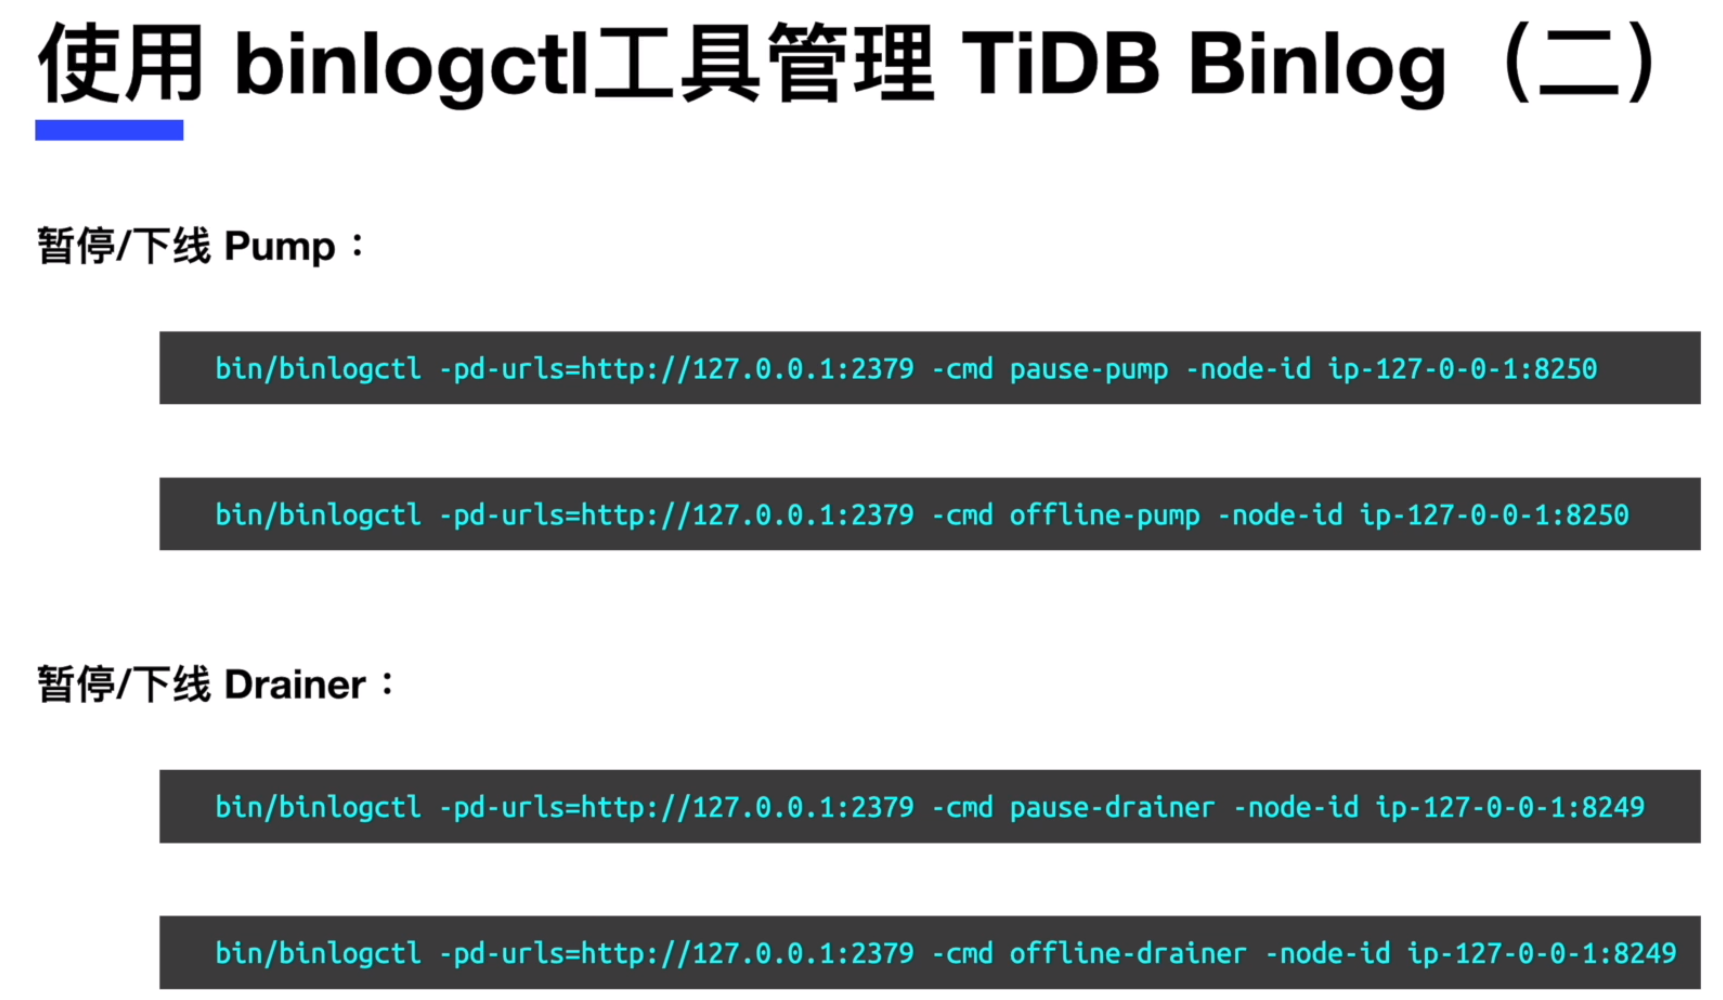
在这个练习中,您将使用 binlogctl 工具来管理 TiDB Binlog 的复制,包括暂停复制和恢复复制。

下载安装 binlogctl 工具
您将使用 binlogctl 来管理 TiDB Binlog 的复制,所以需要预先下载安装 binlogctl 工具,方法如下
- 下载 tidb-v5.0.0-linux-amd64.tar.gz 安装包,binlogctl 工具在里面
[root@db1 ~]# wget https://download.pingcap.org/tidb-v5.0.0-linux-amd64.tar.gz
复制- 解压 tidb-v5.0.0-linux-amd64.tar.gz,获取二进制文件
[root@db1 ~]# tar xvf tidb-v5.0.0-linux-amd64.tar.gz
复制- 检查 binlogctl 是否存在
[root@db1 ~]# cd tidb-v5.0.0-linux-amd64/bin/
[root@db1 bin]# ll
total 904488
-rwxr-xr-x. 1 root root  58545029 Apr  7  2021 arbiter
-rwxr-xr-x. 1 root root  29530617 Apr  7  2021 binlogctl
-rwxr-xr-x. 1 root root  62116145 Apr  7  2021 drainer
-rwxr-xr-x. 1 root root  15817472 Apr  7  2021 etcdctl
-rwxr-xr-x. 1 root root  37428396 Apr  7  2021 pd-ctl
-rwxr-xr-x. 1 root root  36484204 Apr  7  2021 pd-recover
-rwxr-xr-x. 1 root root  94747536 Apr  7  2021 pd-server
-rwxr-xr-x. 1 root root  57335289 Apr  7  2021 pump
-rwxr-xr-x. 1 root root  55158625 Apr  7  2021 reparo
-rwxr-xr-x. 1 root root  17899199 Apr  7  2021 tidb-ctl
-rwxr-xr-x. 1 root root 124889296 Apr  7  2021 tidb-server
-rwxr-xr-x. 1 root root 128894944 Apr  7  2021 tikv-ctl
-rwxr-xr-x. 1 root root 207324144 Apr  7  2021 tikv-server
复制
查看 pump 节点和 drainer 节点当前的状态
- 查看 pump 节点的状态
[root@db1 bin]# ./binlogctl -pd-urls=http://192.168.0.95:2379 -cmd pumps
[2022/02/23 20:12:06.240 +08:00] [INFO] [nodes.go:53] ["query node"] [type=pump] [node="{NodeID: 192.168.0.95:8250, Addr: 192.168.0.95:8250, State: online, MaxCommitTS: 431388969221488641, UpdateTime: 2022-02-23 20:12:03 +0800 CST}"]
复制- 查看 drainer 节点的状态
[root@db1 bin]# ./binlogctl -pd-urls=http://192.168.0.95:2379 -cmd drainers
[2022/02/23 20:12:48.227 +08:00] [INFO] [nodes.go:53] ["query node"] [type=drainer] [node="{NodeID: 192.168.0.97:8249, Addr: 192.168.0.97:8249, State: online, MaxCommitTS: 431388981017968641, UpdateTime: 2022-02-23 20:12:46 +0800 CST}"]
复制
暂停 drainer 节点
[root@db1 bin]# ./binlogctl -pd-urls=http://192.168.0.95:2379 -cmd pause-drainer -node-id 192.168.0.97:8249
[2022/02/23 20:14:30.921 +08:00] [INFO] [nodes.go:123] ["Apply action on node success"] [action=pause] [NodeID=192.168.0.97:8249]
复制- 确认暂停的 drainer 节点状态
[root@db1 bin]# ./binlogctl -pd-urls=http://192.168.0.95:2379 -cmd drainers
[2022/02/23 20:15:10.638 +08:00] [INFO] [nodes.go:53] ["query node"] [type=drainer] [node="{NodeID: 192.168.0.97:8249, Addr: 192.168.0.97:8249, State: paused, MaxCommitTS: 431389007795978241, UpdateTime: 2022-02-23 20:14:30 +0800 CST}"]
复制
确认复制是否还可以继续
- 登录到 TiDB 数据库,向 test 库的表 T 中插入一行数据
[root@db1 ~]# mysql -h 192.168.0.97 -P 4000 -uroot

mysql> use test
Reading table information for completion of table and column names
You can turn off this feature to get a quicker startup with -A

Database changed

mysql> insert into T values(6,'Andy');
Query OK, 1 row affected (0.01 sec)

mysql> select * from T;
+----+-------+
| id | name  |
+----+-------+
|  1 | Tom   |
|  2 | Jack  |
|  3 | Frank |
|  4 | Tony  |
|  6 | Andy  |
+----+-------+
5 rows in set (0.00 sec)
复制- 登录到 MySQL 数据库,查询 test 库的表 T
[root@db1 ~]# mysql -uroot -p'!QAZ2wsx' -h127.0.0.1 -P3306

mysql> use test
Reading table information for completion of table and column names
You can turn off this feature to get a quicker startup with -A

Database changed
mysql> select * from T;
+----+-------+
| id | name  |
+----+-------+
|  1 | Tom   |
|  2 | Jack  |
|  3 | Frank |
|  4 | Tony  |
+----+-------+
4 rows in set (0.00 sec)
复制
从结果上看,drainer 节点停止后,复制已经停止了。
重新启动 drainer 节点,登录到 drainer 节点(192.168.0.97)执行启动操作
[root@db1 ~]# cd /tidb-deploy/drainer-8249/bin/
[root@db1 bin]# nohup ./drainer -pd-urls=http://192.168.0.95:2379 -config ../conf/drainer.toml &
[1] 110242
复制
[root@db1 bin]# ./binlogctl -pd-urls=http://192.168.0.95:2379 -cmd drainers
[2022/02/23 20:26:23.986 +08:00] [INFO] [nodes.go:53] ["query node"] [type=drainer] [node="{NodeID: 192.168.0.97:8249, Addr: 192.168.0.97:8249, State: paused, MaxCommitTS: 431389007795978241, UpdateTime: 2022-02-23 20:14:30 +0800 CST}"]
[2022/02/23 20:26:23.986 +08:00] [INFO] [nodes.go:53] ["query node"] [type=drainer] [node="{NodeID: db1:8249, Addr: 192.168.0.97:8249, State: online, MaxCommitTS: 431389194311434242, UpdateTime: 2022-02-23 20:26:22 +0800 CST}"]
复制
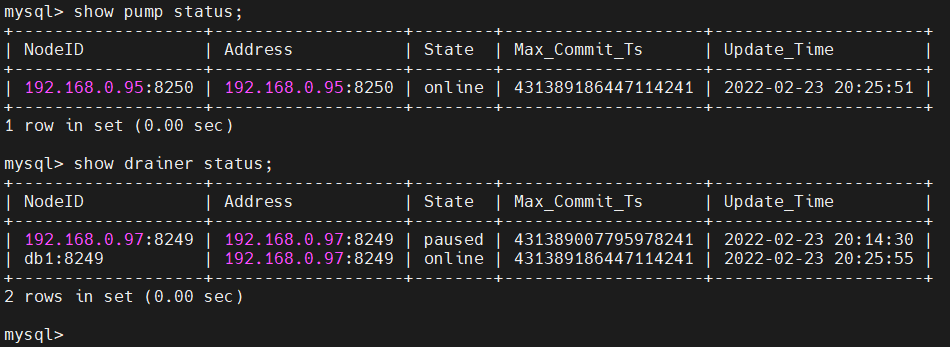
- 查看 MySQL 数据库,查看复制是否继续
[root@db1 ~]# mysql -uroot -p'!QAZ2wsx' -h127.0.0.1 -P3306

mysql> use test
Reading table information for completion of table and column names
You can turn off this feature to get a quicker startup with -A

Database changed
mysql> select * from T;
+----+-------+
| id | name  |
+----+-------+
|  1 | Tom   |
|  2 | Jack  |
|  3 | Frank |
|  4 | Tony  |
|  6 | Andy  |
+----+-------+
5 rows in set (0.00 sec)
复制
可以看到,数据复制已经恢复了。
缩容 TiDB Binlog 节点
先关闭 tidb 数据库的 binlog 功能
- 使用 tiup cluster edit-config 设置 binlog.enable 和 binlog.ignore-error 为 false
[root@db1 ~]# tiup cluster edit-config tidb-test

server_configs:
  tidb:
    binlog.enable: false
    binlog.ignore-error: false
复制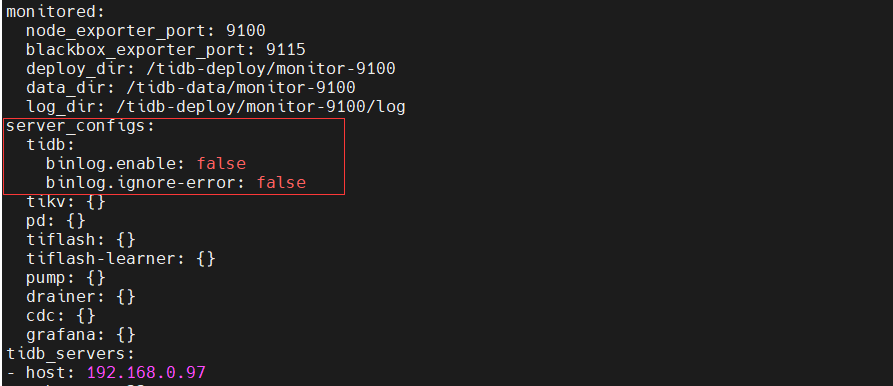
- 使用命令 tiup cluster reload 来载入新的配置
[root@db1 ~]# tiup cluster reload tidb-test
复制- 查看缩容 drainer 和 pump 节点后的 TiDB 数据库集群状态
[root@db1 ~]# tiup cluster display tidb-test
复制
- 登录到 TiDB 数据库,查看 binlog 是否已经开启
[root@db1 ~]# mysql -h 192.168.0.97 -P 4000 -uroot

mysql> show variables like "log_bin";
+---------------+-------+
| Variable_name | Value |
+---------------+-------+
| log_bin       | OFF   |
+---------------+-------+
1 row in set (0.63 sec)
复制
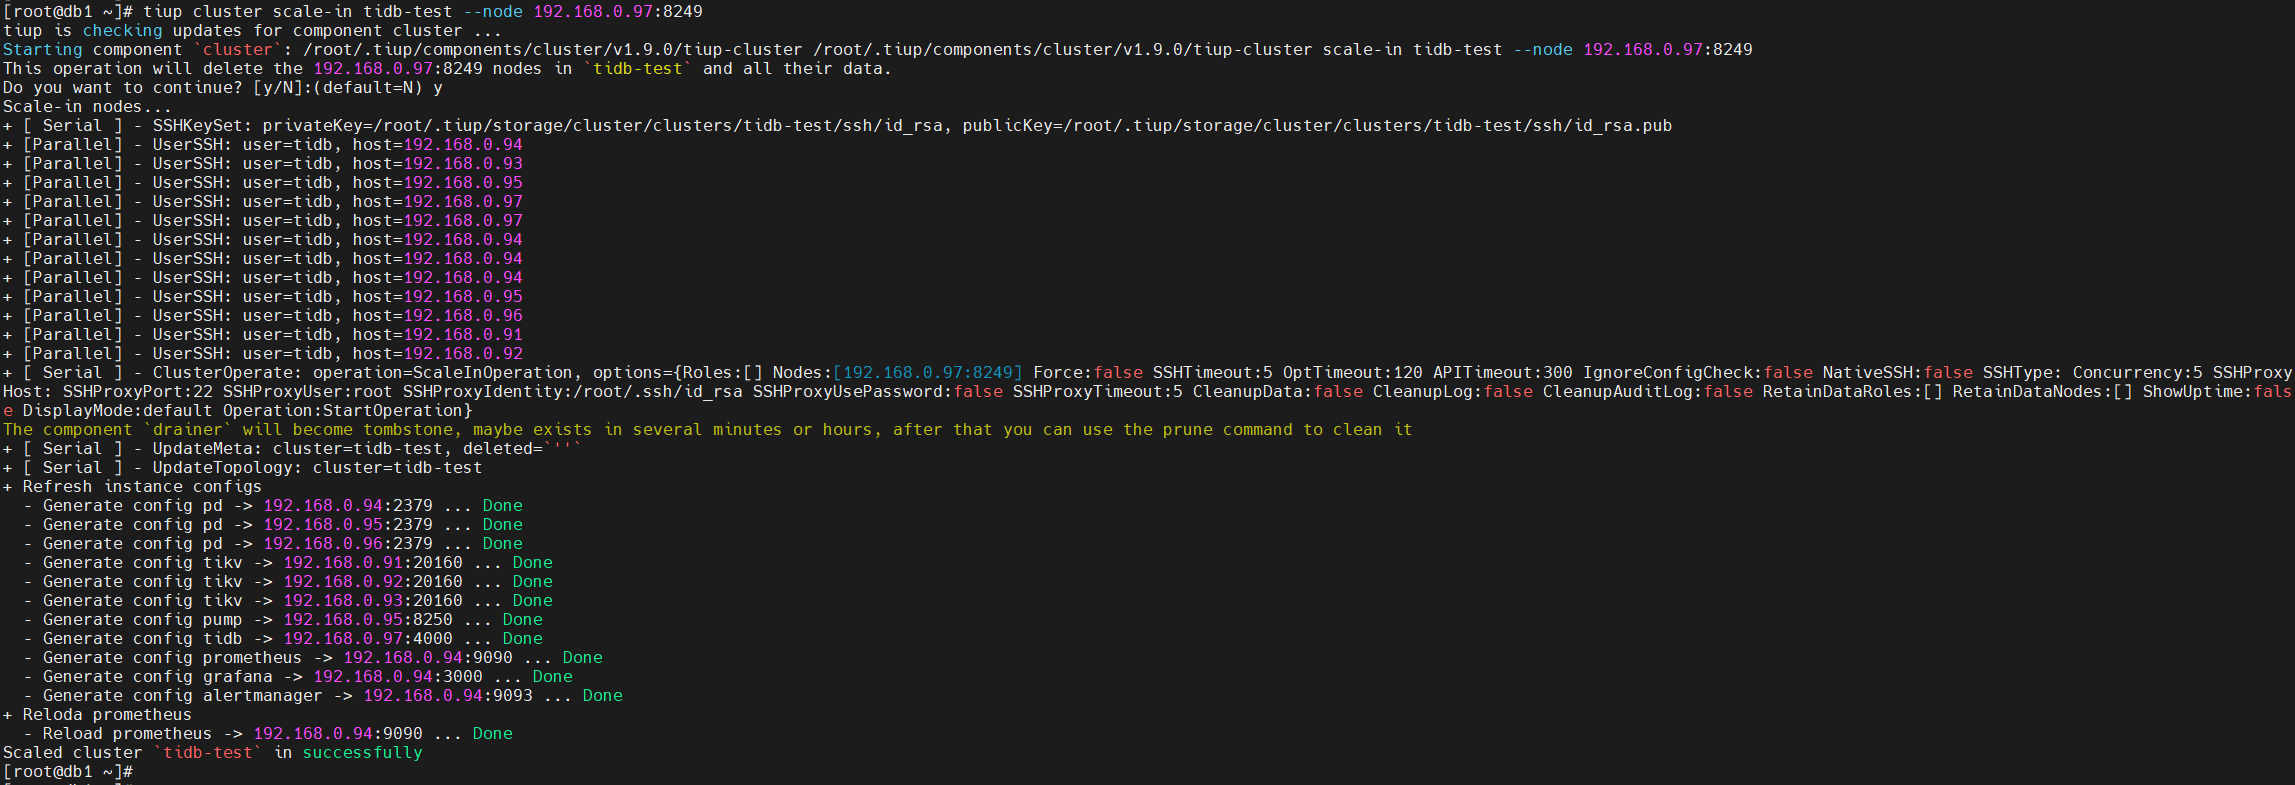
缩容当前集群中的 drainer 节点 192.168.0.97:8249
[root@db1 ~]# tiup cluster scale-in tidb-test --node 192.168.0.97:8249
复制
报了一个错误

可能跟之前 nohup 恢复 drainer 节点有关,手动kill掉这个进程

再次执行缩容当前集群中的 drainer 节点
- 查看缩容后的集群状态
[root@db1 ~]# tiup cluster display tidb-test
复制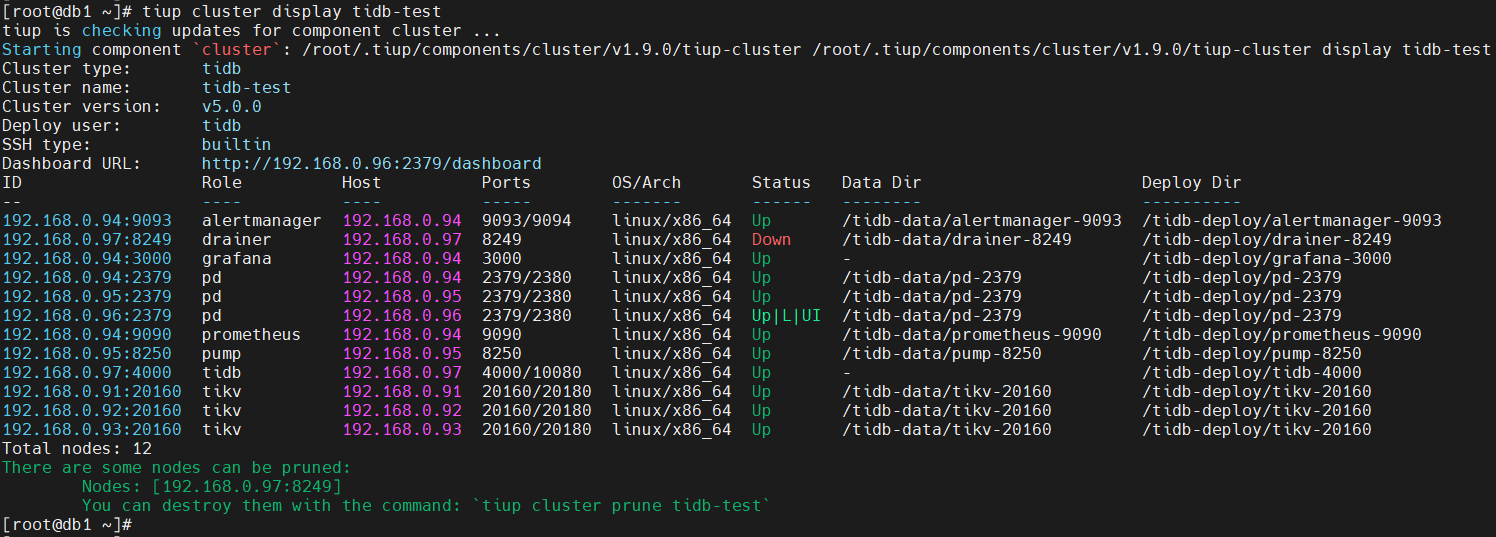
缩容当前集群中的 pump 节点 192.168.0.95:8250
[root@db1 ~]# tiup cluster scale-in tidb-test --node 192.168.0.95:8250
复制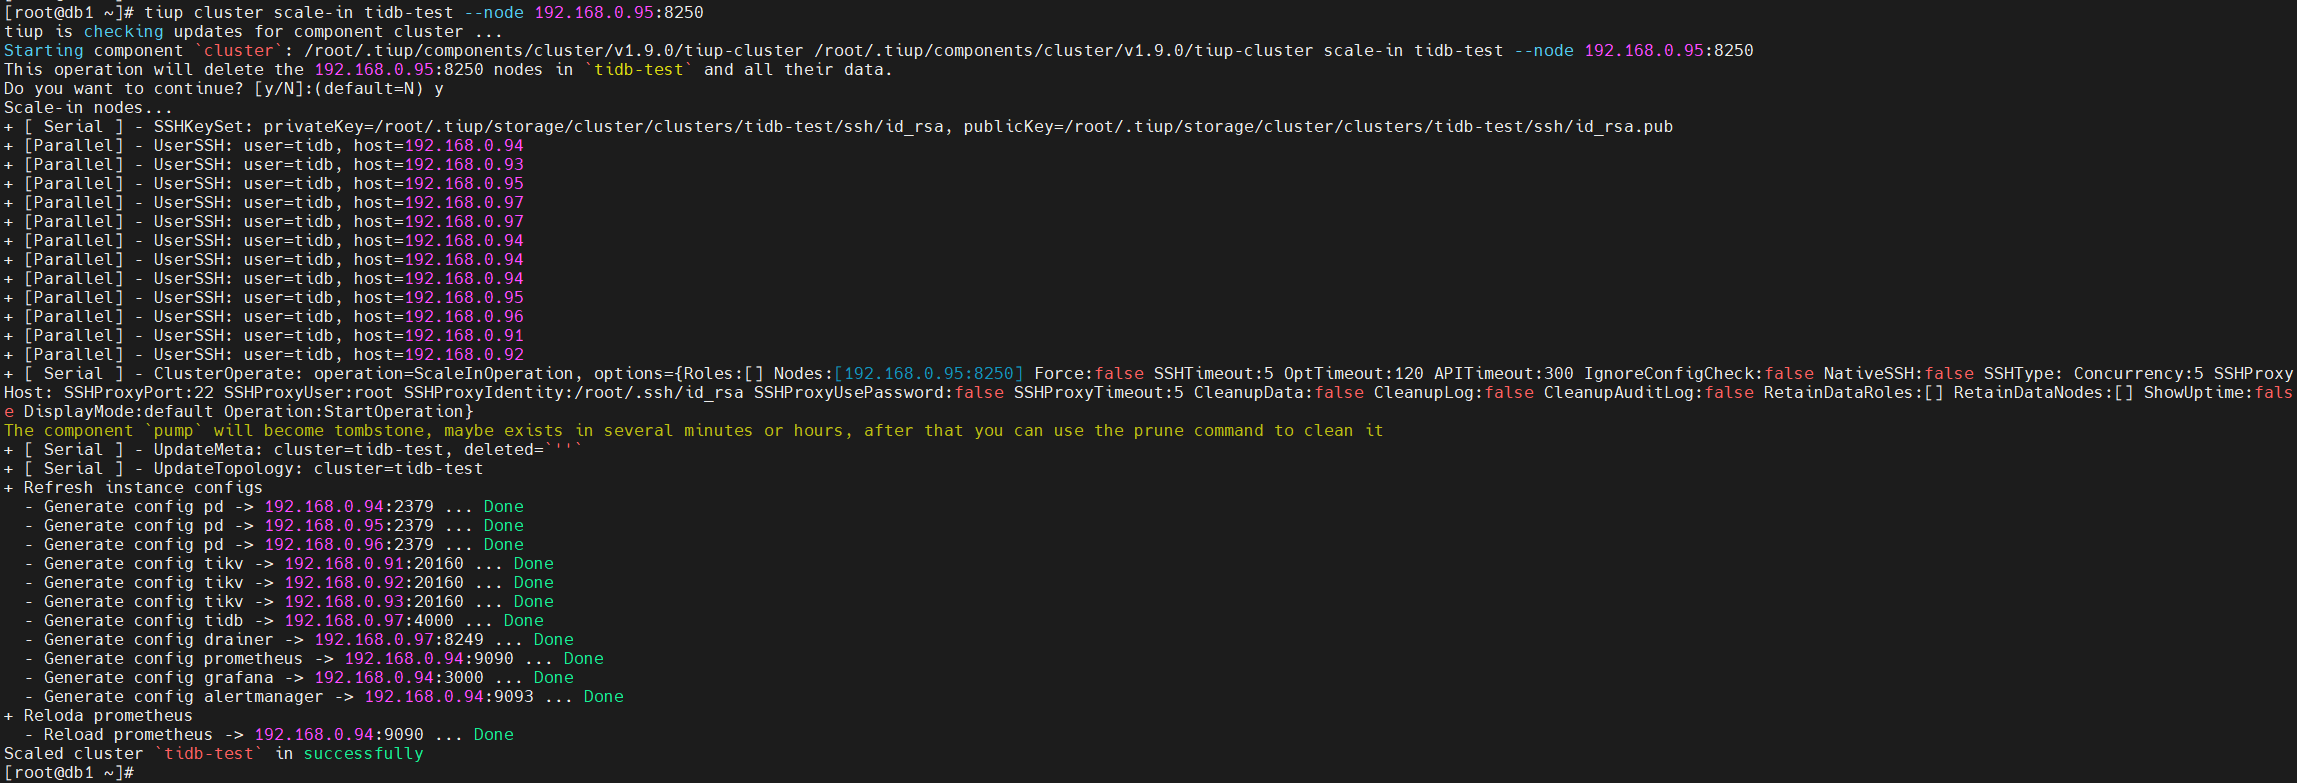
- 查看缩容 drainer 和 pump 节点后的 TiDB 数据库集群状态
[root@db1 ~]# tiup cluster display tidb-test
复制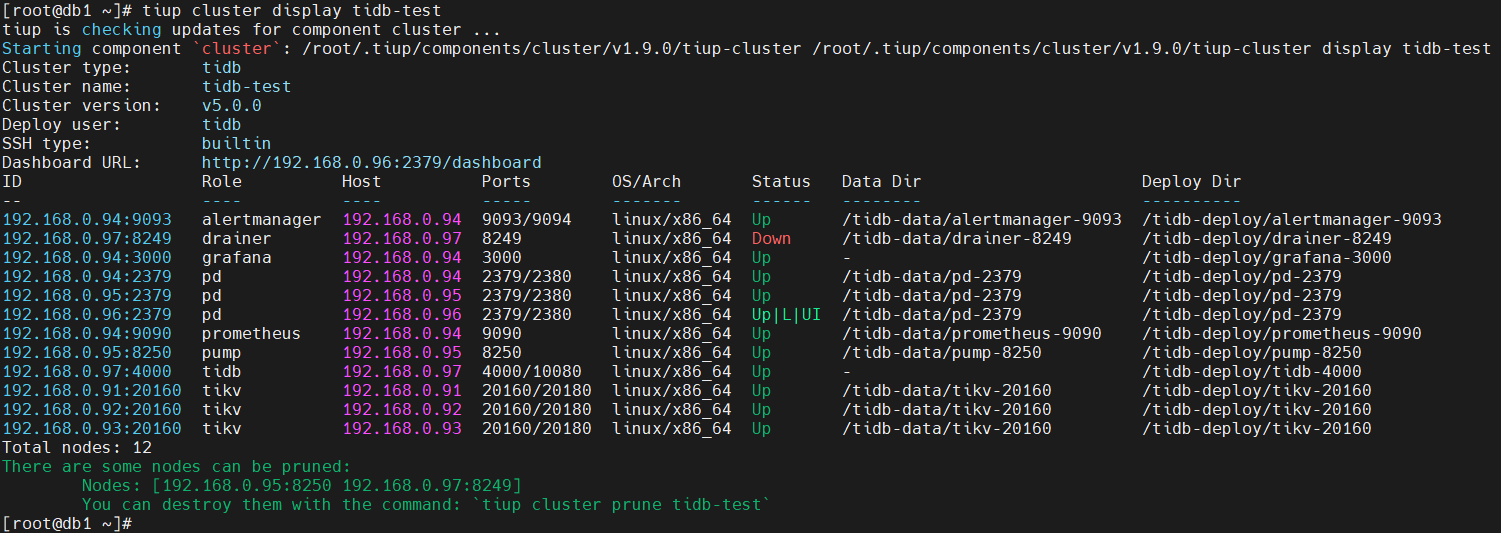
使用 tiup cluster prune 命令清理节点
[root@db1 ~]# tiup cluster prune tidb-test
复制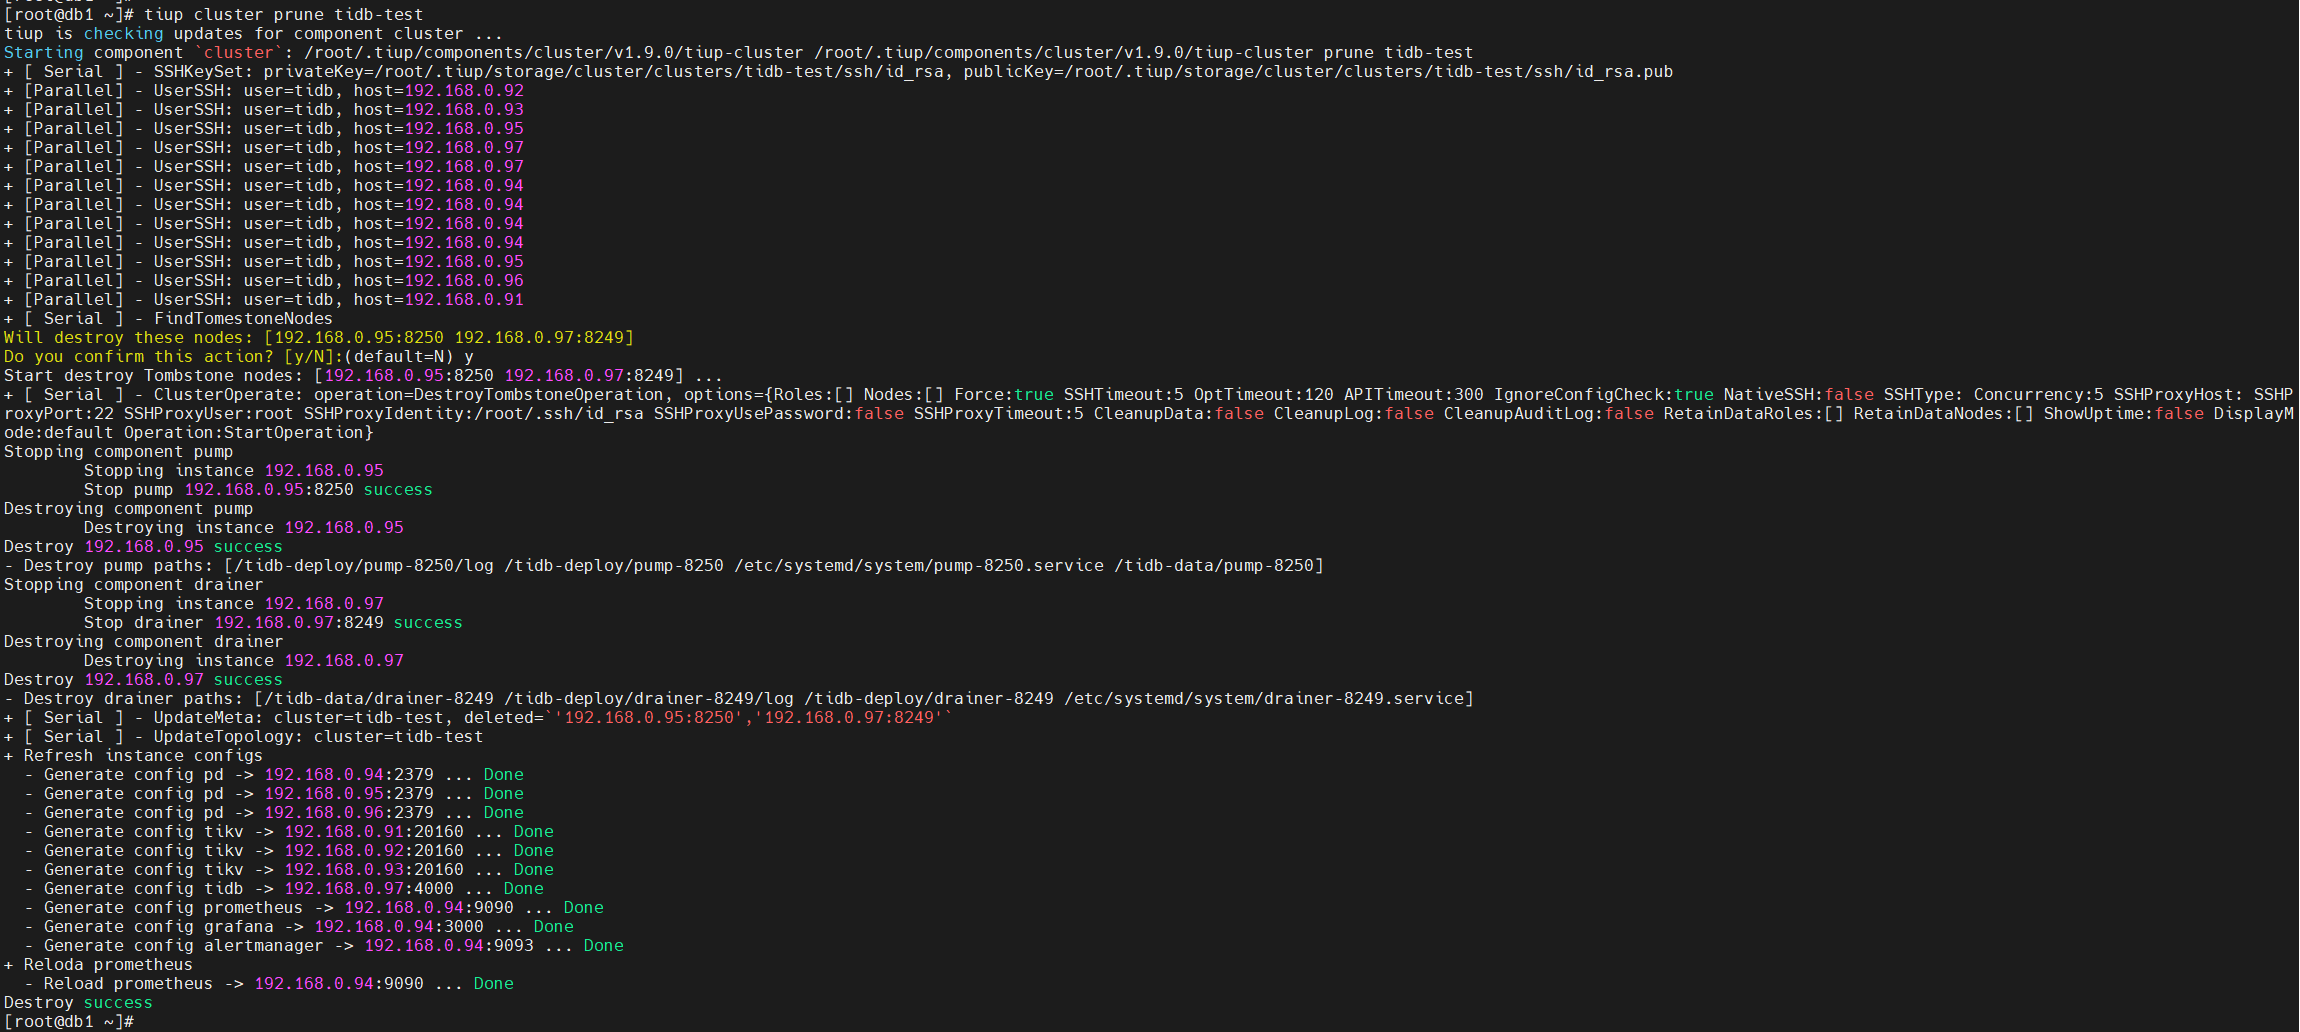
- 查看集群状态,发现 pump 和 drainer 节点已经下线成功
[root@db1 ~]# tiup cluster display tidb-test
复制
「喜欢这篇文章,您的关注和赞赏是给作者最好的鼓励」
关注作者
【版权声明】本文为墨天轮用户原创内容,转载时必须标注文章的来源(墨天轮),文章链接,文章作者等基本信息,否则作者和墨天轮有权追究责任。如果您发现墨天轮中有涉嫌抄袭或者侵权的内容,欢迎发送邮件至:contact@modb.pro进行举报,并提供相关证据,一经查实,墨天轮将立刻删除相关内容。
评论
您好,您的文章已入选合格奖,10墨值奖励已经到账请查收!
❤️我们还会实时派发您的流量收益。
3年前
 点赞
点赞 评论
相关阅读
史诗级革新 | Apache Flink 2.0 正式发布
严少安
153次阅读
2025-03-25 00:55:05
NineData 社区版:从 MySQL 到 TiDB 数据复制新选择
严少安
142次阅读
2025-03-13 17:27:45
PingCAP 2025 校园招聘 | 开源领航,星耀前程
PingCAP
110次阅读
2025-03-27 09:55:55
你好,3月 | 各大数据库社区又要卷出新高度啦
严少安
86次阅读
2025-03-04 17:50:59
2025w11 | 图数据库了解一下
严少安
61次阅读
2025-03-21 16:51:24
【TiDB 深圳地区交流回顾】大规模 TiDB 国产化替代在金融、跨境电商企业的最新实践!
TiDB Club
38次阅读
2025-03-10 10:29:44
国产数据库如何赋能智慧医疗?3.28 TiDB 与您相约宜昌 “医院云数智技术实践研讨及成果展示交流会”
PingCAP
31次阅读
2025-03-25 18:14:39
DBdoctor v3.3.0.2版本发布,新增Oracle索引推荐,强化TiDB审计日志功能
DBdoctor
31次阅读
2025-03-07 10:29:31
TiDB 观测性解读(一)丨索引观测:快速识别无用索引与低效索引
PingCAP
29次阅读
2025-03-12 10:23:21
国产数据库再获资本赋能,「九有数据库」完成A轮融资
严少安
25次阅读
2025-03-31 13:00:54
TA的专栏
目录


