


介绍
Nestjs是一个尖端节点。用于开发高效、可靠和可扩展的服务器端应用程序的js框架。它很容易与NoSQL和SQL数据库集成,如MongoDB、Yugabyte、SQLite、Postgres、MySQL等。它支持流行的对象关系映射器,如TypeORM Sequelize和Mongoose。
在本教程中,我们将使用SQLite和TypeORM创建一个电子商务应用程序。我们还将介绍Arctype,这是一种功能强大的SQL客户端和数据库管理工具。
让我们开始吧!
先决条件
本教程是一个动手演示,让您开始学习。确保您满足以下要求:
-
您已经安装了节点(>=10.13.0,v13除外)
-
您具有Javascript的基础知识
-
已安装Arctype
项目设置
要开始使用Nestjs,请使用以下命令安装Nestjs CLI:
npm i -g @nestjs/cli复制
安装完成后,使用以下命令创建Nestjs项目:
nest new ecommerce复制
选择您的npm作为包管理器,点击enter按钮,等待Nest安装运行此应用程序所需的包。
安装完成后,使用以下命令将目录更改为项目文件夹:
cd ecommerce复制
然后在您最喜欢的文本编辑器或IDE中打开项目目录,打开一个新的终端,并使用以下命令以开发模式运行服务器(这将启用热重新加载,并允许我们在控制台上查看可能的错误):
npm run start:dev复制
再进行
服务器启动并运行后,打开一个新的终端窗口,这样就不会退出服务器。这将允许您在本教程中看到对代码库所做更改的效果。
现在安装以下依赖项:
-
护照
-
护照本地
-
Jwt公司
-
护照jwt
-
SQLIte3
-
类型
-
跨平台文件加密工具
您可以使用以下命令执行此操作:
npm install --save @nestjs/passport passport passport-local @nestjs/jwt passport-jwt @nestjs/typeorm typeorm sqlite3 bcrypt复制
然后使用以下命令安装dev依赖项:
npm install --save-dev @types/passport-local @types/passport-jwt @types/bcrypt复制
您可以在npm安装软件包时喝杯咖啡。一旦安装完成,让我们把手弄脏。
创建应用程序模块
有了运行应用程序所需的所有必要包,让我们继续创建应用程序模块。为了构建一个干净且易于维护的应用程序,您将为该应用程序中实现的所有功能生成单独的模块。由于这是一个电子商务应用程序,您将拥有身份验证、购物车、产品和订单。所有这些都将在各自的模块中。让我们从身份验证模块开始。
创建身份验证模块
使用以下命令生成身份验证模块:
nest g module auth复制
上面的命令在项目的src目录中创建一个auth文件夹,其中包含必要的样板文件,并在项目根模块(app.module.ts文件)中注册该模块。
接下来,使用以下命令创建产品、购物车、订单和模块:
#Create a product module nest g module product #Create cart module nest g module cart #Create cart module nest g module order复制
以上内容将在项目的src文件夹中创建一个包含基本样板的产品、购物车和订单文件夹,并在项目的根应用程序模块中注册这些模块。
设置TypeORM和SQLite数据库
安装了应用程序模块后,设置TypeORM将应用程序连接到SQLite数据库并创建模块实体。要开始,请打开应用程序。单元并使用以下代码段配置SQLite数据库:
imports: [ … TypeOrmModule.forRoot({ type :"sqlite", database: "shoppingDB", entities: [__dirname + "/**/*.entity{.ts,.js}"], synchronize: true }) ], …复制
在上面的代码段中,您使用Typeform forRoot将应用程序连接到SQLite数据库,指定了数据库类型、数据库名称以及Nestjs可以找到模型实体的位置。
服务器刷新后,您应该会看到在该项目的根目录中创建的shoppingDB文件。
创建应用实体模型
通过数据库设置,让我们为应用程序模块创建实体模型。我们将从auth模块开始。使用以下命令在auth module文件夹中生成实体文件:
nest generate class auth/user.entity –flat复制
然后添加以下代码段以定义用户表属性:
import { Entity, OneToOne, JoinColumn,Column, CreateDateColumn, UpdateDateColumn, PrimaryGeneratedColumn, OneToMany } from 'typeorm' import { CartEntity } from 'src/cart/cart.entity' import { OrderEntity } from 'src/order/order.entity' @Entity() export class Users { @PrimaryGeneratedColumn() id: number @Column() username: string @Column() password: string @Column() role: string @CreateDateColumn() createdAt : String @UpdateDateColumn() updtedAt : String @OneToMany(type => CartEntity, cart => cart.id) @JoinColumn() cart: CartEntity[] @OneToOne(type => OrderEntity, order => order.id) @JoinColumn() order : OrderEntity; }复制
在代码段中,您导入了设置数据库表所需的装饰器。您还导入了稍后将创建的Carentity和orderEntity类。使用Typeform装饰器,我们定义了用户模型的数据库属性。最后,我们在用户实体和CarteEntity和orderEntity之间创建了一对一和一对多的关系。这样,您可以将购物车项目与用户关联。这同样适用于用户的订单。
接下来,使用以下命令创建产品实体类:
nest generate class product/product.entity –flat复制
上述命令将生成产品。实体产品模块文件夹中的ts文件。
现在,使用以下代码段配置产品表属性:
import { Entity, JoinColumn, OneToMany, Column, CreateDateColumn, UpdateDateColumn, PrimaryGeneratedColumn } from 'typeorm' import { CartEntity } from 'src/cart/cart.entity' @Entity() export class ProductEntity { @PrimaryGeneratedColumn("uuid") id!: number @Column() name: string @Column() price: number @Column() quantity: string @CreateDateColumn() createdAt: String @UpdateDateColumn() updtedAt: String @OneToMany(type => CartEntity, cart => cart.id) @JoinColumn() cart: CartEntity[] }复制
在上面的代码片段中,我们配置了产品表的属性,并创建了与购物车实体的一对多关系。
然后使用以下命令创建购物车实体:
nest generate class cart/cart.entity –flat复制
上述命令将生成购物车。实体购物车模块文件夹中的ts文件。现在,将下面的代码段添加到您创建的文件中,以配置购物车表属性。
import { Entity, OneToOne,ManyToOne, JoinColumn, Column, PrimaryGeneratedColumn } from 'typeorm' import { OrderEntity } from 'src/order/order.entity' import { ProductEntity } from 'src/product/product.entity' import { Users } from 'src/auth/user.entity' @Entity() export class CartEntity { @PrimaryGeneratedColumn('uuid') id: number @Column() total: number @Column() quantity: number @ManyToOne(type => ProductEntity, order => order.id) @JoinColumn() item: ProductEntity @ManyToOne(type => Users, user => user.username) @JoinColumn() user: Users }复制
在上面的代码段中,您配置了购物车表的属性,创建了购物车实体之间的多对一关系以及与用户实体的多对一关系。
最后,使用以下命令创建订单实体:
nest generate class order/order.entity –flat复制
上述命令将生成订单。实体订单模块文件夹中的ts文件,打开订单。实体并使用以下命令配置数据库表:
import { Entity, OneToMany, JoinColumn, OneToOne, Column, PrimaryGeneratedColumn } from 'typeorm' import { ProductEntity } from 'src/product/product.entity'; import { Users } from 'src/auth/user.entity'; @Entity() export class OrderEntity { @PrimaryGeneratedColumn('uuid') id: number @OneToMany(type => ProductEntity, item => item.id) items: ProductEntity[]; @OneToOne(type => Users, user => user.username) @JoinColumn() user : Users; @Column() subTotal: number @Column({ default: false }) pending: boolean }复制
在上面的代码段中,您创建了用户实体之间的一对一关系以及与产品实体之间的一对多关系。
此时,您的数据库实体已设置并连接。现在,创建业务逻辑来存储这些实体上的记录。
创建应用程序服务
现在,为该应用程序中的模块创建服务。在这里,您将允许管理员将产品添加到产品表,验证用户,允许用户将商店中的产品添加到购物车,并通过购物车订购产品。
创建身份验证服务
要创建身份验证服务,请运行下面的命令为身份验证模块生成服务。
nest generate service auth/service/auth --flat复制
上述命令将在src/auth/service文件夹中生成auth.service.ts文件。现在打开auth.service.ts并在下面添加代码段:
import { Injectable, HttpException, HttpStatus } from '@nestjs/common'; import { InjectRepository } from '@nestjs/typeorm'; import { Repository } from 'typeorm'; import { Users } from '../user.entity'; import * as bcrypt from 'bcrypt'; import { JwtService } from '@nestjs/jwt'; @Injectable() export class AuthService { constructor(@InjectRepository(Users) private userRepository: Repository<Users>, private jwt: JwtService) { } }复制
在上面的代码段中,您导入了InjectRepository、Repository decorator、JwtService和bcrypt模块。然后,使用InjectRepository装饰器,您使用户实体类在身份验证服务中可用,从而提供了在用户实体中执行CRUD操作的方法。
然后创建一个注册方法,允许用户使用以下代码段在应用程序中注册:
async signup(user: Users): Promise<Users> { const salt = await bcrypt.genSalt(); const hash = await bcrypt.hash(user.password, salt); user.password = hash return await this.userRepository.save(user); }复制
现在创建validateUser方法来验证用户的详细信息,创建login方法来为经过身份验证的用户生成jwt令牌。
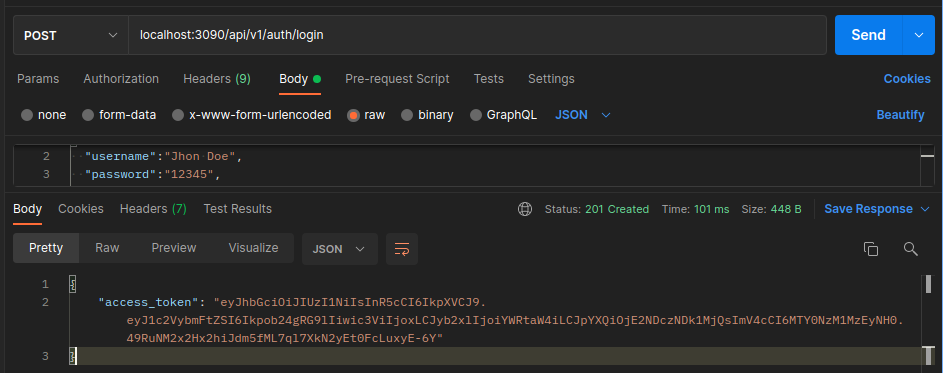
… async validateUser(username: string, password: string): Promise<any> { const foundUser = await this.userRepository.findOne({ username }); if (foundUser) { if (await bcrypt.compare(password, foundUser.password)) { const { password, ...result } = foundUser return result; } return null; } return null } async login(user: any) { const payload = { username: user.username, sub: user.id, role:user.role }; return { access_token: this.jwt.sign(payload), }; }复制
现在我们可以实现我们的Passport本地身份验证策略。创建一个名为local.strategu.ts的文件并添加以下代码:
import { Strategy } from 'passport-local'; import { PassportStrategy } from '@nestjs/passport'; import { Injectable, UnauthorizedException } from '@nestjs/common'; import { AuthService } from './service/auth.service'; @Injectable() export class LocalStrategy extends PassportStrategy(Strategy) { constructor(private authService: AuthService) { super(); } async validate(username: string, password: string): Promise<any> { const foundUser = await this.authService.validateUser(username, password); if (!foundUser) { throw new UnauthorizedException(); } return foundUser; } }复制
在上面的代码片段中,您已经实现了passport本地策略。没有配置选项,因此我们的构造函数只调用super(),而没有options对象。
您还实现了validate()方法。Passport将使用适当的策略特定参数集为每个策略调用验证函数。对于本地策略,Passport需要一个具有以下签名的validate()方法:validate(用户名:string,密码:string):any。
然后创建jwt身份验证。警卫ts文件,并使用下面的代码段定义自定义auth guard:
import { Injectable } from '@nestjs/common'; import { AuthGuard } from '@nestjs/passport'; @Injectable() export class LocalAuthGuard extends AuthGuard('local') {} You'll use the AuthGuard created in the code snippet to protect your API routes from unauthorized users. Now create a jwt-strategy file in the auth module folder to authenticate users and generate jwt tokens for logged in users with the code snippet below: import { ExtractJwt, Strategy } from 'passport-jwt'; import { PassportStrategy } from '@nestjs/passport'; import { Injectable } from '@nestjs/common'; import { jwtConstants } from './constants'; @Injectable() export class JwtStrategy extends PassportStrategy(Strategy) { constructor() { super({ jwtFromRequest: ExtractJwt.fromAuthHeaderAsBearerToken(), ignoreExpiration: false, secretOrKey: jwtConstants.secret, }); } async validate(payload: any) { return { userId: payload.sub, username: payload.username, role: payload.role }; } }复制
然后在auth中配置JWT模块。单元验证模块文件夹中的ts文件。在此之前,创建一个常数。在同一auth module文件夹中的ts文件,用以下代码段定义JWT密码:
export const jwtConstants = { secret: 'wjeld-djeuedw399e3-uejheuii33-4jrjjejei3-rjdjfjf', }复制
您可以在生产中生成更安全的JWT机密,但为了演示起见,我们将使用该机密。
现在在auth中导入所有必需的模块。单元包含以下代码段的ts文件:
… import { JwtModule } from '@nestjs/jwt'; import { jwtConstants } from './constants'; import { JwtStrategy } from './jwt.strategy'; import { PassportModule } from '@nestjs/passport'; import { LocalStrategy } from './local.strategy'; import { TypeOrmModule } from '@nestjs/typeorm'; import { Users } from './user.entity'; …复制
然后在导入数组中,使用以下代码段配置JWT:
… imports: [ PassportModule, JwtModule.register({ secret: jwtConstants.secret, signOptions: { expiresIn: '60m' }, }), …复制
在上面的代码片段中,我们添加了PassModule包,以允许Passport处理用户的身份验证,并使用JwtModule register方法配置了JWT。我们传递在常数文件中创建的秘密,并指定生成的令牌的过期时间(您可以根据用例减少或增加时间)。
创建产品服务
使用auth service设置,使用以下命令生成产品服务:
nest generate service product/service/product复制
现在打开产品。服务在产品模块中由上述命令生成的ts文件,并添加以下代码段:
import { Injectable, UnauthorizedException } from '@nestjs/common'; import { ProductEntity } from '../product.entity'; import { Repository, UpdateResult, DeleteResult } from 'typeorm'; import { InjectRepository } from '@nestjs/typeorm'; import { Users } from 'src/auth/user.entity'; @Injectable() export class ProductsService { constructor(@InjectRepository(ProductEntity) private productRepository: Repository<ProductEntity>) { } async getAll(): Promise<ProductEntity[]> { return await this.productRepository.find() } async create(product: ProductEntity, user: Users): Promise<ProductEntity> { if (user.role == 'admin') { return await this.productRepository.save(product); } throw new UnauthorizedException(); } async getOne(id: number): Promise<ProductEntity> { return this.productRepository.findOne(id); } async update(id: number, product: ProductEntity, user: Users): Promise<UpdateResult> { if (user.role == 'admin') { return await this.productRepository.update(id, product); } throw new UnauthorizedException(); } async delete(id: number, user: Users): Promise<DeleteResult> { if (user.role == 'admin') { return await this.productRepository.delete(id); } throw new UnauthorizedException(); } }复制
在上面的代码片段中,我们创建了CRUD服务。创建、更新和删除方法对用户有限制。只有管理员可以创建产品、删除或更新产品。
现在打开产品。单元并使用以下代码段访问产品实体:
imports: [TypeOrmModule.forFeature([ProductEntity])],复制
创建购物车服务
此时,管理员可以将产品添加到数据库中,经过身份验证的用户可以看到所有可用的产品。现在,让我们允许用户将他们喜欢的项目添加到购物车中。要开始,请使用以下命令生成购物车服务:
nest generate service cart/service/cart –flat复制
然后打开购物车。服务由命令生成的ts文件,并添加以下代码段:
import { Injectable } from '@nestjs/common'; import { Repository } from 'typeorm'; import { InjectRepository } from '@nestjs/typeorm'; import { CartEntity } from '../cart.entity'; import { ProductsService } from 'src/product/service/products.service'; import { Users } from 'src/auth/user.entity'; @Injectable() export class CartService { constructor( @InjectRepository(CartEntity) private cartRepository: Repository<CartEntity>, @InjectRepository(Users) private userRepository: Repository<Users>, private productsService: ProductsService, ) { } …复制
您导入了创建嵌套所需的模块。上述代码段中的js服务。我们还在这里导入了它们,因为您在购物车、用户和产品实体之间创建了关系。然后,创建一个构造函数方法,将这些实体绑定到CartService类。现在创建一个方法,将项目添加到购物车。
async addToCart(productId: number, quantity: number, user: string): Promise<any> { const cartItems = await this.cartRepository.find({ relations: ["item",'user'] }); const product = await this.productsService.getOne(productId); const authUser = await this.userRepository.findOne({ username: user }) //Confirm the product exists. if (product) { //confirm if user has item in cart const cart = cartItems.filter( (item) => item.item.id === productId && item.user.username === user, ); if (cart.length < 1) { const newItem = this.cartRepository.create({ total: product.price * quantity, quantity }); newItem.user = authUser; newItem.item = product; this.cartRepository.save(newItem) return await this.cartRepository.save(newItem) } else { //Update the item quantity const quantity = (cart[0].quantity += 1); const total = cart[0].total * quantity; return await this.cartRepository.update(cart[0].id, { quantity, total }); } } return null; }复制
在上面的代码段中,您创建了一个addToCart方法,该方法将productId、quantity和user作为参数。然后检查用户的购物车中是否已经有该项目。如果是这样,则增加数量并更新该项目的总价。否则,您将该项目添加到用户的购物车中。
接下来,通过在购物车中注册cartEntity、productEntity用户实体和productService,使其可以在cartService中访问。单元包含以下代码段的ts文件:
… import { CartEntity } from './cart.entity'; import { ProductsService } from 'src/product/service/products.service'; import { ProductEntity } from 'src/product/product.entity'; import { Users } from 'src/auth/user.entity'; @Module({ imports: [TypeOrmModule.forFeature([CartEntity, ProductEntity, Users])], providers: [CartService, ProductsService], … })复制
最后,创建一个getItemsInCart方法,该方法将用户作为参数来返回属于特定用户的所有Cart。
async getItemsInCard(user: string): Promise<CartEntity[]> { const userCart = await this.cartRepository.find({ relations: ["item",'user'] }); return (await userCart).filter(item => item.user.username === user) }复制
创建订单服务
当用户完成购物后,他们可以在购物车中订购商品。使用以下命令生成订单服务:
nest generate service order/service/order –flat复制
现在打开订单。服务运行上述命令生成的ts文件,并添加以下代码段:
import { OrderEntity } from '../order.entity'; import { Repository } from 'typeorm'; import { InjectRepository } from '@nestjs/typeorm'; import { CartService } from 'src/cart/service/cart.service'; import { Users } from 'src/auth/user.entity'; @Injectable() export class OrderService { constructor(@InjectRepository(OrderEntity) private orderRepository: Repository<OrderEntity>, @InjectRepository(Users) private userRepository: Repository<Users>, private cartService: CartService) { }复制
您导入了创建嵌套所需的模块。上述代码段中的js服务。我们还在这里导入了它们,因为您在购物车、用户和产品实体之间创建了关系。然后,您创建了一个构造函数方法,将这些实体绑定到OrderService类。现在创建一个方法来订购用户购物车中的物品。
… async order(user: string): Promise<any> { //find user existing orders const usersOrder = await this.orderRepository.find({ relations: ['user'] }); const userOrder = usersOrder.filter(order => order.user?.username === user && order.pending === false); //find user's cart items const cartItems = await this.cartService.getItemsInCard(user) const subTotal = cartItems.map(item => item.total).reduce((acc, next) => acc + next); //get the authenticated user const authUser = await this.userRepository.findOne({ username: user }) //if users has an pending order - add item to the list of order const cart = await cartItems.map(item => item.item); if (userOrder.length === 0) { const newOrder = await this.orderRepository.create({ subTotal }); newOrder.items = cart newOrder.user = authUser; return await this.orderRepository.save(newOrder); } else { const existingOrder = userOrder.map(item => item) await this.orderRepository.update(existingOrder[0].id, { subTotal: existingOrder[0].subTotal + cart[0].price }); return { message: "order modified" } } } …复制
然后创建另一个方法,从数据库的订单数组中获取用户订单,代码段如下:
… async getOrders(user: string): Promise<OrderEntity[]> { const orders = await this.orderRepository.find({ relations: ['user'] }); return orders.filter(order => order.user?.username === user) } }复制
最后,打开订单。单元ts文件,并使用以下代码段在orderService中访问用户、产品和购物车实体:
import { TypeOrmModule } from '@nestjs/typeorm'; import { OrderEntity } from './order.entity'; import { ProductEntity } from 'src/product/product.entity'; import { CartService } from 'src/cart/service/cart.service'; import { CartEntity } from 'src/cart/cart.entity'; import { Users } from 'src/auth/user.entity'; import { ProductsService } from 'src/product/service/products.service'; @Module({ imports: [TypeOrmModule.forFeature([OrderEntity, ProductEntity, CartEntity, Users])], controllers: [OrderController], providers: [OrderService, CartService, ProductsService] })复制
创建应用程序控制器
成功创建应用程序服务后,让我们为应用程序服务创建API路由。
创建身份验证控制器
使用以下命令生成auth控制器:
nest generate controller auth/controller/auth –flat复制
现在打开auth.controller.ts。运行上述命令生成的ts文件,并使用以下代码段配置身份验证路由:
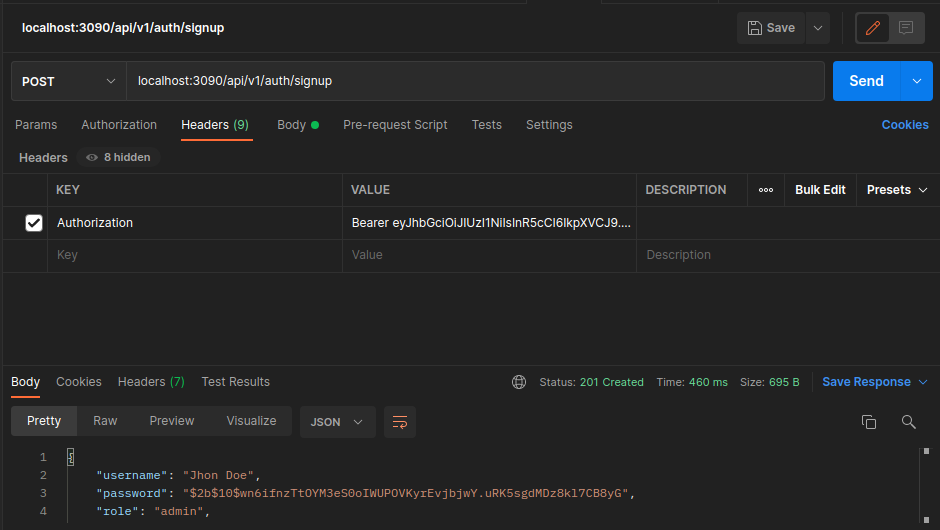
import { Controller, Request, Post, UseGuards, Body } from '@nestjs/common'; import { AuthGuard } from '@nestjs/passport'; import { AuthService } from '../service/auth.service'; import { Users } from '../user.entity'; @Controller('api/v1/auth/') export class AuthController { constructor(private usersService: AuthService) { } @Post('signup') async signup(@Body() user: Users): Promise<Users> { return this.usersService.signup(user); } @UseGuards(AuthGuard('local')) @Post('login') async login(@Request() req) { return this.usersService.login(req.user) } }复制
创建产品控制器
配置验证控制器路由后,使用以下命令生成产品控制器:
nest generate controller product/controller/product –flat复制
打开product.controlle.ts文件。运行上述命令生成的ts文件,并使用以下代码段配置产品路线:
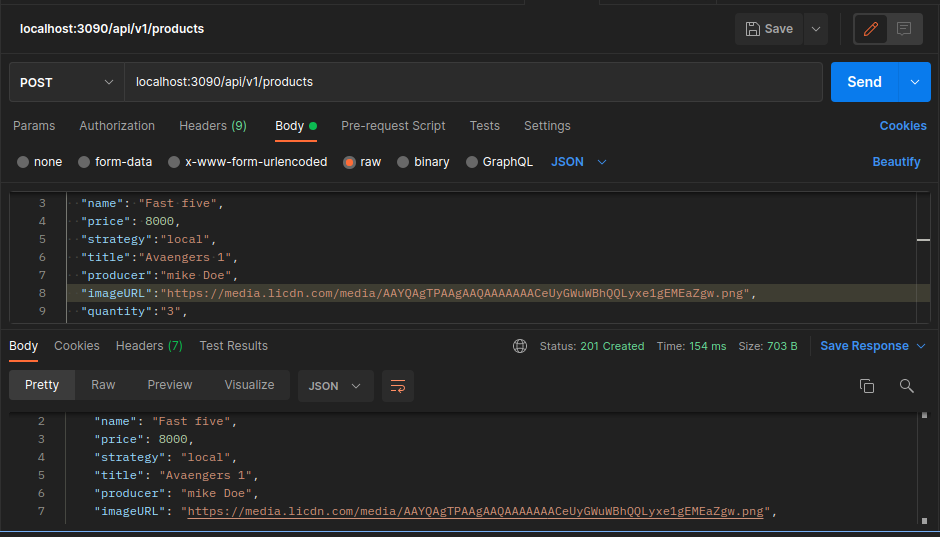
import { Controller, Post, Get, Put, Delete, Param, Request, Body, UseGuards } from '@nestjs/common'; import {UpdateResult, DeleteResult} from 'typeorm'; import { ProductsService } from '../service/products.service'; import { ProductEntity } from '../product.entity'; import { JwtAuthGuard } from 'src/auth/jwt-auth.guard'; @Controller('api/v1/products') export class ProductsController { constructor(private productsService: ProductsService) { } @UseGuards(JwtAuthGuard) @Get() async GetAll(): Promise<ProductEntity[]> { return await this.productsService.getAll(); } @UseGuards(JwtAuthGuard) @Post() async Create(@Request() req, @Body() product: ProductEntity): Promise<ProductEntity> { return await this.productsService.create(product, req.user); } @UseGuards(JwtAuthGuard) @Get(':id') async GetOne(@Param() id: number): Promise<ProductEntity> { return await this.productsService.getOne(id); } @UseGuards(JwtAuthGuard) @Put(':id') async Update(@Param() id: number, @Body() product: ProductEntity, @Request() req): Promise<UpdateResult> { return await this.productsService.update(id, product, req.user); } @UseGuards(JwtAuthGuard) @Delete(':id') async Delete(@Param() id: number, @Request() req): Promise<DeleteResult> { return await this.productsService.delete(id, req.user); } }复制
在上面的代码段中,您为产品服务定义了CRUD路由。我们使用UseGuard装饰器传递JwtAuthGaurd来保护路由免受未经授权的用户的攻击。
创建购物车控制器
现在使用以下命令生成购物车控制器:
nest generate controller cart/controller/cart –flat复制
然后打开cart.controller.ts。运行上述命令生成的ts文件,并使用以下代码段配置购物车路线:
import { Controller, Post, Get,Request, Delete, Body, UseGuards } from '@nestjs/common'; import { CartService } from '../service/cart.service'; import { CartEntity } from '../cart.entity'; import { JwtAuthGuard } from 'src/auth/jwt-auth.guard'; @Controller('api/v1/cart') export class CartController { constructor(private cartService: CartService) { } @UseGuards(JwtAuthGuard) @Post() async AddToCart(@Body() body, @Request() req): Promise<void> { const { productId, quantity } = body return await this.cartService.addToCart(productId, quantity, req.user.username); } @UseGuards(JwtAuthGuard) @Get() async getItemsInCart(@Request() req): Promise<CartEntity[]> { return await this.cartService.getItemsInCard(req.user.username); } }复制
创建订单控制器
配置购物车路线后,使用以下命令创建订单控制器:
nest generate controller order/controller/order –flat复制
然后打开order.controlle.ts。运行上述命令生成的ts文件,并使用以下代码段配置购物车路线:
import { Controller, Post, Get, Request, UseGuards } from '@nestjs/common'; import { OrderService } from '../service/order.service' import { OrderEntity } from '../order.entity'; import { JwtAuthGuard } from 'src/auth/jwt-auth.guard'; @Controller('api/v1/order') export class OrderController { constructor(private orderService: OrderService) { } @UseGuards(JwtAuthGuard) @Post() async order(@Request() req): Promise<any> { return this.orderService.order(req.user.username) } @UseGuards(JwtAuthGuard) @Get() async getOrders(@Request() req): Promise<OrderEntity[]> { return await this.orderService.getOrders(req.user.username) } }复制
此时,您的所有API路由都已配置。
测试应用程序
现在让我们用邮递员测试一下。come测试结果如下所示。
您可以在Github上测试其他路由,并在这里使用代码。
将Arctype连接到SQLite数据库
Arctype是一个SQL客户端和数据库管理工具,使用起来很有趣。它允许您对数据库表进行可视化表示,并且可以使用Arctype在数据库中执行CRUD操作目录。将Arctype连接到SQLite数据库是一个简单的过程。要开始,请执行以下步骤:
首先,启动Arctype。您将看到如下屏幕,允许您添加凭据。
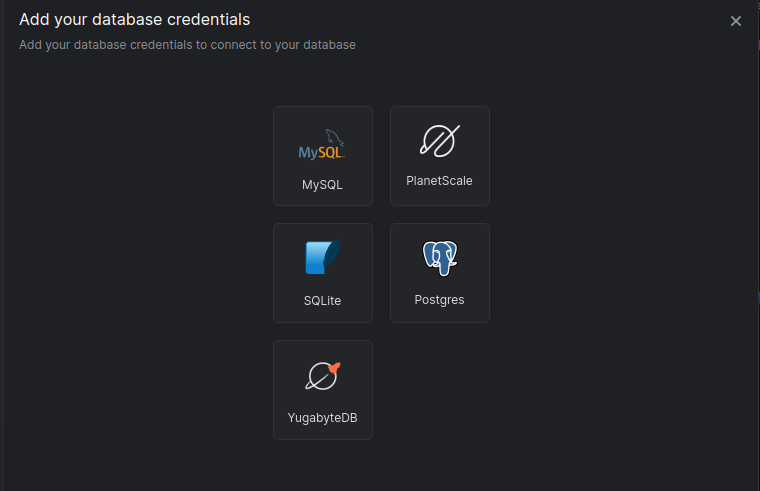
单击SQLite选项卡。这将出现下面的屏幕。

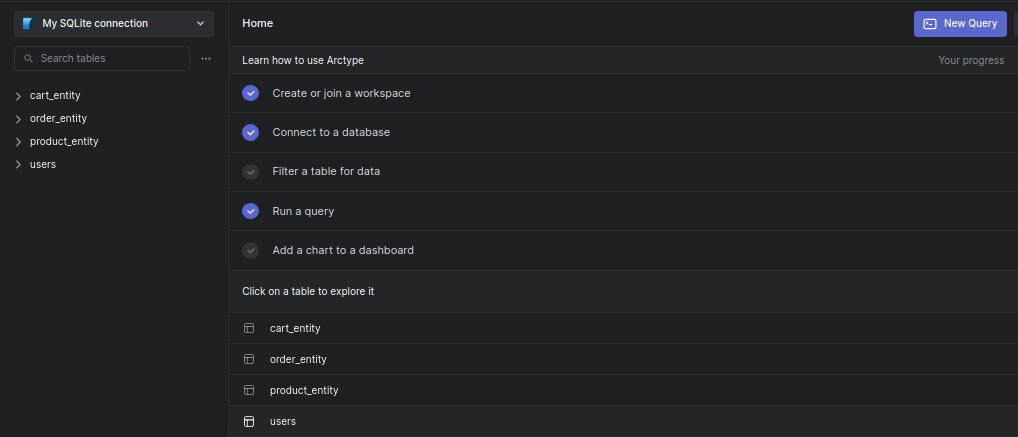
单击“选择SQLite文件”按钮并导航到项目文件夹。选择应用程序数据库文件并按下“打开”按钮。按save按钮,您将看到您的数据库实体,如下面的屏幕截图所示。
结论
通过构建一个演示项目,我们学习了如何使用Nestjs和SQLite数据库制作一个电子商务应用程序。首先,我们从介绍NestJS开始。然后,我们创建了一个NestJS应用程序,使用TypeORM将该应用程序连接到SQLite数据库,并执行CRUD操作。现在,您已经获得了所需的知识,可以随意为应用程序添加额外的功能。
原文标题:Building an E-Commerce API Using Nestjs, SQLite, and TypeORM
原文作者:Clara Ekekenta
原文链接:https://dzone.com/articles/building-an-e-commerce-api-using-nestjs-sqlite-and


