Terraform是一个开源IT基础架构自动化编排工具,支持"Infrastructure as Code"基础架构即代码,由HashiCorp公司创建。Terraform几乎可以支持所有市面上常见的云服务,包括OCI(Oracle Cloud Infrastructure)。Terraform 是一种声明性编码工具,使用配置语言来描述用于运行应用程序所需的云或本地基础设施。然后,它生成一个达到该最终状态的计划,并执行该计划。由于Terraform使用简单的语法,可以跨多个云和本地数据中心提供基础设施,并且能够安全高效地根据配置变化重新提供基础设施,因此它是目前最流行的基础设施自动化工具之一。
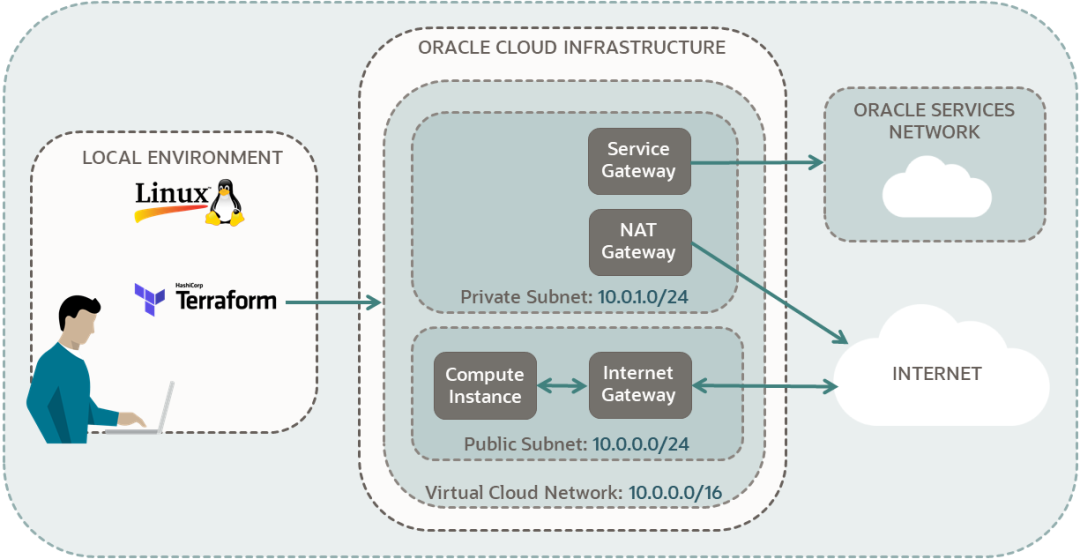
本文介绍如何使用Terraform访问OCI服务,并OCI上创建一套基础架构,包括:
VCN
Private Subnet
Public Subnet
Service Gateway
NAT Gateway
Internet Gateway
Secutity List
计算实例
具体架构如下:
1. 安装Terraform
Terraform安装非常简单,在本文中以Oracle Linux为例,从
https://releases.hashicorp.com/terraform/0.14.7/terraform_0.14.7_linux_amd64.zip
下载zip文件,并解压到合适的路径。在本文中以Oracle Linux为例,把解压文件复制到/usr/local/bin目录。安装完成后,检查你的Terraform版本,当前最新的版本是v0.14.7
terraform -vTerraform v0.14.7+ provider registry.terraform.io/hashicorp/oci v4.15.0复制
2. 配置Terraform访问OCI
Terraform依靠称为“provider”的插件与远程系统进行交互,Terraform配置必须声明它们需要哪些提供程序,以便Terraform可以安装和使用它们。Oracle Cloud Infrastructure提供程序用于与Oracle Cloud Infrastructure支持的许多资源进行交互。需要为提供程序配置Oracle Cloud Infrastructure帐户的凭据。具体信息可以查看
https://registry.terraform.io/providers/hashicorp/oci/latest/docs 获得。
创建RSA密钥,用于OCI资源访问的身份认证
创建.oci目录
mkdir $HOME/.oci复制
生成PEM格式的2048 bit的私钥
openssl genrsa -out $HOME/.oci/<your-rsa-key-name>.pem 2048复制
赋予私钥读写权限
chmod 600 $HOME/.oci/<your-rsa-key-name>.pem复制
生成公钥
openssl rsa -pubout -in $HOME/.oci/<your-rsa-key-name>.pem -out $HOME/.oci/<your-rsa-key-name>_public.pem复制
在终端窗口中复制公钥内容复制
cat $HOME/.oci/<your-rsa-key-name>_public.pem
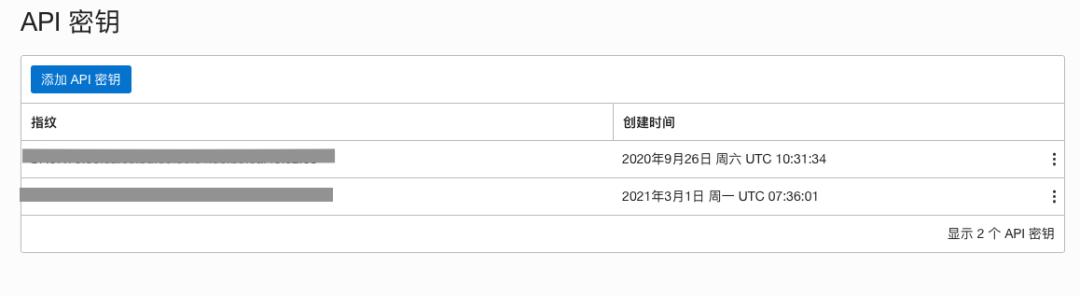
在OCI管理控制台中,设置用户的API密钥,用于通过API方式访问OCI资源
在管理控制台中访问 用户设置
在页面的左下角点击 API密钥
点击 添加API密钥
在添加密钥的页面选择"粘贴公共密钥",并粘贴刚刚复制的密钥,完成密钥的添加
保留生成的API密钥的指纹用于后面的配置
创建 provider
创建你的项目目录,例如目录命名为tf-test。注意:Terraform运行时会读取工作目录中所有的 *.tf, *.tfvars文件,所以我们可以为一个项目创建多个tf文件。
mkdir tf-test复制
在目录中创建 provider.tf 文件,内容如下:
provider "oci"{ tenancy_ocid = var.tenancy_ocid user_ocid = var.user_ocid private_key_path = var.private_key_path fingerprint = var.fingerprint region = var.region}复制
3. 使用Terraform管理OCI资源
Terraform资源定义
在Terraform中,使用resource和data source来定义和描述资源。同时对于某些常用的资源组合我们可以定义到module中方便使用。
resource是Teraform中最重要的组成元素,每个resource块代表一个或多个云产品实例
data source用来查询一些资源的信息
module是Terraform为了管理单元化资源而设计的,是子节点,子资源,子架构模板的整合和抽象。包含架构中涉及到的资源,可以在不同的项目中反复使用
本文中使用Oracle官方提供的VCN模版来定义VCN及其相关资源,具体模版信息和代码请参考
https://github.com/oracle-terraform-modules/terraform-oci-vcn
获得项目的间隔信息
创建compartment.tf文件,查询本项目使用的间隔名称,输出到用户界面
data "oci_identity_compartment" "tf-compartment" { # Required id = var.compartment_ocid }复制
创建outputs.tf文件,定义输出内容
# Outputs for compartmentoutput "compartment-name" { description = "The name of the Compartment where the VCN is located" value = data.oci_identity_compartment.tf-compartment.name}output "compartment-OCID" { description = "The id of the Compartment where the VCN is located" value = oci_identity_compartment.tf-compartment.id}复制
查询项目相关的资源信息,用于创建指定的资源
创建availability_domains.tf,查询可用域信息,用于创建计算实例
data "oci_identity_availability_domains" "ads" { compartment_id = var.compartment_ocid}复制
把下列内容追加到outputs.tf中
# Outputs for availability_domainsoutput "availability-domains" { description = "The name of the availability_domains where the resource is located" value = data.oci_identity_availability_domains.ads.availability_domains[0].name}复制
创建vcn
创建vcn使用Oracle定义的vcn module
下载
https://github.com/oracle-terraform-modules/terraform-oci-vcn/archive/v2.0.0.zip 并unzip到指定的目录。本文中路径为./modules/vcn
编写vcn.tf用于创建一个指定CIDR的VCN,并创建和绑定internet_gateway、nat_gateway和service_gateway
module "vcn"{ source = "./modules/vcn" # Required compartment_id = var.compartment_ocid region = var.region vcn_name = "${var.prefix}-vcn" vcn_dns_label = var.prefix # Optional internet_gateway_enabled = true nat_gateway_enabled = true service_gateway_enabled = true vcn_cidr = var.vcn_cidr}复制
把下列内容追加到outputs.tf中
# Outputs for the vcn module
output "vcn-id" { description = "OCID of the VCN that is created" value = module.vcn.vcn_id}output "id-for-route-table-that-includes-the-internet-gateway" { description = "OCID of the internet-route table. This route table has an internet gateway to be used for public subnets" value = module.vcn.ig_route_id}output "nat-gateway-id" { description = "OCID for NAT gateway" value = module.vcn.nat_gateway_id}output "id-for-for-route-table-that-includes-the-nat-gateway" { description = "OCID of the nat-route table - This route table has a nat gateway to be used for private subnets. This route table also has a service gateway." value = module.vcn.nat_route_id}复制
创建公共和私有子网,极其相关的安全列表,支持来自于互联网的SSH访问
编写下列文件用于创建相关资源
private-security-list.tf
resource "oci_core_security_list" "private-security-list"{ # Required compartment_id = var.compartment_ocid vcn_id = module.vcn.vcn_id # Optional display_name = "${var.prefix}-security-list-for-private-subnet" egress_security_rules { stateless = false destination = var.vcn_cidr destination_type = "CIDR_BLOCK" protocol = "all" } ingress_security_rules { stateless = false source = var.vcn_cidr source_type = "CIDR_BLOCK" # Get protocol numbers from https://www.iana.org/assignments/protocol-numbers/protocol-numbers.xhtml TCP is 6 protocol = "6" tcp_options { min = 22 max = 22 } } ingress_security_rules { stateless = false source = var.internet_cidr source_type = "CIDR_BLOCK" # Get protocol numbers from https://www.iana.org/assignments/protocol-numbers/protocol-numbers.xhtml ICMP is 1 protocol = "1" # For ICMP type and code see: https://www.iana.org/assignments/icmp-parameters/icmp-parameters.xhtml icmp_options { type = 3 code = 4 } } ingress_security_rules { stateless = false source = var.vcn_cidr source_type = "CIDR_BLOCK" # Get protocol numbers from https://www.iana.org/assignments/protocol-numbers/protocol-numbers.xhtml ICMP is 1 protocol = "1" # For ICMP type and code see: https://www.iana.org/assignments/icmp-parameters/icmp-parameters.xhtml icmp_options { type = 3 } }}复制
public-security-list.tf
resource "oci_core_security_list" "public-security-list"{ # Required compartment_id = var.compartment_ocid vcn_id = module.vcn.vcn_id # Optional display_name = "${var.prefix}-security-list-for-public-subnet" egress_security_rules { stateless = false destination = var.vcn_cidr destination_type = "CIDR_BLOCK" protocol = "all" } ingress_security_rules { stateless = false source = var.internet_cidr source_type = "CIDR_BLOCK" # Get protocol numbers from https://www.iana.org/assignments/protocol-numbers/protocol-numbers.xhtml TCP is 6 protocol = "6" tcp_options { min = 22 max = 22 } } ingress_security_rules { stateless = false source = var.internet_cidr source_type = "CIDR_BLOCK" # Get protocol numbers from https://www.iana.org/assignments/protocol-numbers/protocol-numbers.xhtml ICMP is 1 protocol = "1" # For ICMP type and code see: https://www.iana.org/assignments/icmp-parameters/icmp-parameters.xhtml icmp_options { type = 3 code = 4 } } ingress_security_rules { stateless = false source = var.vcn_cidr source_type = "CIDR_BLOCK" # Get protocol numbers from https://www.iana.org/assignments/protocol-numbers/protocol-numbers.xhtml ICMP is 1 protocol = "1" # For ICMP type and code see: https://www.iana.org/assignments/icmp-parameters/icmp-parameters.xhtml icmp_options { type = 3 } }}复制
vcn-public-subnet.tf
resource "oci_core_subnet" "vcn-public-subnet"{ # Required compartment_id = var.compartment_ocid vcn_id = module.vcn.vcn_id cidr_block = var.public_subnet_cidr # Optional route_table_id = module.vcn.ig_route_id security_list_ids = [oci_core_security_list.public-security-list.id] display_name = "${var.prefix}-public-subnet"}复制
vcn-private-subnet.tf
resource "oci_core_subnet" "vcn-private-subnet"{ # Required compartment_id = var.compartment_ocid vcn_id = module.vcn.vcn_id cidr_block = var.private_subnet_cidr # Optional # Caution: For the route table id, use module.vcn.nat_route_id. # Do not use module.vcn.nat_gateway_id, because it is the OCID for the gateway and not the route table. route_table_id = module.vcn.nat_route_id security_list_ids = [oci_core_security_list.private-security-list.id] display_name = "${var.prefix}-private-subnet"}复制
把下列内容追加到outputs.tf中
# Outputs for private security listoutput "private-security-list-name" { value = oci_core_security_list.private-security-list.display_name}output "private-security-list-OCID" { value = oci_core_security_list.private-security-list.id}# Outputs for public security listoutput "public-security-list-name" { value = oci_core_security_list.public-security-list.display_name}output "public-security-list-OCID" { value = oci_core_security_list.public-security-list.id}# Outputs for private subnetoutput "private-subnet-name" { value = oci_core_subnet.vcn-private-subnet.display_name}output "private-subnet-OCID" { value = oci_core_subnet.vcn-private-subnet.id}# Outputs for public subnetoutput "public-subnet-name" { value = oci_core_subnet.vcn-public-subnet.display_name}output "public-subnet-OCID" { value = oci_core_subnet.vcn-public-subnet.id}复制
创建计算实例
创建compute-instance.tf文件,在公共子网中创建一个使用Oracle Linux 7.9操作系统和VM.Standard.E2.1机型的虚拟机实例
resource "oci_core_instance" "tftest_instance" { # Required availability_domain = data.oci_identity_availability_domains.ads.availability_domains[0].name compartment_id = var.compartment_ocid shape = var.shape source_details { source_id = var.image source_type = "image" } # Optional display_name = "${var.prefix}-instance" create_vnic_details { assign_public_ip = true subnet_id = oci_core_subnet.vcn-public-subnet.id } metadata = { ssh_authorized_keys = file(var.ssh-public-key-path) } preserve_boot_volume = false}复制
把下列内容追加到outputs.tf中,输出实例相关信息
# Outputs for compute instance
output "public-ip-for-compute-instance" { value = oci_core_instance.tftest_instance.public_ip}output "instance-name" { value = oci_core_instance.tftest_instance.display_name}output "instance-OCID" { value = oci_core_instance.tftest_instance.id}output "instance-region" { value = oci_core_instance.tftest_instance.region}output "instance-shape" { value = oci_core_instance.tftest_instance.shape}output "instance-state" { value = oci_core_instance.tftest_instance.state}output "instance-OCPUs" { value = oci_core_instance.tftest_instance.shape_config[0].ocpus}output "instance-memory-in-GBs" { value = oci_core_instance.tftest_instance.shape_config[0].memory_in_gbs}output "time-created" { value = oci_core_instance.tftest_instance.time_created}复制
4. 变量定义和赋值
定义variables.tf文件,用于定义项目中用到的变量
variable "tenancy_ocid" {
}variable "user_ocid" {}variable "fingerprint" {}variable "private_key_path" {}variable "region" {}variable "compartment_ocid" {}variable "prefix" {description = "The prefix used for all resources in this example"}variable "vcn_cidr" {}variable "internet_cidr" {}variable "private_subnet_cidr" {}variable "public_subnet_cidr" {}variable "shape" { description = "shape of compute instance"}variable "ssh-public-key-path" { description = "public key for compute instance" }variable "image" {description = "The OCID of an image"}复制
为项目中的变量赋值有以下几种办法
通过读取variables.tf中的变量值,可以在定义变量的时候指定变量的default值;
使用.tfvars文件为变量赋值,在执行terraform -apply的时候指定使用tfvars的名字。名为terraform.tfvars的文件会默认被调用,不需要在执行的时候指定;
通过执行terraform -apply 过程中,直接设置变量值;
本文采用tfvars文件赋值,我们来编辑terraform.tfvars,并把文件保存到跟tf文件同一个目录。由于该文件里很多信息是涉及到帐号安全,请不要上传该文件到公开的网站
```# provider identity parameterstenancy_ocid = “<tenancy-ocid>”user_ocid = “<user-ocid>”private_key_path = "<rsa-private-key-path>"fingerprint = "<fingerprint>"region = <region-identifier># general oci parameterscompartment_ocid = "<compartment_ocid>"# The prefix used for all resources in this exampleprefix = "tftest"vcn_cidr = "10.0.0.0/16"internet_cidr = "0.0.0.0/0"private_subnet_cidr = "10.0.1.0/24"public_subnet_cidr = "10.0.0.0/24"shape = "VM.Standard.E2.1"ssh-public-key-path = "<ssh-public-key-path>"image = "ocid1.image.oc1.iad.aaaaaaaayuihpsm2nfkxztdkottbjtfjqhgod7hfuirt2rqlewxrmdlgg75q"```可以从OCI管理控制台查到下列内容
Tenancy OCID: <tenancy-ocid>
User OCID: <user-ocid>
Region: <region-identifier>
Fingerprint: <fingerprint>
Compartment OCID: <compartment_ocid>
指定通过API访问OCI服务的私钥文件路径,例如;$HOME/.oci/.pem
Private Key Path: <rsa-private-key-path>
创建虚拟机时,可以指定共有密钥,用于通过SSH访问虚拟机的认证
ssh-public-key-path:<ssh-public-key-path>
image OCID可以在Oracle网站上查询获得,注意不同的区域OCID是不同的,Oracle Linux的镜像OCID可以在下面的网址
https://docs.oracle.com/en-us/iaas/images/oraclelinux-7x/
初始化
terraform init输出结果
Initializing modules...Initializing the backend...Initializing provider plugins...- Reusing previous version of hashicorp/oci from the dependency lock file- Using previously-installed hashicorp/oci v4.15.0Terraform has been successfully initialized!
计划
执行下面的命令,制定达到目标的计划
terraform plan输出结果,最终显示计划达到的目标
Plan: 11 to add, 0 to change, 0 to destroy.Changes to Outputs: + availability-domains = "dTZF:US-ASHBURN-AD-1" + compartment-name = "tftest-compartment" + id-for-for-route-table-that-includes-the-nat-gateway = (known after apply) + id-for-route-table-that-includes-the-internet-gateway = (known after apply) + instance-OCID = (known after apply) + instance-OCPUs = (known after apply) + instance-memory-in-GBs = (known after apply) + instance-name = "tftest-instance" + instance-region = (known after apply) + instance-shape = "VM.Standard.E2.1" + instance-state = (known after apply) + nat-gateway-id = (known after apply) + private-security-list-OCID = (known after apply) + private-security-list-name = "tftest-security-list-for-private-subnet" + private-subnet-OCID = (known after apply) + private-subnet-name = "tftest-private-subnet" + public-ip-for-compute-instance = (known after apply) + public-security-list-OCID = (known after apply) + public-security-list-name = "tftest-security-list-for-public-subnet" + public-subnet-OCID = (known after apply) + public-subnet-name = "tftest-public-subnet" + time-created = (known after apply) + vcn-id = (known after apply)应用
执行下面的命令,制定达到目标的计划
terraform apply -auto-approve输出结果,最终显示执行后的实际结果
Apply complete! Resources: 11 added, 0 changed, 0 destroyed.Outputs:availability-domains = "dTZF:US-ASHBURN-AD-1"compartment-name = "tftest-compartment"id-for-for-route-table-that-includes-the-nat-gateway = "ocid1.routetable.oc1.iad.aaaaaaaauo5hsouewxq3slaesc5ru74xw2uohzuk37l7ht5q2d26qpdnpfia"id-for-route-table-that-includes-the-internet-gateway = "ocid1.routetable.oc1.iad.aaaaaaaajmburnzzqeutgpdwqvx3ssyxteolifismwpjji2xcrfy6c7ehdka"instance-OCID = "ocid1.instance.oc1.iad.anuwcljtcuco5yqcdbad3k34hjlkm4vrks7z4gqjylupqb7mkielf3edlrxa"instance-OCPUs = 1instance-memory-in-GBs = 8instance-name = "tftest-instance"instance-region = "iad"instance-shape = "VM.Standard.E2.1"instance-state = "RUNNING"nat-gateway-id = "ocid1.natgateway.oc1.iad.aaaaaaaanu6jwprxzy2dmfutl6wcjgw2zltub6xtiqlzc5tyh7babyjsvevq"private-security-list-OCID = "ocid1.securitylist.oc1.iad.aaaaaaaasy4y2emi37dicfsfv3i5vgyi5p3thdjtck4y22zhkunjcpymjkdq"private-security-list-name = "tftest-security-list-for-private-subnet"private-subnet-OCID = "ocid1.subnet.oc1.iad.aaaaaaaazs5ytmwgo5l62lvjsymkvws6tti7rsrvx2hd2ugehpaskc6ho6mq"private-subnet-name = "tftest-private-subnet"public-ip-for-compute-instance = "158.101.117.63"public-security-list-OCID = "ocid1.securitylist.oc1.iad.aaaaaaaaob5fconsdyv3pzyeywjqacvemsalt6dugamcgfadiydhnsnipjba"public-security-list-name = "tftest-security-list-for-public-subnet"public-subnet-OCID = "ocid1.subnet.oc1.iad.aaaaaaaazkm2dslyn2rrmf5vdp67dkdllczodk7fgrc5vdpducozoyjfsrcq"public-subnet-name = "tftest-public-subnet"time-created = "2021-03-04 10:25:49.526 +0000 UTC"vcn-id = "ocid1.vcn.oc1.iad.amaaaaaacuco5yqas6gjzbeb6jm2csm2kpctq5n6tjwy2amn55wnka7v6zaa"查看OCI管理控制台,对比控制台上的实例信息与上面的输出内容
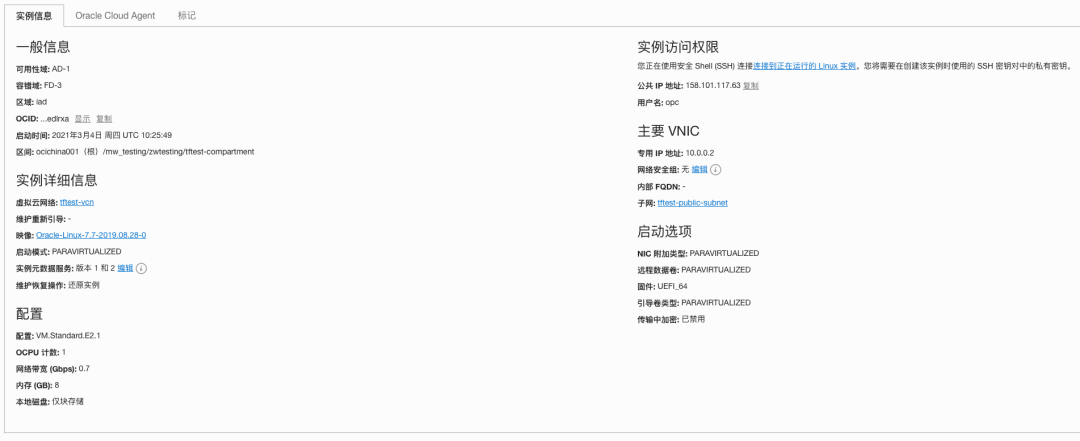
除了使用终端以脚本的形式执行,OCI还支持使用管理控制台的堆栈来部署Terraform模版。相对来说更容易上手,有兴趣的读者可以去试一下。
Terraform支持多平台的云服务,在Oracle Cloud Infrastructure平台上有完善的支持,并包含了大量的Oracle官方的模版,目前provider的更新速度很快,基本每周都会有新版本出现,整个生态非常活跃。如果大家想在Oracle Cloud Infrastructure的管理实践中引入基础设施即代码,相信 Terraform 都不会让你失望。
参考文档
https://docs.oracle.com/en-us/iaas/developer-tutorials/tutorials/home.htm
https://registry.terraform.io/providers/hashicorp/oci/latest/docs
https://github.com/oracle-terraform-modules
https://github.com/terraform-providers/terraform-provider-oci

作者简介
张巍,甲骨文云架构团队资深咨询顾问,专注于甲骨文OCI相关产品及解决方案。具有15+年的中间件及云服务相关技术,产品,方案和项目实施经验。熟悉OCI,AWS,Softlayer等公有云平台。您可以通过wei.m.zhang@oracle.com与他联系。
扫描二维码或点击阅读原文
快速预约精选云解决方案演示