作者:郭奥门
爱可生 DBLE 研发成员,负责分布式数据库中间件的新功能开发,回答社区/客户/内部提出的一般性问题。
本文来源:原创投稿
*爱可生开源社区出品,原创内容未经授权不得随意使用,转载请联系小编并注明来源。
前言
observer 调试有三种⽅法:⽇志,gdb 调试,vscode 调试(本质上是 gdb 或 lldb)。这里我们关注如何借助 vscode 进行调试
调试版本
OB代码基线:开源版本,社区版,3.1.5
github:https://github.com/oceanbase/oceanbase.git
commit id:99777b4bc94d2cfc6be8ae1dce624e46beefad08
调试方式采用本地开发工具+远程 gdb 方式
所需工具:
远程环境
编译
详细可参考:https://github.com/oceanbase/oceanbase/wiki/Build-from-source-code
yum install -y git wget rpm* cpio make glibc-devel glibc-headers binutils m4
cd opt && git clone https://github.com/oceanbase/oceanbase.git
cd oceanbase && git checkout 99777b4bc94d2cfc6be8ae1dce624e46beefad08
curl http://mirrors.aliyun.com/oceanbase/OceanBase.repo
## 修改编译选项
## 注释掉 set(DEBUG_PREFIX "-fdebug-prefix-map=${CMAKE_SOURCE_DIR}=.")
vi cmake/Env.cmake
#时间较长,可以先操作下面的步骤
bash build.sh debug --init --make
#完成后会在当前目录生成build_debug子目录,在build_debug/src/observer目录下会有一个observer二进制文件,此文件为observer的启动文件复制
安装
检查环境
vi etc/security/limits.conf
#追加
root soft nofile 655350
root hard nofile 655350
* soft nofile 655350
* hard nofile 655350
* soft stack 20480
* hard stack 20480
* soft nproc 655360
* hard nproc 655360
* soft core unlimited
* hard core unlimited
#退出当前会话,重新登录。执行以下命令,查看配置是否生效:
ulimit -a复制
部署
详细可参考:https://github.com/oceanbase/oceanbase/wiki/how_to_deploy_binary
yum install -y yum-utils
yum-config-manager --add-repo https://mirrors.aliyun.com/oceanbase/OceanBase.repo
yum install -y libtool libaio obclient
/opt/oceanbase/deps/3rd && bash dep_create.sh all
cd opt/oceanbase/tools/deploy
#该命令会将observer二进制文件(build_debug 或 build_release 都可以)和一些其他组件复制到当前目录,例如部署配置模板文件。
./obd.sh prepare -p opt/oceanbase/build_debug/src/observer
./obd.sh deploy -c single.yaml复制
后续修改源码再调试时可直接运行:
./obd.sh prepare -p opt/oceanbase/build_debug/src/observer
./obd.sh deploy -c single.yaml复制
测试连接:(single.yaml 默认 mysql 端口为 10000 ,RPC 端口为 10001)
[root@localhost deploy]# obclient -uroot -P10000 -h127.0.0.1
Welcome to the OceanBase. Commands end with ; or \g.
Your OceanBase connection id is 3221487642
Server version: OceanBase 3.1.5 (r1-99777b4bc94d2cfc6be8ae1dce624e46beefad08) (Built Nov 22 2022 06:09:41)
Copyright (c) 2000, 2018, OB Corporation Ab and others.
Type 'help;' or '\h' for help. Type '\c' to clear the current input statement.
obclient [(none)]>复制
99777b4bc94d2cfc6be8ae1dce624e46beefad08 对应我们编译的 observer 版本
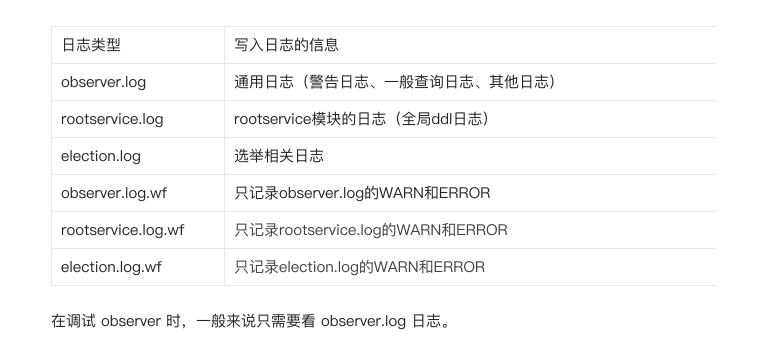
日志
安装 gdb
cd opt && wget http://ftp.gnu.org/gnu/gdb/gdb-7.12.tar.gz
tar zxvf gdb-7.12.tar.gz && cd gdb-7.12
yum -y install gcc gcc-c++ texinfo
./configure
make && make install
gdb --version
gdbserver --version复制
本地环境
配置 vscode
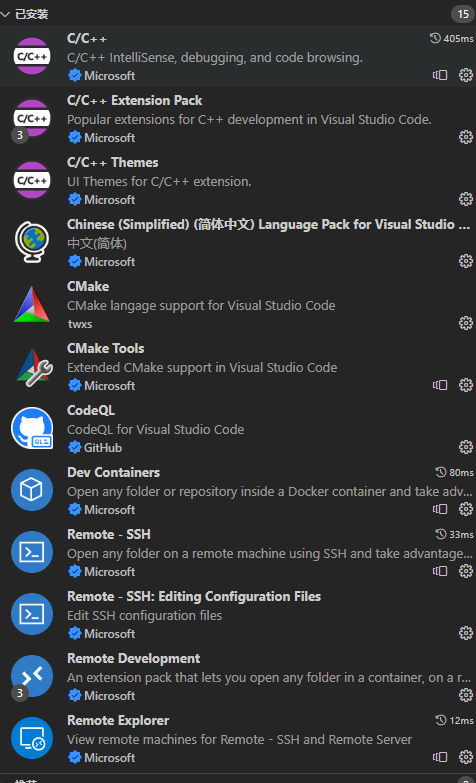
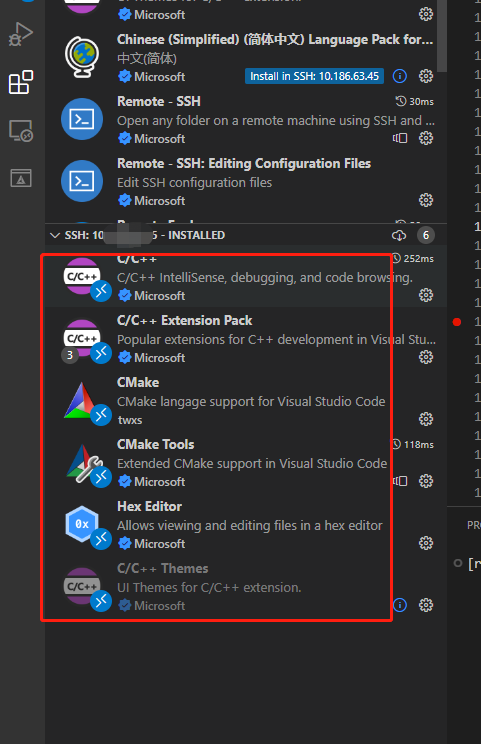
本地自行安装插件:C/C++、CMake、CMake Tools、Remote - SSH、Remote Development
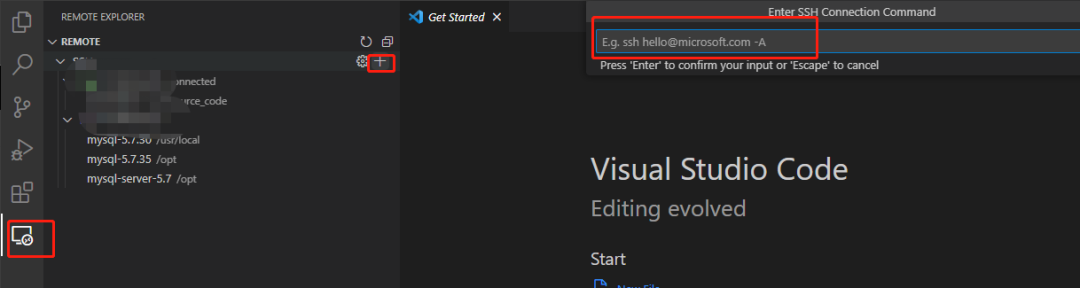
安装成功后,打开远程管理器,ssh连接observer所在的服务器(不用ssh免密也可以,就是每次指定密码登录)
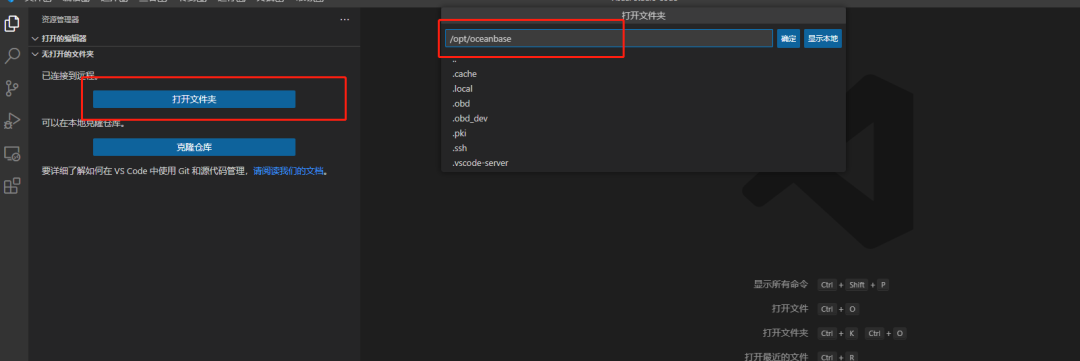
打开 oceanbase 的源码目录
继续在远程服务器上安装插件:C/C++、CMake、CMake Tools
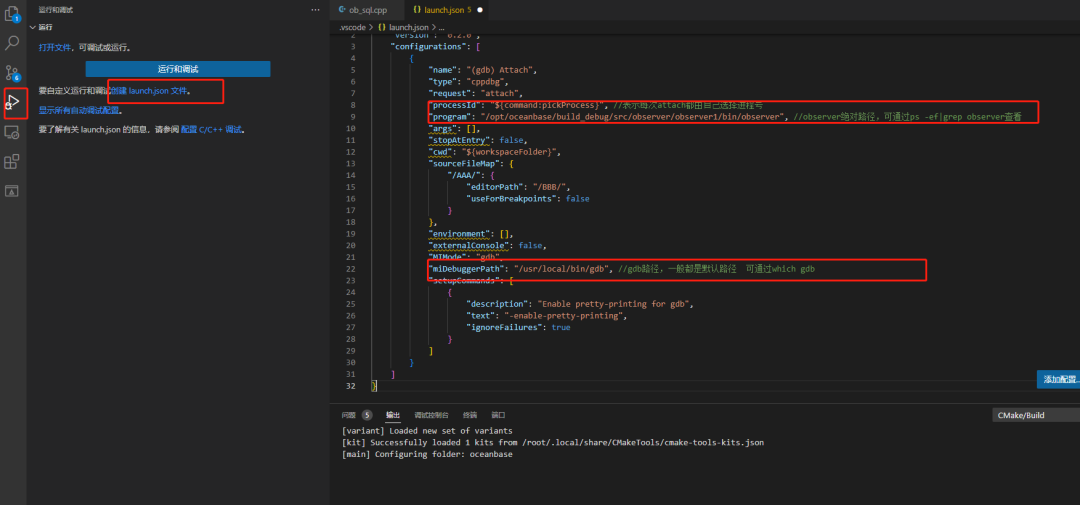
创建并配置launch.json,创建成功后会保存在.vscode目录下
{
"version": "0.2.0",
"configurations": [
{
"name": "(gdb) Attach",
"type": "cppdbg",
"request": "attach",
"processId": "${command:pickProcess}", 表示每次attach都由⾃⼰选择进程号
"program": "/opt/oceanbase/build_debug/src/observer/observer1/bin/observer", observer绝对路径,可通过ps -ef|grep observer查看
"args": [],
"stopAtEntry": false,
"cwd": "${workspaceFolder}",
"sourceFileMap": {
"/AAA/": {
"editorPath": "/BBB/",
"useForBreakpoints": false
}
},
"environment": [],
"externalConsole": false,
"MIMode": "gdb",
"miDebuggerPath": "/usr/local/bin/gdb", /gdb路径,⼀般都是默认路径 可通过which gdb
"setupCommands": [
{
"description": "Enable pretty-printing for gdb",
"text": "-enable-pretty-printing",
"ignoreFailures": true
}
]
}
]
}复制
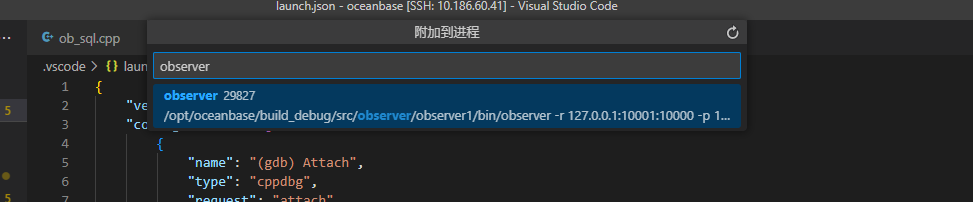
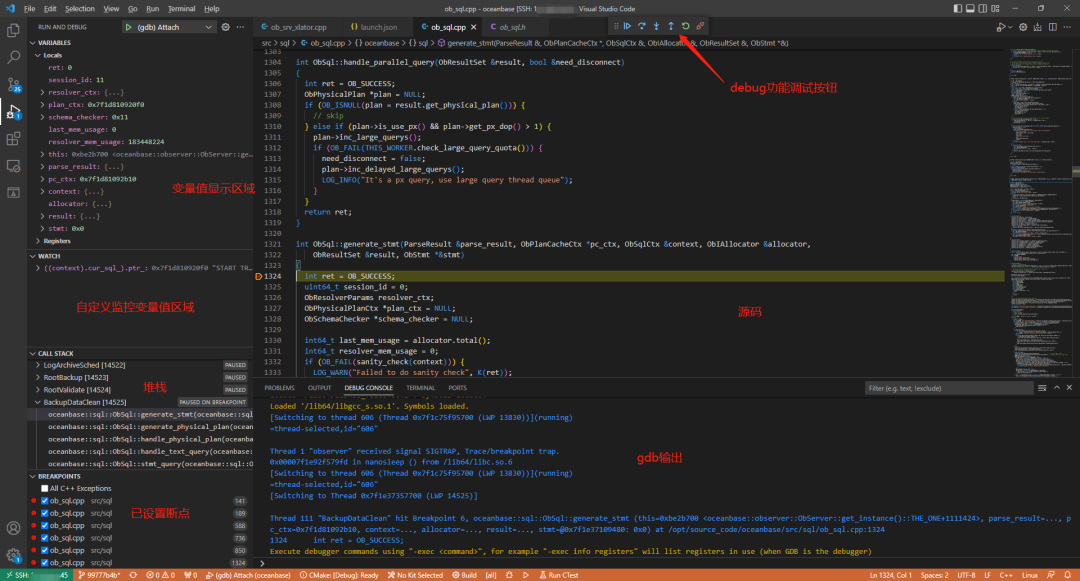
启动
选择 Run->Start Debugging,然后选择 attach 的进程号,输⼊ observer 就可以搜索到
如下图所示,表示 debug 已启动成功
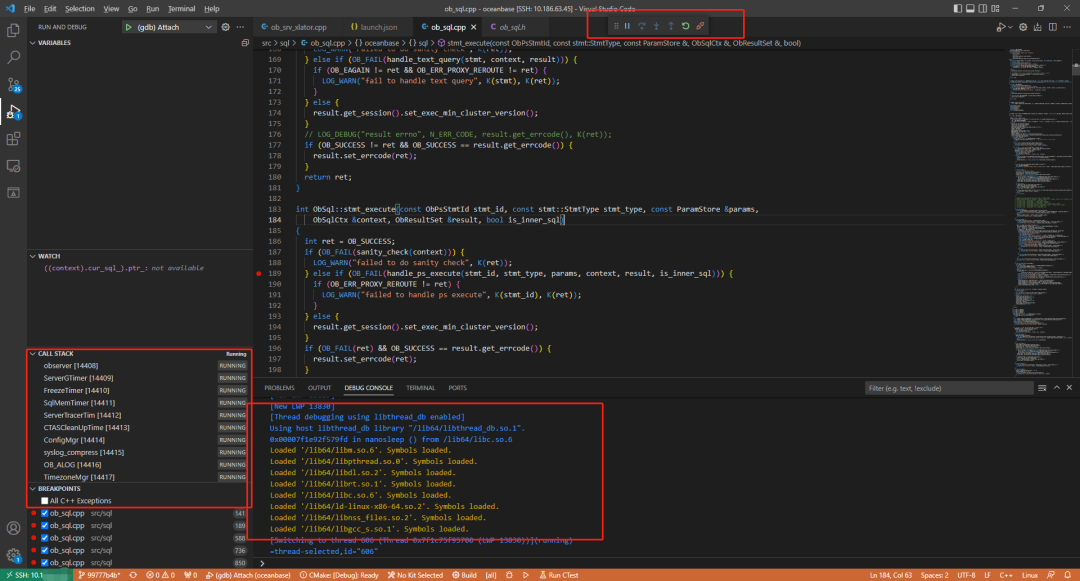
调试
注:因为 oceanbase 有很多后台任务,会定时的执行 SQL ,所以调试时设置的断点有可能会命中后台任务执行的 SQL ,调试起来不是很方便
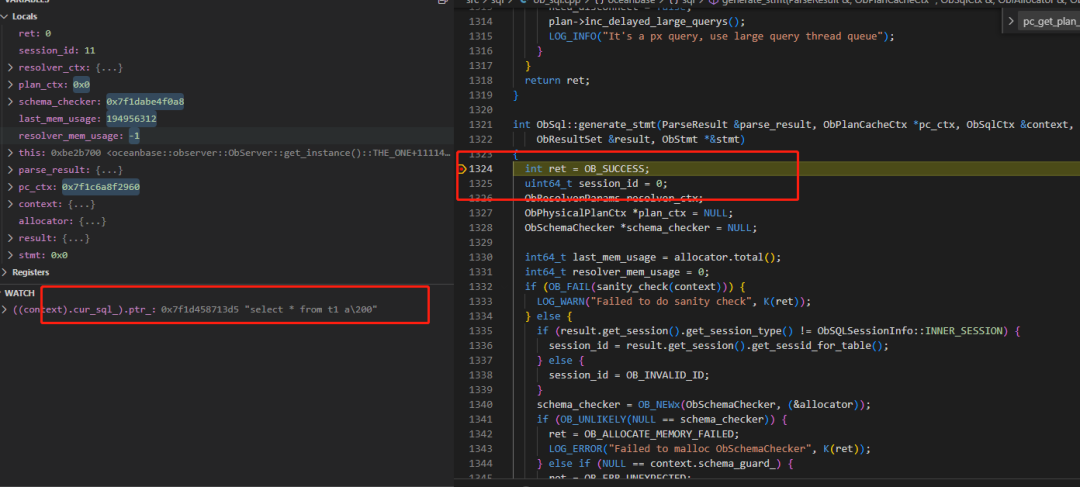
接下来开始愉快的调试吧=-=
参考:
https://github.com/oceanbase/oceanbase/wiki
关于SQLE
爱可生开源社区的 SQLE 是一款面向数据库使用者和管理者,支持多场景审核,支持标准化上线流程,原生支持 MySQL 审核且数据库类型可扩展的 SQL 审核工具。
| 类型 | 地址 |
|---|---|
| 版本库 | https://github.com/actiontech/sqle |
| 文档 | https://actiontech.github.io/sqle-docs-cn/ |
| 发布信息 | https://github.com/actiontech/sqle/releases |
| 数据审核插件开发文档 | https://actiontech.github.io/sqle-docs-cn/3.modules/3.7_auditplugin/auditplugin_development.html |
提交有效 pr ,高质量 issue ,将获赠面值200-500元(具体面额依据质量而定)京东卡以及爱可生开源社区精美周边!
更多关于 SQLE 的信息和交流,请加入官方 QQ 交流群:637150065...