


一、环境介绍
1. 环境介绍
- 服务器数量:2台 Kunpeng-920 TaiShan 200 (Model 2280)
- 服务器硬件规格:
- 内存:32G*24 主频 2666 MHz
- cpu :Kunpeng 920-6426 64*2 主频 2600 MHz
- 硬盘:SAS SSD 6T*3 底层做的RAID0
- 网卡:Hi1822千兆网卡,光纤互连。
- 系统:openEuler-20.03-LTS (aarch64 架构)
建议:内存大于512G,硬盘最好用nvme。
二、环境部署
1. 数据库安装
参考 MogDB/openGauss 手动部署(非OM工具)单机,主备,主备级联架构
单机部署即可
2. 客户端安装
采用的是benchmarksql工具 建议从公司wiki直接下载。
下载地址: http://wiki.enmotech.com:8090/pages/viewpage.action?pageId=24809138
## 3. 准备测试数据 - 数据库创建相关对象 ```shell [omm@node152 ~]$ gsql -d postgres -p26000 -r postgres=# create database tpcc; CREATE DATABASE postgres=# \q [omm@node152 ~]$ gsql -d tpcc -p26000 -r tpcc=# CREATE USER tpcc WITH PASSWORD "tpcc@123"; CREATE ROLE tpcc=# GRANT ALL ON schema public TO tpcc; GRANT复制
- 修改benchmarksql配置文件
[root@node151 run]# pwd /tmp/benchmarksql-5.0-mysql-support-opt-2.1/run [root@node151 run]# cat props.mog db=postgres driver=org.postgresql.Driver conn=jdbc:postgresql://10.10.10.40:26000/tpcc?prepareThreshold=1&batchMode=on&fetchsize=10&loggerLevel=off user=tpcc_usr password=tpcc@1234 warehouses=100 loadWorkers=256 terminals=300 runTxnsPerTerminal=0 runMins=5 limitTxnsPerMin=0 terminalWarehouseFixed=true newOrderWeight=45 paymentWeight=43 orderStatusWeight=4 deliveryWeight=4 stockLevelWeight=4复制
- 构造数据
[root@node151 run]# sh runDatabaseBuild.sh props.mog

# ------------------------------------------------------------
# Loading SQL file ./sql.common/tableCreates.sql
# ------------------------------------------------------------
create table bmsql_config (
cfg_name    varchar(30) primary key,
cfg_value   varchar(50)
);


''''''

# ------------------------------------------------------------
# Loading SQL file ./sql.postgres/buildFinish.sql
# ------------------------------------------------------------
-- ----
-- Extra commands to run after the tables are created, loaded,
-- indexes built and extra's created.
-- PostgreSQL version.
-- ----
vacuum analyze;
复制- 运行tpcc跑分
[root@node151 run]# sh runBenchmark.sh props.mog复制
- 删除数据
[root@node151 run]# sh runDatabaseDestroy.sh props.mog
# ------------------------------------------------------------
# Loading SQL file ./sql.common/tableDrops.sql
# ------------------------------------------------------------
drop table bmsql_config;
drop table bmsql_new_order;
drop table bmsql_order_line;
drop table bmsql_oorder;
drop table bmsql_history;
drop table bmsql_customer;
drop table bmsql_stock;
drop table bmsql_item;
drop table bmsql_district;
drop table bmsql_warehouse;
drop sequence bmsql_hist_id_seq;
复制
三、调优
1. 观察系统资源工具
- htop 观察CPU使用情况,arm平台需要从源码编译
- iostat 查看系统IO使用情况
- sar 查看网络使用情况
- nmon 作为系统资源整体监控
2. BIOS配置
- BIOS>Advanced>MISC Config,配置Support Smmu为Disabled
- BIOS>Advanced>MISC Config,配置CPU Prefetching Configuration为Disabled
- BIOS>Advanced>Memory Config,配置Die Interleaving为Disable
3. 操作系统配置
- 修改操作系统内核PAGESIZE为64KB(一般默认就是)
- 关闭irqbalance
systemctl stop irqbalance复制
- 调整numa_balance
echo 0 > /proc/sys/kernel/numa_balancing复制
- 调整透明大页
echo 'never' > /sys/kernel/mm/transparent_hugepage/enabled echo 'never' > /sys/kernel/mm/transparent_hugepage/defrag复制
- 针对nvme磁盘io队列调度机制设置。
echo none > /sys/block/nvme*n*/queue/scheduler复制
4. 文件系统配置
- 格式为xfs,数据库大小为8K
mkfs.xfs -b size=8192 /dev/nvme0n1 -f复制
5. 网络配置
- 网卡多中断队列设置
下载 IN500_solution_5.1.0.SPC401.zip 安装hinicadm
[root@node151 fc]# pwd /root/IN500_solution_5/tools/linux_arm/fc [root@node151 fc]# rpm -ivh hifcadm-2.4.1.0-1.aarch64.rpm Verifying... ################################# [100%] Preparing... ################################# [100%] package hifcadm-2.4.1.0-1.aarch64 is already installed [root@node151 fc]#复制
- 修改系统支持的最大中断队列数
[root@node151 config]# pwd /root/IN500_solution_5/tools/linux_arm/nic/config [root@node151 config]# ./hinicconfig hinic0 -f std_sh_4x25ge_dpdk_cfg_template0.ini [root@node151 config]# reboot [root@node151 config]# ethtool -L enp3s0 combined 48复制
不同平台,不同应用的优化值可能不同,当前128核的平台,服务器端调优值为12,客户端调优值为48。
- 中断调优开启tso,lro,gro,gso特性。
ethtool -K enp3s0 tso on ethtool -K enp3s0 lro on ethtool -K enp3s0 gro on ethtool -K enp3s0 gso on复制
- 网卡固件确认与更新
[root@node151 ~]# ethtool -i enp3s0 driver: hinic version: 2.3.2.11 firmware-version: 2.4.1.0 expansion-rom-version: bus-info: 0000:03:00.0 supports-statistics: yes supports-test: yes supports-eeprom-access: no supports-register-dump: no supports-priv-flags: no复制
网卡固件版本应为2.4.1.0
- 更新网卡固件。
[root@node151 cfg_data_nic_prd_1h_4x25G]# pwd /root/IN500_solution_5/firmware/update_bin/cfg_data_nic_prd_1h_4x25G [root@node151 cfg_data_nic_prd_1h_4x25G]# hinicadm updatefw -i enp3s0 -f /root/IN500_solution_5/firmware/update_bin/cfg_data_nic_prd_1h_4x25G/Hi1822_nic_prd_1h_4x25G.bin复制
重启服务器,再确认网卡固件版本成功更新为2.4.1.0。
6. 数据库服务端及客户端绑核
- 安装numa特性安装包
[root@node151 ~]# yum install numa* -y复制
- 网卡中断队列与CPU核进行绑定,脚本为数据库安装自带。
数据库端
sh bind_net_irq.sh 12复制
客户端
sh bind_net_irq.sh 48复制
关键参数
- synchronous_commit = local/on 表示主机事务提交需要等待主机自身将对应日志刷新到磁盘,通常也称为本地提交。
- enable_thread_pool = on 开启线程池功能
- async_submit = on 打开事务异步提交,该session上所有事务提交将异步完成
7. 数据库参数修改
max_connections = 4096 allow_concurrent_tuple_update = true audit_enabled = off cstore_buffers =16MB enable_alarm = off enable_codegen = false enable_data_replicate = off full_page_writes = off max_files_per_process = 100000 max_prepared_transactions = 2048 shared_buffers = 350GB use_workload_manager = off wal_buffers = 1GB work_mem = 1MB transaction_isolation = 'read committed' default_transaction_isolation = 'read committed' fsync = on maintenance_work_mem = 2GB autovacuum = on autovacuum_mode = vacuum autovacuum_vacuum_cost_delay =10 update_lockwait_timeout =20min enable_mergejoin = off enable_nestloop = off enable_hashjoin = off enable_bitmapscan = on enable_material = off wal_log_hints = off log_duration = off checkpoint_timeout = 15min autovacuum_vacuum_scale_factor = 0.1 autovacuum_analyze_scale_factor = 0.02 enable_save_datachanged_timestamp =FALSE log_timezone = 'PRC' timezone = 'PRC' lc_messages = 'C' lc_monetary = 'C' lc_numeric = 'C' lc_time = 'C' enable_incremental_checkpoint = on enable_opfusion = on numa_distribute_mode = 'all' **track_activities = off enable_instr_track_wait = off enable_instr_rt_percentile = off track_counts =on track_sql_count = off enable_instr_cpu_timer = off enable_resource_track = off instr_unique_sql_count = 0 ** plog_merge_age = 0 session_timeout = 0 enable_instance_metric_persistent = off enable_logical_io_statistics = off enable_user_metric_persistent =off enable_xlog_prune = off enable_beta_opfusion = on enable_thread_pool = on enable_partition_opfusion=off max_io_capacity = 2GB dirty_page_percent_max = 0.1 candidate_buf_percent_target = 0.7 bgwriter_delay = 500 pagewriter_sleep = 30 checkpoint_segments =10240 advance_xlog_file_num = 100 autovacuum_max_workers = 20 autovacuum_naptime = 5s bgwriter_flush_after = 256kB data_replicate_buffer_size = 16MB enable_stmt_track = off remote_read_mode=non_authentication hot_standby = off hot_standby_feedback = off client_min_messages = ERROR log_min_messages = FATAL enable_asp = off enable_bbox_dump = off enable_ffic_log = off enable_twophase_commit = off wal_keep_segments = 1025 incremental_checkpoint_timeout = 5min max_process_memory = 12GB vacuum_cost_limit = 10000 xloginsert_locks = 8 wal_writer_delay = 100 wal_file_init_num = 30 wal_level=minimal max_wal_senders=0 fsync=off synchronous_commit = on enable_thread_pool = on async_submit = on enable_indexonlyscan=on thread_pool_attr = '345,4,(cpubind:1-28,32-60,64-92,96-124)' enable_page_lsn_check = off enable_double_write = off复制
8. benchmarksql调优
- 连接串
conn=jdbc:postgresql://10.10.10.40:26000/tpcc?prepareThreshold=1&batchMode=on&fetchsize=10&loggerLevel=off - 修改文件内容将数据分散,调整FILLFACTOR,数据分区。
[root@node151 ~]# ls benchmarksql-5.0-mysql-support-opt-2.1/run/sql.common/tableCreates.sql benchmarksql-5.0-mysql-support-opt-2.1/run/sql.common/tableCreates.sql [root@node151 sql.common]# cat tableCreates.sql CREATE TABLESPACE example2 relative location 'tablespace2'; CREATE TABLESPACE example3 relative location 'tablespace3'; create table bmsql_config ( cfg_name varchar(30), cfg_value varchar(50) ); create table bmsql_warehouse ( w_id integer not null, w_ytd decimal(12,2), w_tax decimal(4,4), w_name varchar(10), w_street_1 varchar(20), w_street_2 varchar(20), w_city varchar(20), w_state char(2), w_zip char(9) ) WITH (FILLFACTOR=80); create table bmsql_district ( d_w_id integer not null, d_id integer not null, d_ytd decimal(12,2), d_tax decimal(4,4), d_next_o_id integer, d_name varchar(10), d_street_1 varchar(20), d_street_2 varchar(20), d_city varchar(20), d_state char(2), d_zip char(9) ) WITH (FILLFACTOR=80); create table bmsql_customer ( c_w_id integer not null, c_d_id integer not null, c_id integer not null, c_discount decimal(4,4), c_credit char(2), c_last varchar(16), c_first varchar(16), c_credit_lim decimal(12,2), c_balance decimal(12,2), c_ytd_payment decimal(12,2), c_payment_cnt integer, c_delivery_cnt integer, c_street_1 varchar(20), c_street_2 varchar(20), c_city varchar(20), c_state char(2), c_zip char(9), c_phone char(16), c_since timestamp, c_middle char(2), c_data varchar(500) ) WITH (FILLFACTOR=80) tablespace example2; create sequence bmsql_hist_id_seq; create table bmsql_history ( hist_id integer, h_c_id integer, h_c_d_id integer, h_c_w_id integer, h_d_id integer, h_w_id integer, h_date timestamp, h_amount decimal(6,2), h_data varchar(24) ) WITH (FILLFACTOR=80); create table bmsql_new_order ( no_w_id integer not null, no_d_id integer not null, no_o_id integer not null ) WITH (FILLFACTOR=80); create table bmsql_oorder ( o_w_id integer not null, o_d_id integer not null, o_id integer not null, o_c_id integer, o_carrier_id integer, o_ol_cnt integer, o_all_local integer, o_entry_d timestamp ) WITH (FILLFACTOR=80); create table bmsql_order_line ( ol_w_id integer not null, ol_d_id integer not null, ol_o_id integer not null, ol_number integer not null, ol_i_id integer not null, ol_delivery_d timestamp, ol_amount decimal(6,2), ol_supply_w_id integer, ol_quantity integer, ol_dist_info char(24) ) WITH (FILLFACTOR=80); create table bmsql_item ( i_id integer not null, i_name varchar(24), i_price decimal(5,2), i_data varchar(50), i_im_id integer ); create table bmsql_stock ( s_w_id integer not null, s_i_id integer not null, s_quantity integer, s_ytd integer, s_order_cnt integer, s_remote_cnt integer, s_data varchar(50), s_dist_01 char(24), s_dist_02 char(24), s_dist_03 char(24), s_dist_04 char(24), s_dist_05 char(24), s_dist_06 char(24), s_dist_07 char(24), s_dist_08 char(24), s_dist_09 char(24), s_dist_10 char(24) ) WITH (FILLFACTOR=80) tablespace example3;复制
9. 将数据库和客户端分别以numactl方式启动
数据库
[omm@node152 ~]$ numactl -C 1-28,32-60,64-92,96-124 mogdb --single_node -D /opt/data/db2/ -p 26000 &复制
客户端
[root@node151 run]# numactl -C 0-19,32-51,64-83,96-115 sh runBenchmark.sh props.mog复制
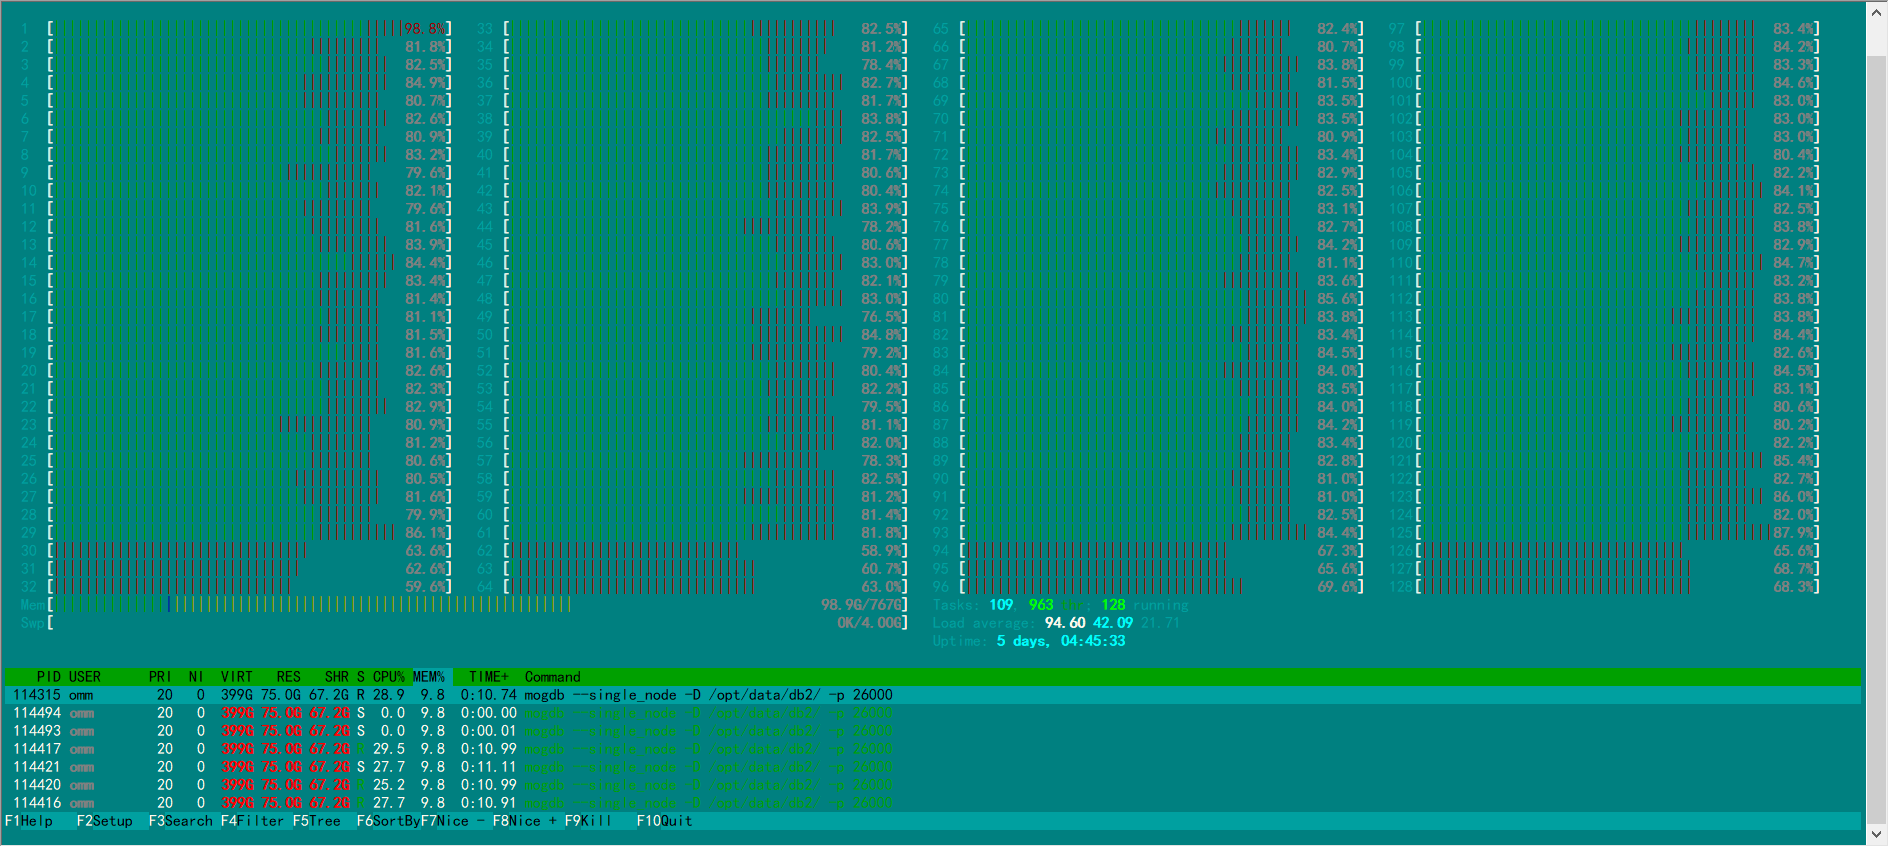
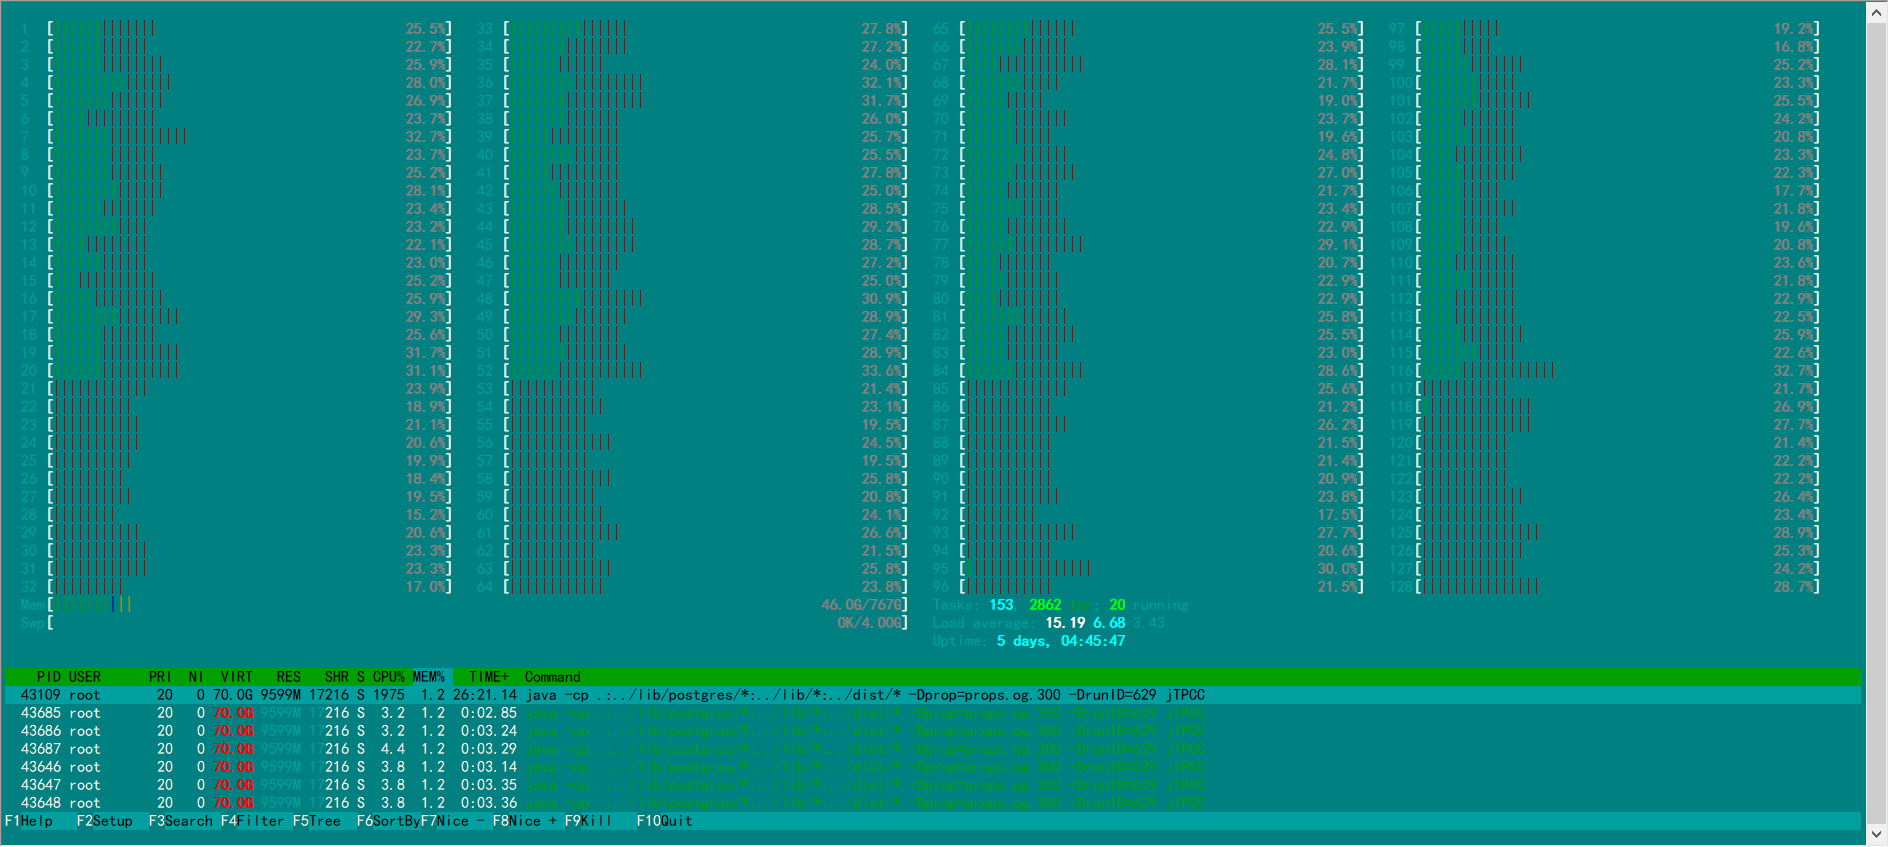
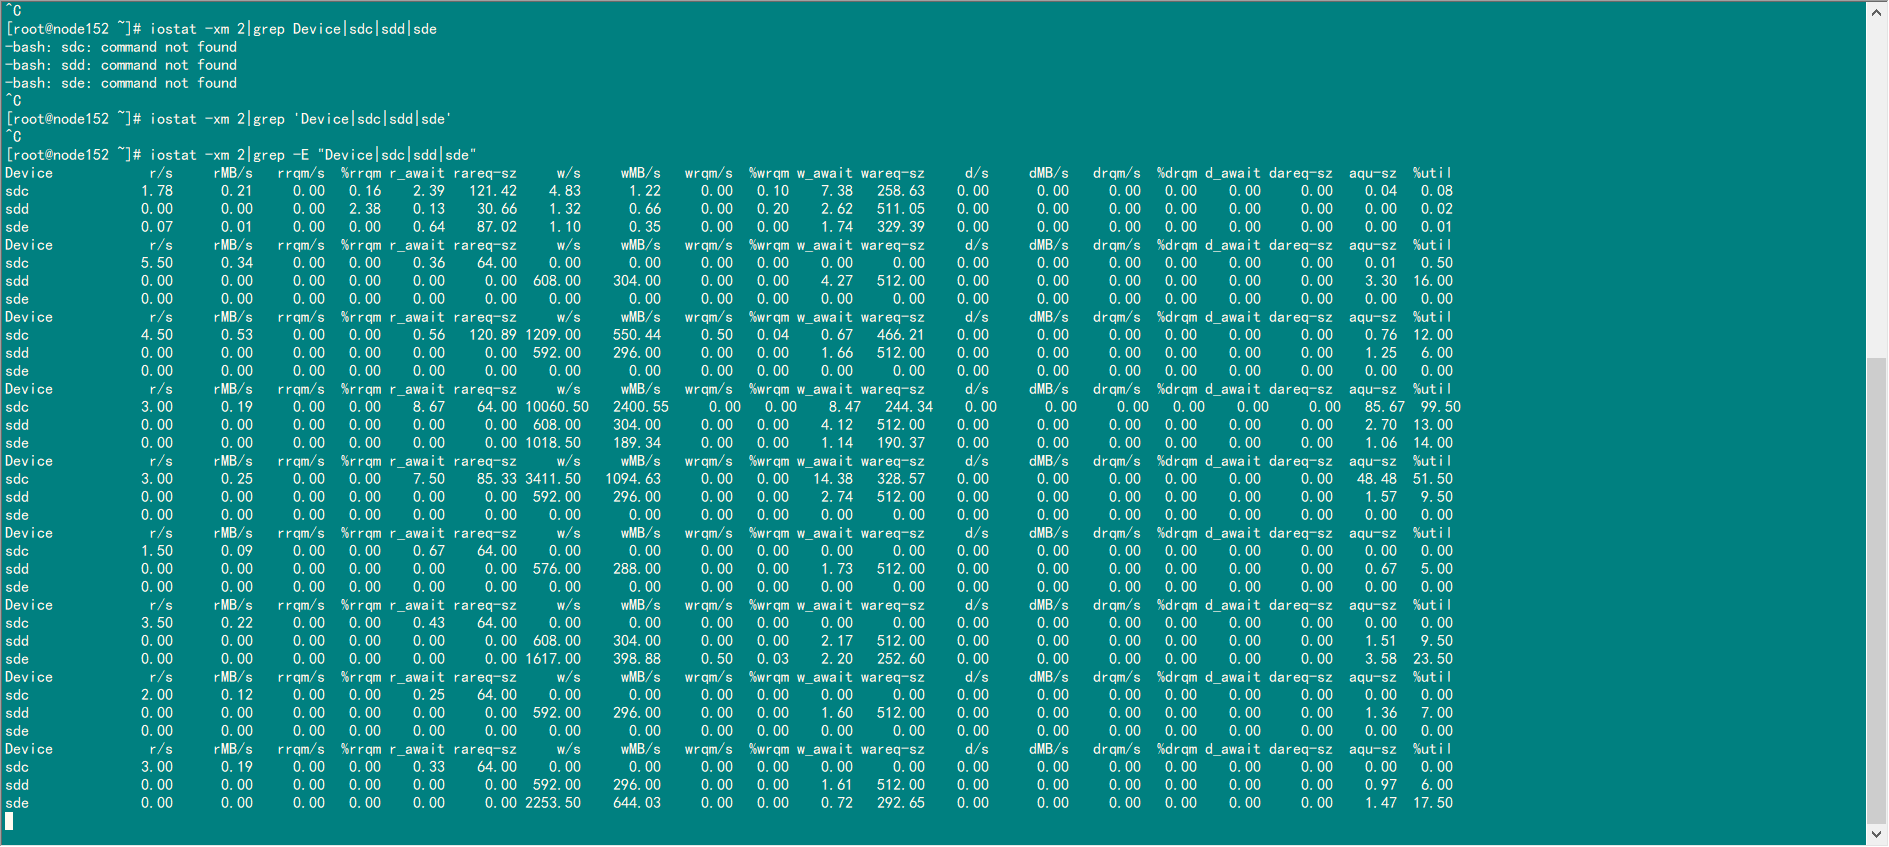
四、部分数据截图
-
数据库htop
-
客户端htop
-
iostat 查看系统IO使用情况
-
sar 查看网络使用情况

最后修改时间:2022-12-06 21:26:20
「喜欢这篇文章,您的关注和赞赏是给作者最好的鼓励」
关注作者
【版权声明】本文为墨天轮用户原创内容,转载时必须标注文章的来源(墨天轮),文章链接,文章作者等基本信息,否则作者和墨天轮有权追究责任。如果您发现墨天轮中有涉嫌抄袭或者侵权的内容,欢迎发送邮件至:contact@modb.pro进行举报,并提供相关证据,一经查实,墨天轮将立刻删除相关内容。
评论
weizhao.zhang (anbob)

6月前
评论
 0
0关于4 修改XFS 文件系统的 blocksize 注意, mkfs.xfs 即使创建是指定了更大的块大小,但是在mount 文件系统时也会检查pagesize大小, 要求blocksize<=pagesize,否则会挂载文件系统失败“ Function not implemented ”
# getconf PAGE_SIZE
4096
6月前
点赞 评论
相关阅读
2025年3月国产数据库大事记
墨天轮编辑部
605次阅读
2025-04-03 15:21:16
内蒙古公司成功完成新一代BOSS云原生系统割接上线
openGauss
201次阅读
2025-03-24 09:40:40
第4期 openGauss 中级认证OGCP直播班招生中!3月30日开课
墨天轮小教习
162次阅读
2025-03-17 15:48:40
openGauss 7.0.0-RC1 版本正式发布!
Gauss松鼠会
147次阅读
2025-04-01 12:27:03
openGauss 7.0.0-RC1 版本体验:一主一备快速安装指南
孙莹
128次阅读
2025-04-01 10:30:07
从数据库源码比较 PostgreSql和OpenGauss的启动过程
maozicb
86次阅读
2025-03-24 15:55:04
一文快速上手openGauss
进击的CJR
80次阅读
2025-03-26 16:12:54
openGauss HASH JOIN原理
lbsswhu
61次阅读
2025-03-18 10:45:01
openGauss 学习之路:集群部署实战探索
openGauss
55次阅读
2025-03-21 10:34:13
openGauss问题记录:开启备机归档且备机stop情况下,执行gs_probackup失败
zym
45次阅读
2025-03-18 19:06:13


