01:linux中安装docker
02:使用docker安装mysql
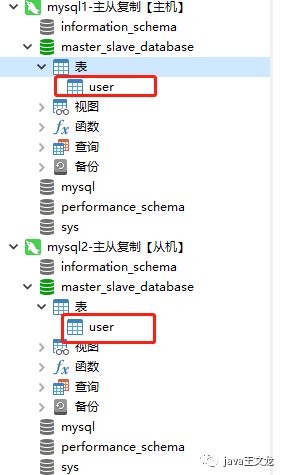
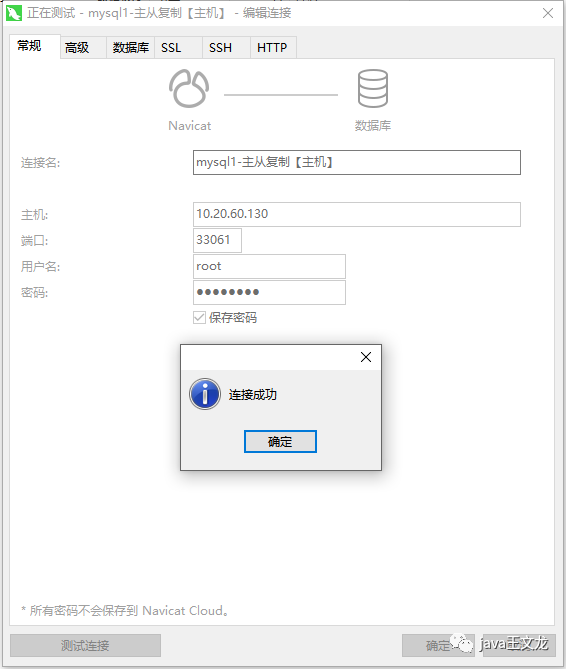
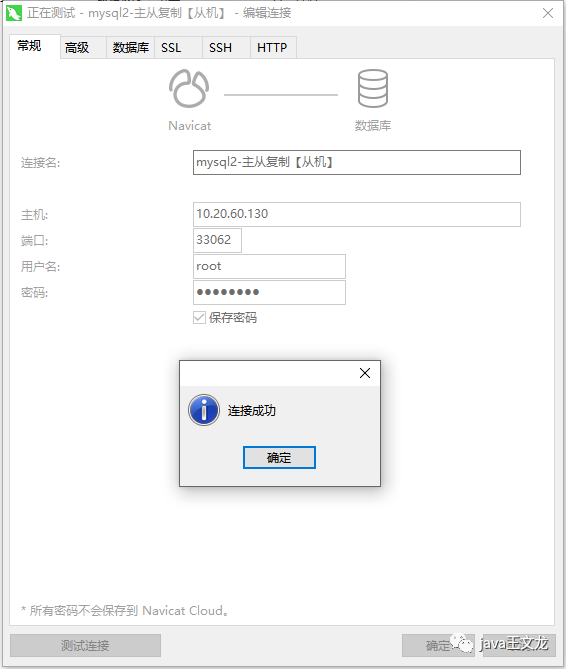
03:可视化工具连接mysql
04:主机中分配用户
05:开启binlog
06:配置从机
07:创建数据库,测试主从复制
首先说明一点,我在linux中安装docker是为了更好的安装其他应用程序,如mysql、nginx,简单方便,当然小伙伴儿们也可以手动一步步安装应用程序,linux中安装docker命令如下:
[root@localhost mysql]# yum -y install docker复制
[root@localhost mysql]# docker -vDocker version 1.13.1, build 0be3e21/1.13.1复制
[root@localhost mysql]# service docker start复制
本次通过docker在linux中安装两个mysql,一个做主机,另一个做从机,通过后面的配置达到主从复制的效果
安装第一个mysql
[root@localhost ]# docker run --name mysql1 -p 33061:3306 -e MYSQL_ROOT_PASSWORD=root1234 -d mysql:5.7 --character-set-server=utf8mb4 --collation-server=utf8mb4_unicode_ci复制
安装第二个mysql
[root@localhost ]# docker run --name mysql2 -p 33062:3306 -e MYSQL_ROOT_PASSWORD=root1234 -d mysql:5.7 --character-set-server=utf8mb4 --collation-server=utf8mb4_unicode_ci复制
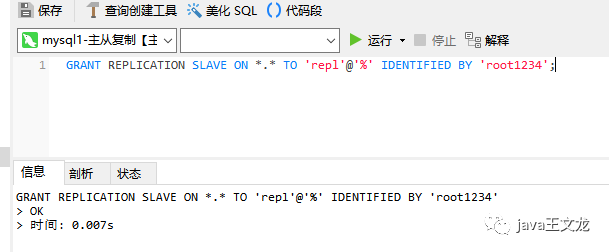
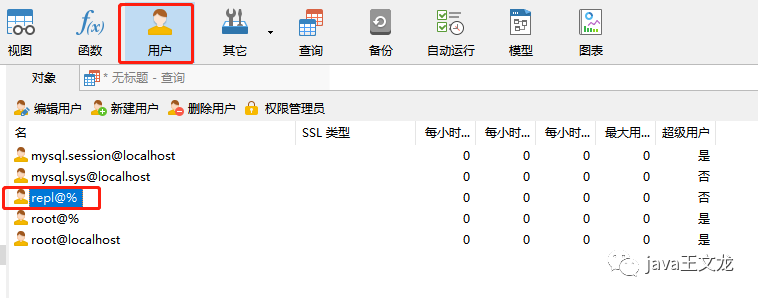
上面我创建了两个mysql,一个是mysql1,另一个是mysql2,那么我就把mysql1作为主机,mysql2作为从机,首先给主机重新分配一个用户,目的是为从机登录主机读取数据用的,操作如下:
GRANT REPLICATION SLAVE ON *.* TO 'repl'@'%' IDENTIFIED BY 'root1234';复制
05
开启binlog
进入 mysql1容器
[root@localhost /]# docker exec -it mysql1 /bin/bash复制
查看原配置:
root@125dfce1b700:/# cat etc/mysql/mysql.conf.d/mysqld.cnf复制
配置如下:
# Copyright (c) 2014, 2016, Oracle and/or its affiliates. All rights reserved.## This program is free software; you can redistribute it and/or modify# it under the terms of the GNU General Public License, version 2.0,# as published by the Free Software Foundation.## This program is also distributed with certain software (including# but not limited to OpenSSL) that is licensed under separate terms,# as designated in a particular file or component or in included license# documentation. The authors of MySQL hereby grant you an additional# permission to link the program and your derivative works with the# separately licensed software that they have included with MySQL.## This program is distributed in the hope that it will be useful,# but WITHOUT ANY WARRANTY; without even the implied warranty of# MERCHANTABILITY or FITNESS FOR A PARTICULAR PURPOSE. See the# GNU General Public License, version 2.0, for more details.## You should have received a copy of the GNU General Public License# along with this program; if not, write to the Free Software# Foundation, Inc., 51 Franklin St, Fifth Floor, Boston, MA 02110-1301 USA## The MySQL Server configuration file.## For explanations see# http://dev.mysql.com/doc/mysql/en/server-system-variables.html[mysqld]pid-file = var/run/mysqld/mysqld.pidsocket = var/run/mysqld/mysqld.sockdatadir = var/lib/mysql#log-error = var/log/mysql/error.log# By default we only accept connections from localhost#bind-address = 127.0.0.1# Disabling symbolic-links is recommended to prevent assorted security riskssymbolic-links=0复制
退出容器
[root@localhost ]# exit复制
[root@localhost ]# vi mysqld.cnf复制
opyright (c) 2014, 2016, Oracle and/or its affiliates. All rights reserved.## This program is free software; you can redistribute it and/or modify# it under the terms of the GNU General Public License, version 2.0,# as published by the Free Software Foundation.## This program is also distributed with certain software (including# but not limited to OpenSSL) that is licensed under separate terms,# as designated in a particular file or component or in included license# documentation. The authors of MySQL hereby grant you an additional# permission to link the program and your derivative works with the# separately licensed software that they have included with MySQL.## This program is distributed in the hope that it will be useful,# but WITHOUT ANY WARRANTY; without even the implied warranty of# MERCHANTABILITY or FITNESS FOR A PARTICULAR PURPOSE. See the# GNU General Public License, version 2.0, for more details.## You should have received a copy of the GNU General Public License# along with this program; if not, write to the Free Software# Foundation, Inc., 51 Franklin St, Fifth Floor, Boston, MA 02110-1301 USA## The MySQL Server configuration file.## For explanations see# http://dev.mysql.com/doc/mysql/en/server-system-variables.html[mysqld]log-bin=/var/lib/mysql/binlogserver-id=1binlog-do-db=master_slave_databasepid-file = var/run/mysqld/mysqld.pidsocket = var/run/mysqld/mysqld.sockdatadir = var/lib/mysql#log-error = var/log/mysql/error.log# By default we only accept connections from localhost#bind-address = 127.0.0.1# Disabling symbolic-links is recommended to prevent assorted security riskssymbolic-links=0复制
通过docker命令将修改好的配置拷贝到下面的文件夹中
[root@localhost ]# docker cp ./mysqld.cnf mysql1:/etc/mysql/mysql.conf.d/复制
重启mysql1
[root@localhost ]# docker restart mysql1复制
主机中创建数据库master_slave_database(主机中配置的是哪个数据库就建哪个数据库)
可视化工具(Navicat)输入命令出现下面效果说明开启binlog成功
show master status;复制
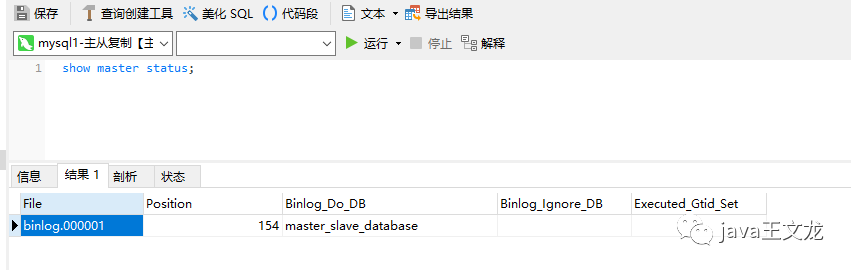
注:file、position、binlog_do_db的内容记住,待会配置从机的时候要用到
配置从机mysql2
步骤跟配mysql1的步骤是一样的,新建文件,修改配置,然后覆盖原文件即可,从机只是配置内容变了(只配一个server-id=2即可),配置如下
[mysqld]server-id=2pid-file = /var/run/mysqld/mysqld.pidsocket = /var/run/mysqld/mysqld.sockdatadir = /var/lib/mysql#log-error = /var/log/mysql/error.log# By default we only accept connections from localhost#bind-address = 127.0.0.1# Disabling symbolic-links is recommended to prevent assorted security riskssymbolic-links=0复制
重启mysql2
[root@localhost /]# docker restart mysql2复制
06
配置从机
进入mysql2容器
[root@localhost /]# docker exec -it mysql2 /bin/bash复制
登录
root@490fac23b15d:/# mysql -u root -pEnter password: 输入自己设置的mysql密码,然后回车即可,会出现下面内容Welcome to the MySQL monitor. Commands end with ; or \g.Your MySQL connection id is 2Server version: 5.7.33 MySQL Community Server (GPL)Copyright (c) 2000, 2021, Oracle and/or its affiliates.Oracle is a registered trademark of Oracle Corporation and/or itsaffiliates. Other names may be trademarks of their respectiveowners.Type 'help;' or '\h' for help. Type '\c' to clear the current input statement.mysql>
开启数据同步【就是指定从机的master是谁】
mysql> change master to master_host='10.20.60.130',master_port=33061,master_user='rep1',master_password='root1234',master_log_file='binlog.000002',master_log_pos=735;//返回这条数据,说明成功了:Query OK, 0 rows affected, 2 warnings (0.03 sec)复制
查看状态
mysql> show slave status\G;复制
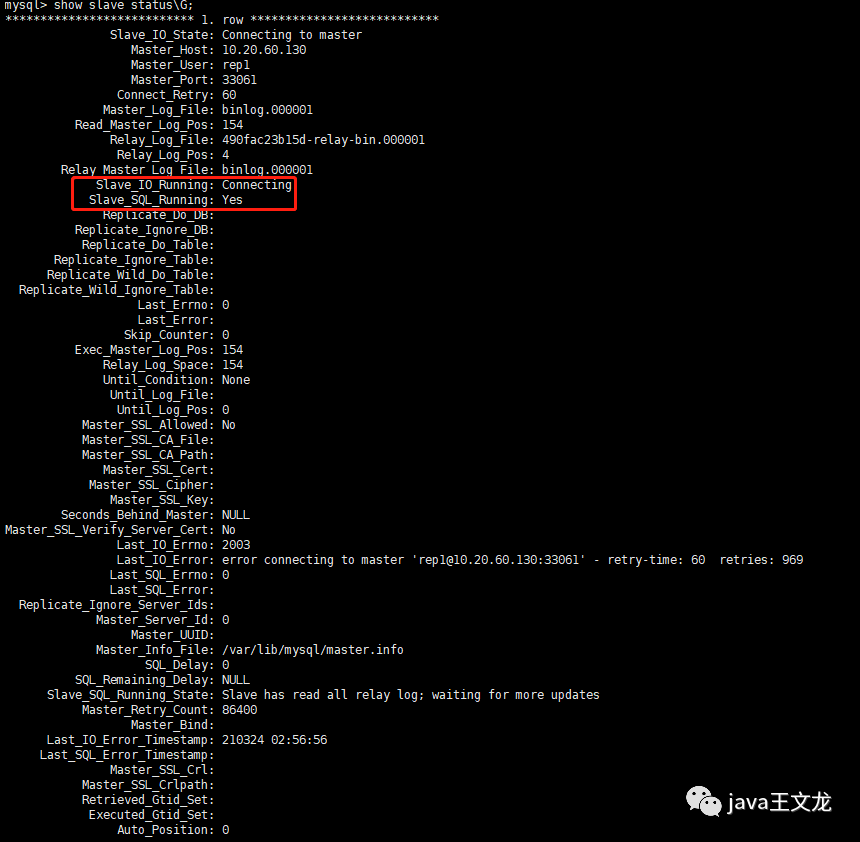
上面两行都是yes才算成功,如果不成功请查看报错信息,如上图
Last_IO_Error: error connecting to master 'rep1@10.20.60.130:33061' - retry-time: 60 retries: 969复制
通过报错信息得知,mysql连接主机时出现了超时,如果是这种情况的话,有一种方式可以解决,将ip地址(原来写的是linux的ip)换成docker的ip,操作如下
停止从机
mysql> stop slave复制
linux打开新窗口【重点:打开新窗口】,查看主机的docker的ip。这样当前页面就不用重复退出mysql及docker容器再重新进入了
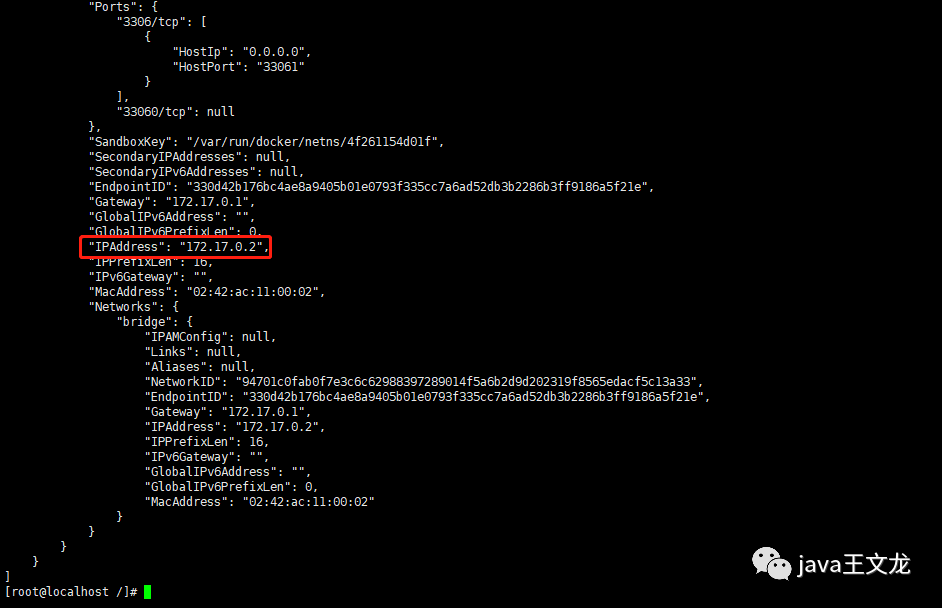
[root@localhost /]# docker inspect mysql1复制
回车后拉到最下面,IPADDress就是docker容器的ip
回到刚才的页面重新开启数据同步
mysql> change master to master_host='172.17.0.1',master_port=3306,master_user='rep1',master_password='root1234',master_log_file='binlog.000002',master_log_pos=735;复制
启动从机,并且查看状态
mysql> start slave;Query OK, 0 rows affected (0.01 sec)mysql> show slave status\G;复制
此时可以看到,Slave_IO_Running: Yes,Slave_SQL_Running: Yes,说明已经成功了
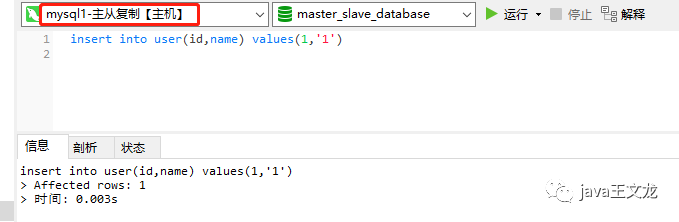
07
创建数据库,测试主从复制