


作者 | yanwei
来源 | 墨天轮
https://mp.weixin.qq.com/s/r1gddJ6Qsq-bU68YEbNQNQ
大家好,我是 JiekeXu,很高兴又和大家见面了,今天和大家一起来看看 Linux7.9 安装 Oracle19c RAC 详细配置方案,欢迎点击上方蓝字关注我,标星或置顶,更多干货第一时间到达!
《基于 VMWARE Oracle Linux7.9 安装 Oracle19c RAC》4 万多字,是我看过的 Oracle 19c RAC 安装学习篇最好的一篇,这一篇认真看完,必定收获满满。尤其后面章节连接测试,日常管理,值得推荐。
目 录
一、安装规划
1.1 软件规划
1.1.1 软件下载
1.1.1.1 OS下载
1.1.1.2 RAC软件下载
1.1.1.3 RU下载
1.1.2 操作系统认证
1.2 虚拟机规划
1.3 网络规划
1.4 操作系统规划
1.4.1 操作系统目录
1.4.2 软件包
1.5 共享存储规划
1.6 Oracle规划
1.6.1 软件规划
1.6.2 用户组和用户
1.6.3 软件目录规划
1.6.4 整体数据库安装规划
1.6.5 RU升级规划
二、虚拟机安装
2.1 选择硬件兼容性
2.2 选择操作系统ISO
2.3 命名虚拟机
2.4 CPU
2.5 内存
2.6 网卡
2.7 硬盘
2.8 添加网卡
2.9 同样方式创建RAC2节点
2.10 分别安装操作系统
2.11 安装完成之后,加快SSH登录
三、共享存储配置
3.1 创建共享磁盘-命令行
3.2 创建共享磁盘-图形(可选,本次未采用)
3.3 关闭两台虚拟机,编辑相关vmx文件
3.4 重新启动虚拟机
3.5 multipath+udev方式绑定存储
四、19cRAC安装准备工作
4.1 硬件配置和系统情况
4.1.1 检查操作系统
4.1.2 检查内存
4.1.3 检查swap
4.1.4 检查/tmp
4.1.4 检查时间和时区
4.2 主机名和hosts文件
4.2.1 设置和检查主机名
4.2.2 调整hosts文件
4.3 网卡(虚拟)配置、netwok文件
4.3.1 (可选)禁用虚拟网卡
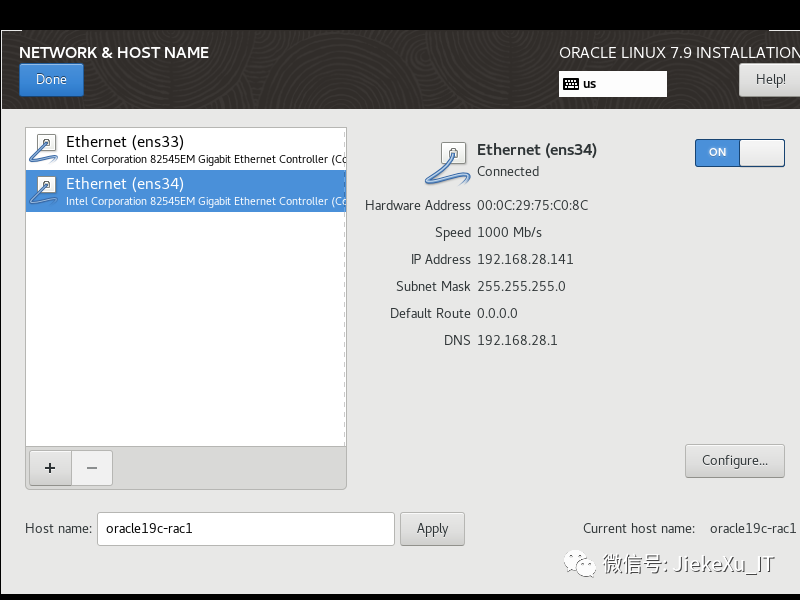
4.3.2 检查节点的网卡名和IP
4.3.3 测试连通性
4.3.4 调整network
4.4 调整/dev/shm
4.5 关闭THP和numa
4.6 关闭防火墙
4.7 关闭selinux
4.8 配置软件yum源
4.8 安装软件包
4.9 配置核心参数
4.10 关闭avahi服务
4.11 关闭其他服务
4.12 配置ssh服务
4.13 hugepage配置(可选)
4.14 修改login配置
4.15 配置用户限制
4.16 配置NTP服务(可选)
4.16.1 使用ctss
4.16.2 使用ntp
4.16.3 使用chony
4.17 创建组和用户
4.18 创建目录
4.19 配置用户环境变量
4.19.1 grid
4.19.2 oracle
4.20 配置共享存储(multipath+udev)
4.20.1 multipath
4.20.2 UDEV
4.20.2 UDEV(非multipath)
4.20.3 afd(不推荐)
4.21 配置IO调度
4.22 重启OS
4.23 整体check脚本检查
五、安装GI+RU
5.1 修改软件包权限
5.2 解压缩软件
5.2.1 解压缩grid 软件
5.2.2 升级OPatch
5.2.3 解压缩19.11RU
5.3 安装cvuqdisk软件
5.4 配置grid 用户ssh(可选)
5.5 安装前检查
5.6 执行安装(直接升级19.11)
5.6.1 图形截图
5.6.2 执行脚本
5.6.3 检查
六 创建磁盘组
七、安装Oracle软件+RU
7.1 修改软件包权限
7.2 解压缩到oracle_home
7.3 升级opatch版本
7.4 安装Oracle软件(直接升级RU19.11)
7.5 安装截图
八 创建数据库
8.1 数据库规划
8.2 dbca建库
8.3 连接测试
8.3.1 连接CDB
8.3.2 连接pdb
8.3.3 datafile
九 RAC日常管理命令
9.1 集群资源状态
9.2 集群服务状态
9.3 数据库状态
9.4 监听状态
9.5 scan状态
9.6 nodeapps状态
9.7 VIP状态
9.8 数据库配置
9.9 OCR
9.10 VOTEDISK
9.11 GI版本
9.12 ASM
9.13 启动和关闭RAC
9.14 节点状态
9.15 切换scan
9.16 切换VIP
一、安装规划
1.1 软件规划
| 软件 | 版本 |
|---|---|
| 虚拟化软件 | VMware®Workstation16 Pro15.0.0 build-10134415 |
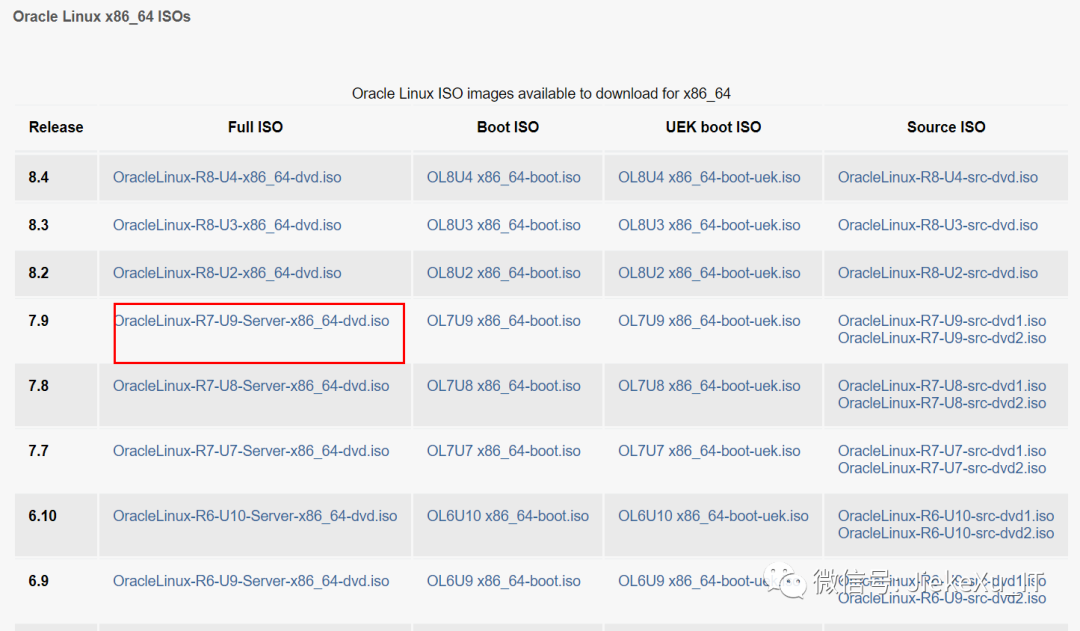
| OS软件 | OracleLinux-R7-U9-Server-x86_64-dvd.iso,要求7.4以上 |
| Oracle软件 | LINUX.X64_193000_db_home.zip(安装包) |
| GI软件 | LINUX.X64_193000_grid_home.zip(安装包) |
| RU软件 | p32545008_190000_Linux-x86-64.zip -19.11(非滚动升级方式)p32895426_190000_Linux-x86-64.zip(滚动升级方式) --编者 不太懂能从 RU 区分是否滚动升级方式? |
1.1.1 软件下载
1.1.1.1 OS下载
https://yum.oracle.com/oracle-linux-isos.html
1.1.1.2 RAC软件下载
https://www.oracle.com/database/technologies/oracle19c-linux-downloads.html
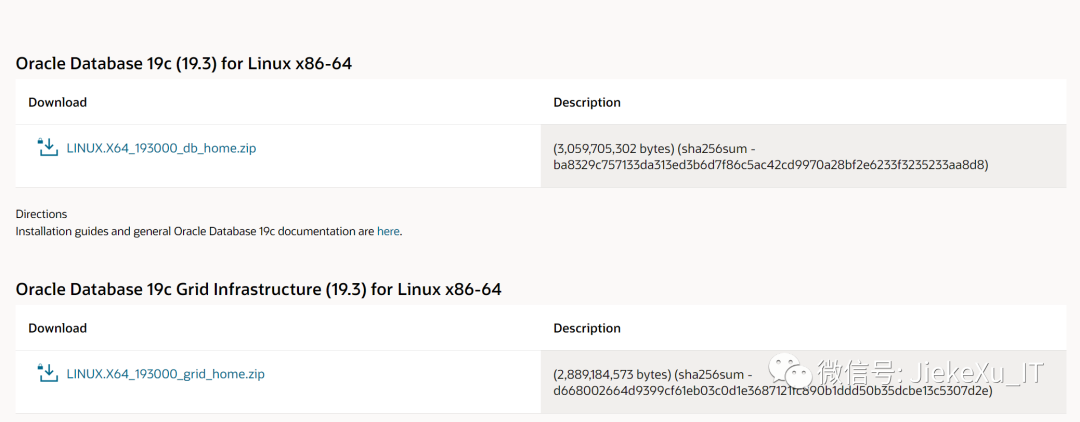
可以利用sha256sum检验软件的完整性。
[root@dwrac1 soft]# sha256sum LINUX.X64_193000_db_home.zipba8329c757133da313ed3b6d7f86c5ac42cd9970a28bf2e6233f3235233aa8d8 LINUX.X64_193000_db_home.zip[root@dwrac1 soft]# sha256sum LINUX.X64_193000_grid_home.zipd668002664d9399cf61eb03c0d1e3687121fc890b1ddd50b35dcbe13c5307d2e LINUX.X64_193000_grid_home.zip
1.1.1.3 RU下载
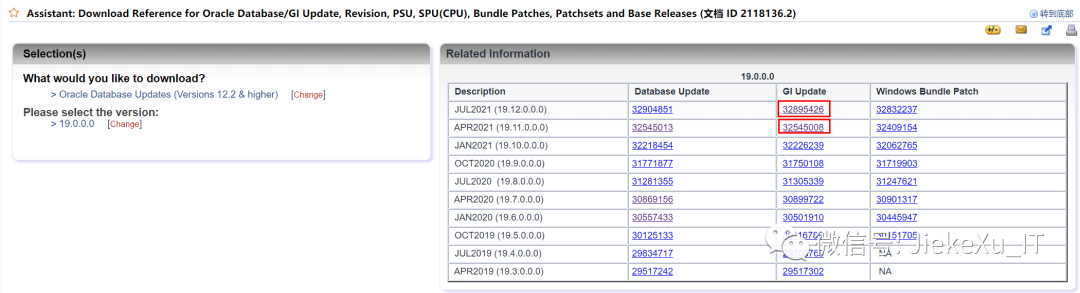
每个 RU 大小在 2.5G 左右。
编者注:19.11 RU 下载 32578973 即可,包含 GI and DB,还有 OJVM 补丁,比较方便。不过现在 19.12 RU Linux 版已经发布了,可查看:https://www.modb.pro/download/137693 。
1.1.2 操作系统认证
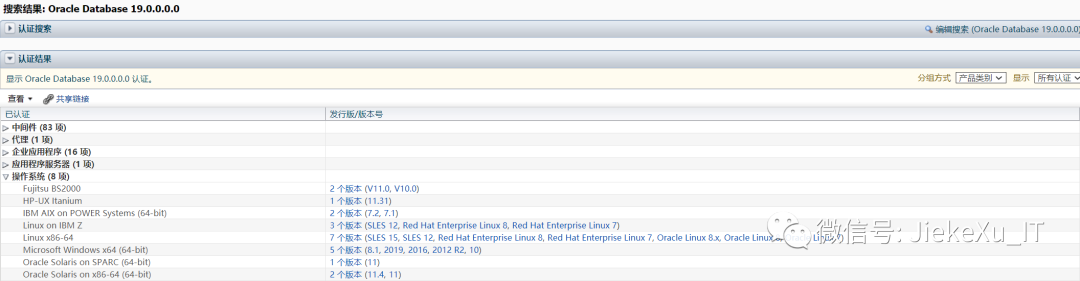
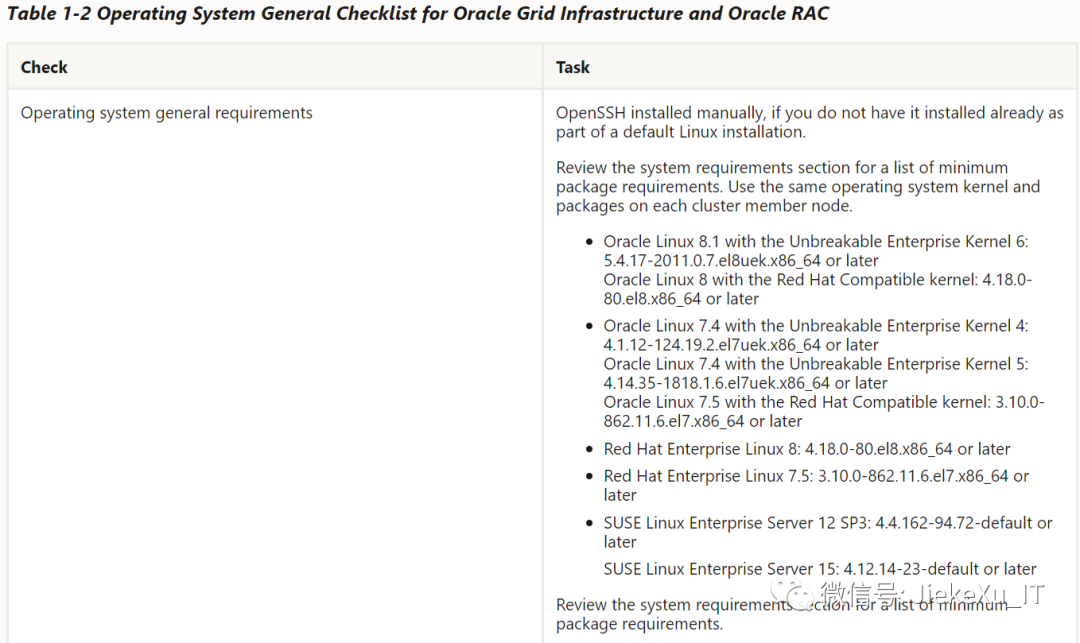
因此安装 Oracle19c RAC,选择 Linux 操作系统,要求最好在 7.5 版本以上。这点请注意。
1.2 虚拟机规划
硬件要求 8G 内存,但是无奈自己的笔记本只有16G.因此每个虚拟机划分为 4G。尝试安装。
| 配置 | |
|---|---|
| CPU | 2core |
| MEM | 4G |
| DISK | 100G |
| 网卡 | 两个网卡,一块Public IP、一块Private IP |
| ISO | OracleLinux-R7-U9-Server-x86_64-dvd.iso |
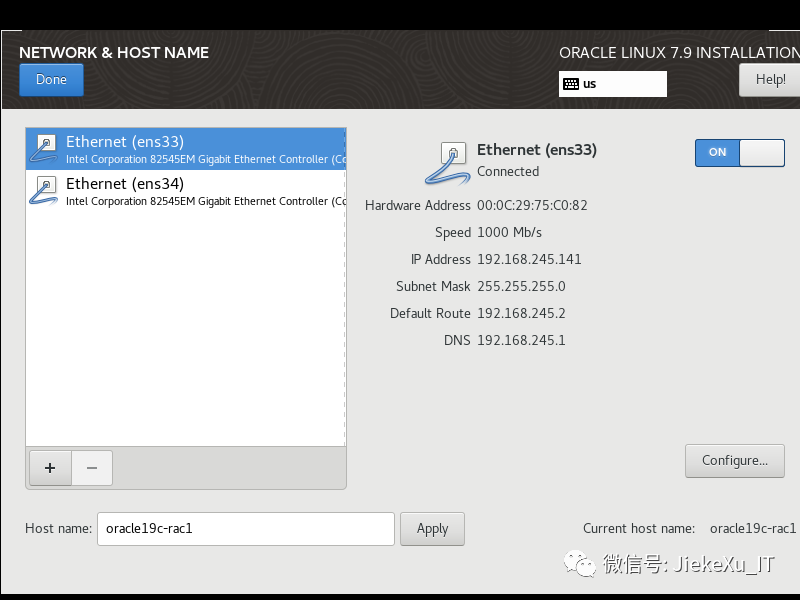
1.3 网络规划
| 节点名称 | Public IP(NAT) | Private IP(HOST) | Virtual IP | SCAN 名称 | SCAN IP |
|---|---|---|---|---|---|
| oracle19c-rac1 | 192.168.245.141 | 192.168.28.141 | 192.168.245.143 | rac-scan | 192.168.245.145 |
| oracle19c-rac2 | 192.168.245.142 | 192.168.28.142 | 192.168.245.144 |
cp etc/hosts etc/hosts_`date +"%Y%m%d_%H%M%S"`echo '#public ip192.168.245.141 oracle19c-rac1192.168.245.142 oracle19c-rac2#private ip192.168.28.141 oracle19c-rac1-priv192.168.28.142 oracle19c-rac2-priv#vip192.168.245.143 oracle19c-rac1-vip192.168.245.144 oracle19c-rac2-vip#scanip192.168.245.145 oracle19c-rac-scan1'>> etc/hosts
1.4 操作系统规划
Table 1-3 Server Configuration Checklist for Oracle Grid Infrastructure
| Check | Task |
|---|---|
| Disk space allocated to the temporary file system | At least 1 GB of space in the temporary disk space (/tmp) directory. |
| Swap space allocation relative to RAM | Between 4 GB and 16 GB: Equal to RAM More than 16 GB: 16 GB Note: If you enable HugePages for your Linux servers, then you should deduct the memory allocated to HugePages from the available RAM before calculating swap space. |
| HugePages memory allocation | Allocate memory to HugePages large enough for the System Global Areas (SGA) of all databases planned to run on the cluster, and to accommodate the System Global Area for the Grid Infrastructure Management Repository. |
| Mount point paths for the software binaries | Oracle recommends that you create an Optimal Flexible Architecture configuration as described in the appendix “Optimal Flexible Architecture” in Oracle Grid Infrastructure Installation and Upgrade Guide for your platform. |
| Ensure that the Oracle home (the Oracle home path you select for Oracle Database) uses only ASCII characters | The ASCII character restriction includes installation owner user names, which are used as a default for some home paths, as well as other directory names you may select for paths. |
| Set locale (if needed) | Specify the language and the territory, or locale, in which you want to use Oracle components. A locale is a linguistic and cultural environment in which a system or program is running. NLS (National Language Support) parameters determine the locale-specific behavior on both servers and clients. The locale setting of a component determines the language of the user interface of the component, and the globalization behavior, such as date and number formatting. |
| Set Network Time Protocol for Cluster Time Synchronization | Oracle Clusterware requires the same time zone environment variable setting on all cluster nodes.Ensure that you set the time zone synchronization across all cluster nodes using either an operating system configured network time protocol (NTP) or Oracle Cluster Time Synchronization Service. |
| Check Shared Memory File System Mount | By default, your operating system includes an entry in /etc/fstabto mount /dev/shm. However, if your Cluster Verification Utility (CVU) or Oracle Universal Installer (OUI) checks fail, then ensure that the /dev/shmmount area is of type tmpfsand is mounted with the following options: rwand execpermissions set on itWithout noexecor nosuidset on itNote: Your operating system usually sets these options as the default permissions. If they are set by the operating system, then they are not listed on the mount options. |
| 要求 | |
|---|---|
| 软件目录 | 安装Grid Infrastracture所需空间:12GB 安装Oracle Database所需空间:7.3GB 此外安装过程中分析、收集、跟踪文件所需空间:10GB 建议总共至少100GB(此处不包含ASM或NFS的空间需求) |
| /tmp | 至少1G |
| swap | 4-16G等于内存;大于16G选择16G |
| /dev/shm | 6G |
| HugePages | 本方案不做配置 |
| 时间同步 |
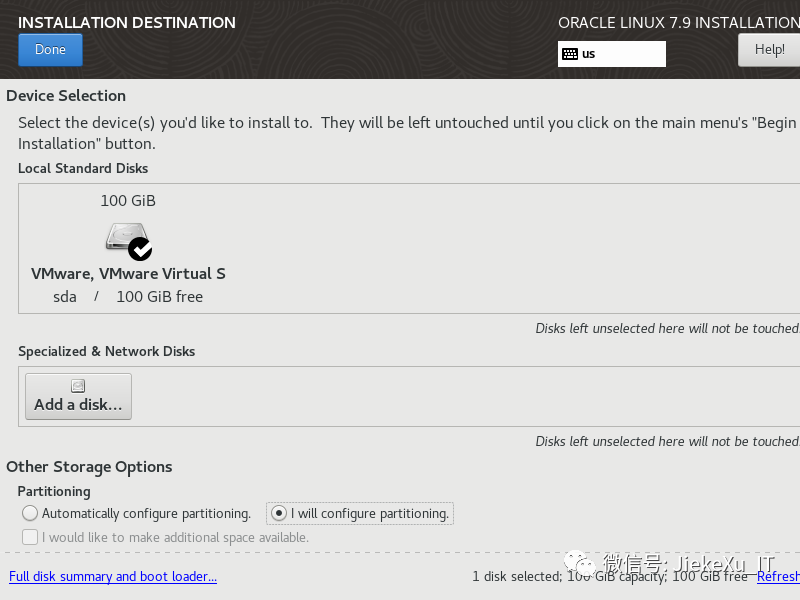
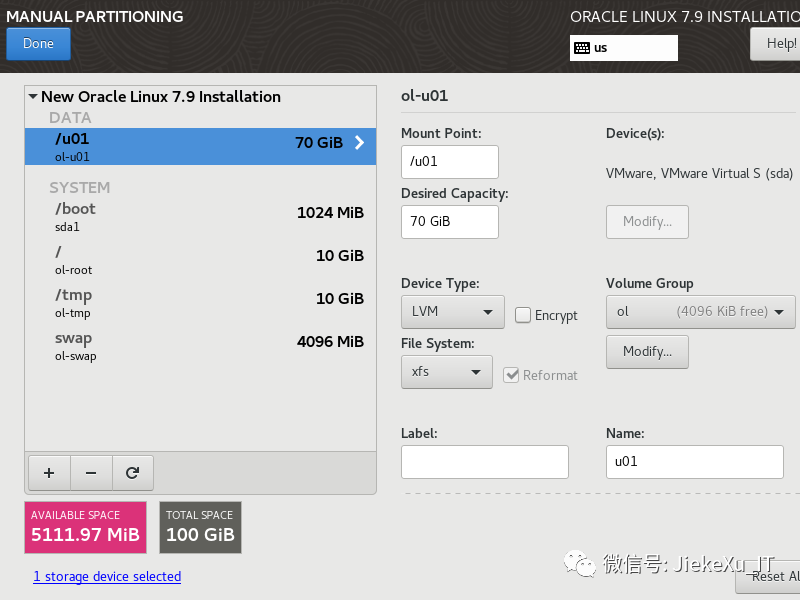
1.4.1 操作系统目录
| 分区 | 大小 |
|---|---|
| /boot | 1G |
| / | 10G |
| /tmp | 10G |
| SWAP | 8G |
| /u01 | 70G |
1.4.2 软件包
Table 4-2 x86-64 Oracle Linux 7 Minimum Operating System Requirements
| Item | Requirements |
|---|---|
| SSH Requirement | Ensure that OpenSSH is installed on your servers. OpenSSH is the required SSH software. |
| Oracle Linux 7 | Subscribe to the Oracle Linux 7 channel on the Unbreakable Linux Network, or configure a yum repository from the Oracle Linux yum server website, and then install the Oracle Preinstallation RPM. This RPM installs all required kernel packages for Oracle Grid Infrastructure and Oracle Database installations, and performs other system configuration.Supported distributions:Oracle Linux 7.4 with the Unbreakable Enterprise Kernel 4: 4.1.12-124.19.2.el7uek.x86_64 or laterOracle Linux 7.4 with the Unbreakable Enterprise Kernel 5: 4.14.35-1818.1.6.el7uek.x86_64 or laterOracle Linux 7.5 with the Red Hat Compatible kernel: 3.10.0-862.11.6.el7.x86_64 or later |
| Packages for Oracle Linux 7 | Install the latest released versions of the following packages: bc binutils compat-libcap1 compat-libstdc33 elfutils-libelf elfutils-libelf-devel fontconfig-devel glibc glibc-devel ksh libaio libaio-devel libXrender libXrender-devel libX11 libXau libXi libXtst libgcc libstdclibstdc+±devel libxcb make smartmontools sysstat Note:If you intend to use 32-bit client applications to access 64-bit servers, then you must also install (where available) the latest 32-bit versions of the packages listed in this table. |
| Optional Packages for Oracle Linux 7 | Based on your requirement, install the latest released versions of the following packages: ipmiutil (for Intelligent Platform Management Interface) net-tools (for Oracle RAC and Oracle Clusterware) nfs-utils (for Oracle ACFS) python (for Oracle ACFS Remote) python-configshell (for Oracle ACFS Remote) python-rtslib (for Oracle ACFS Remote) python-six (for Oracle ACFS Remote) targetcli (for Oracle ACFS Remote) |
| KVM virtualization | Kernel-based virtual machine (KVM), also known as KVM virtualization, is certified on Oracle Database 19c for all supported Oracle Linux 7 distributions. For more information on supported virtualization technologies for Oracle Database, refer to the virtualization matrix:https://www.oracle.com/database/technologies/virtualization-matrix.html |
1.5 共享存储规划
able 1-6 Oracle Grid Infrastructure Storage Configuration Checks
| Check | Task |
|---|---|
| Minimum disk space (local or shared) for Oracle Grid Infrastructure Software | At least 12 GB of space for the Oracle Grid Infrastructure for a cluster home (Grid home). Oracle recommends that you allocate 100 GB to allow additional space for patches. At least 10 GB for Oracle Database Enterprise Edition.Allocate additional storage space as per your cluster configuration, as described in Oracle Clusterware Storage Space Requirements. |
| Select Oracle ASM Storage Options | During installation, based on the cluster configuration, you are asked to provide Oracle ASM storage paths for the Oracle Clusterware files. These path locations must be writable by the Oracle Grid Infrastructure installation owner (Grid user). These locations must be shared across all nodes of the cluster on Oracle ASM because the files in the Oracle ASM disk group created during installation must be available to all cluster member nodes.For Oracle Standalone Cluster deployment, shared storage, either Oracle ASM or shared file system, is locally mounted on each of the cluster nodes.For Oracle Domain Services Cluster deployment, Oracle ASM storage is shared across all nodes, and is available to Oracle Member Clusters. Oracle Member Cluster for Oracle Databases can either use storage services from the Oracle Domain Services Cluster or local Oracle ASM storage shared across all the nodes. Oracle Member Cluster for Applications always use storage services from the Oracle Domain Services Cluster. Before installing Oracle Member Cluster, create a Member Cluster Manifest file that specifies the storage details.Voting files are files that Oracle Clusterware uses to verify cluster node membership and status. Oracle Cluster Registry files (OCR) contain cluster and database configuration information for Oracle Clusterware. |
| Select Grid Infrastructure Management Repository (GIMR) Storage Option | Depending on the type of cluster you are installing, you can choose to either host the Grid Infrastructure Management Repository (GIMR) for a cluster on the same cluster or on a remote cluster.Note:Starting with Oracle Grid Infrastructure 19c, configuring GIMR is optional for Oracle Standalone Cluster deployments.For Oracle Standalone Cluster deployment, you can specify the same or separate Oracle ASM disk group for the GIMR.For Oracle Domain Services Cluster deployment, the GIMR must be configured on a separate Oracle ASM disk group.Oracle Member Clusters use the remote GIMR of the Oracle Domain Services Cluster. You must specify the GIMR details when you create the Member Cluster Manifest file before installation. |
Table 8-1 Minimum Available Space Requirements for Oracle Standalone Cluster With GIMR Configuration
| Redundancy Level | DATA Disk Group | MGMT Disk Group | Oracle Fleet Patching and Provisioning | Total Storage |
|---|---|---|---|---|
| External | 1 GB | 28 GBEach node beyond four:5 GB | 1 GB | 30 GB |
| Normal | 2 GB | 56 GBEach node beyond four:5 GB | 2 GB | 60 GB |
| High/Flex/Extended | 3 GB | 84 GBEach node beyond four:5 GB | 3 GB | 90 GB |
Table 8-2 Minimum Available Space Requirements for Oracle Standalone Cluster Without GIMR Configuration
| Redundancy Level | DATA Disk Group | Oracle Fleet Patching and Provisioning | Total Storage |
|---|---|---|---|
| External | 1 GB | 1 GB | 2 GB |
| Normal | 2 GB | 2 GB | 4 GB |
| High/Flex/Extended | 3 GB | 3 GB | 6 GB |
根据要求,采用的磁盘组策略如下:
| 磁盘组 | 大小 |
|---|---|
| OCRVOTE | 3*2G |
| DATA | 2*10G |
1.6 Oracle规划
1.6.1 软件规划
| 软件 | 版本 |
|---|---|
| Oracle软件 | LINUX.X64_193000_db_home.zip(安装包) |
| GI软件 | LINUX.X64_193000_grid_home.zip(安装包) |
| RU软件 | p32545008_190000_Linux-x86-64.zip -19.11(安装直接升级方式)p32895426_190000_Linux-x86-64.zip(非滚动升级方式) |
| opatch版本 | OPatch 12.2.0.1.25 for DB 12.x, 18.x, 19.x, 20.x and 21.x releases (May 2021) |
1.6.2 用户组和用户
常见用户组说明
| 组 | 角色 | 权限 |
|---|---|---|
| oinstall | 安装和升级oracle软件 | |
| dba | sysdba | 创建、删除、修改、启动、关闭数据库,切换日志归档模式,备份恢复数据库 |
| oper | sysoper | 启动、关闭、修改、备份、恢复数据库,修改归档模式 |
| asmdba | sysdba自动存储管理 | 管理ASM实例 |
| asmoper | sysoper自动存储管理 | 启动、停止ASM实例 |
| asmadmin | sysasm | 挂载、卸载磁盘组,管理其他存储设备 |
| backupdba | sysbackup | 启动关闭和执行备份恢复(12c) |
| dgdba | sysdg | 管理Data Guard(12c) |
| kmdba | syskm | 加密管理相关操作 |
| racdba | rac管理 |
| **GroupName** | **GroupID** | **说明** |
|---|---|---|
| oinstall | 54421 | Oracle清单和软件所有者 |
| dba | 54322 | 数据库管理员 |
| oper | 54323 | DBA操作员组 |
| backupdba | 54324 | 备份管理员 |
| dgdba | 54325 | DG管理员 |
| kmdba | 54326 | KM管理员 |
| asmdba | 54327 | ASM数据库管理员组 |
| asmoper | 54328 | ASM操作员组 |
| asmadmin | 54329 | Oracle自动存储管理组 |
| racdba | 54330 | RAC管理员 |
| 用户UID | OS用户 | 主 | 用户目录 | 默认shell | |
|---|---|---|---|---|---|
| 10000 | oracle | oinstall | dba,asmdba,backupdba,dgdba,kmdba,racdba,oper | /home/oracle | bash |
| 10001 | grid | oinstall | dba,asmadmin,asmdba,racdba,asmoper | /home/grid | bash |
1.6.3 软件目录规划
| 目录名称 | 路径 | 说明 |
|---|---|---|
| ORACLE_BASE (oracle) | /u01/app/oracle | oracle基目录 |
| ORACLE_HOME (oracle) | /u01/app/oracle/product/19.3.0/dbhome_1 | oracle用户HOME目录 |
| ORACLE_BASE (grid) | /u01/app/grid | grid基目录 |
| ORACLE_HOME (grid) | /u01/app/19.3.0/grid | grid用户HOME目录 |
1.6.4 整体数据库安装规划
| 规划内容 | 规划描述 |
|---|---|
| PDB | ocrlpdb |
| 内存规划 | SGA PGA |
| processes | 1000 |
| 字符集 | ZHS16GBK |
| 归档模式 | 非 |
| redo | 5组 每组200M |
| undo | 2G 自动扩展 最大4G |
| temp | 4G |
| 闪回配置 | 4G大小 |
| 归档模式 | 非归档(手工调整归档模式) |
1.6.5 RU升级规划

安装完成之后,计划升级到最新的RU 19.11版本。
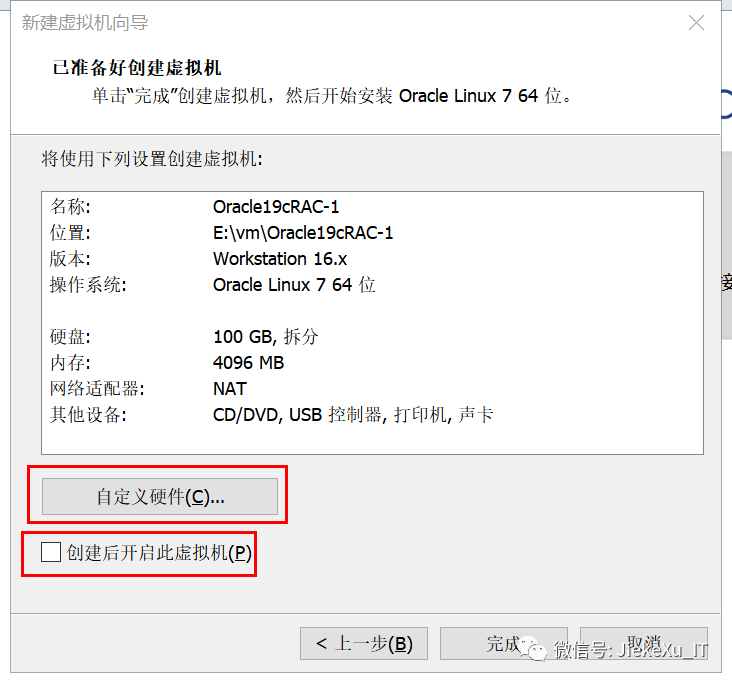
二、虚拟机安装
两台虚拟机创建方式相同,只是IP和主机名不同,因此相关说明只截取一台
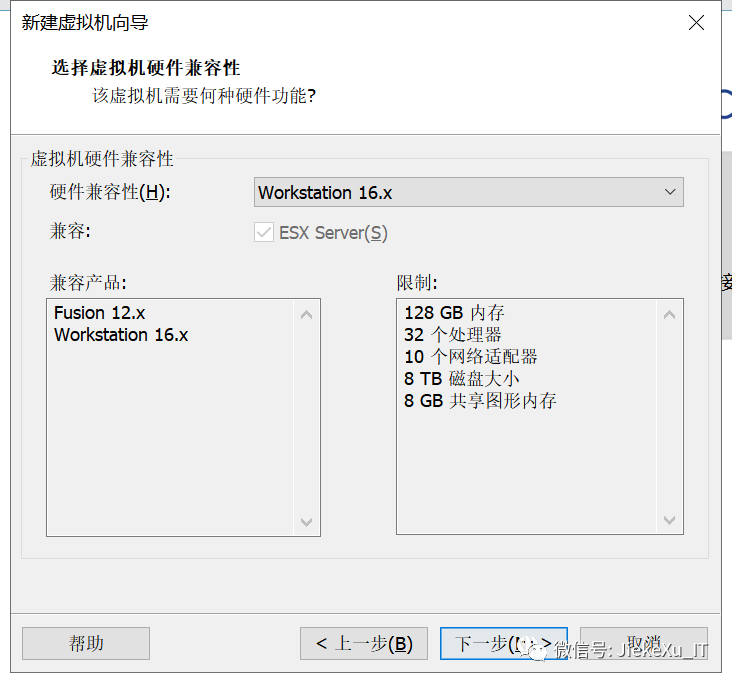
2.1 选择硬件兼容性
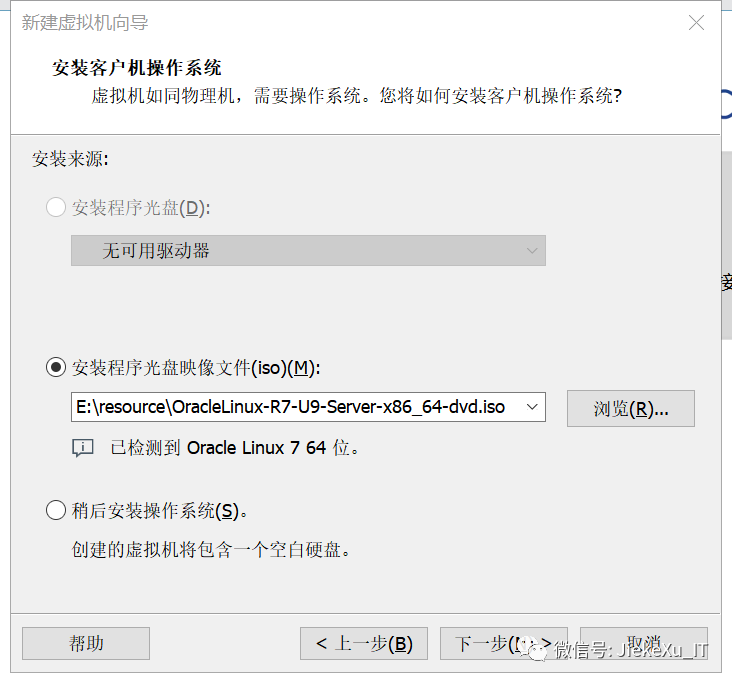
2.2 选择操作系统ISO
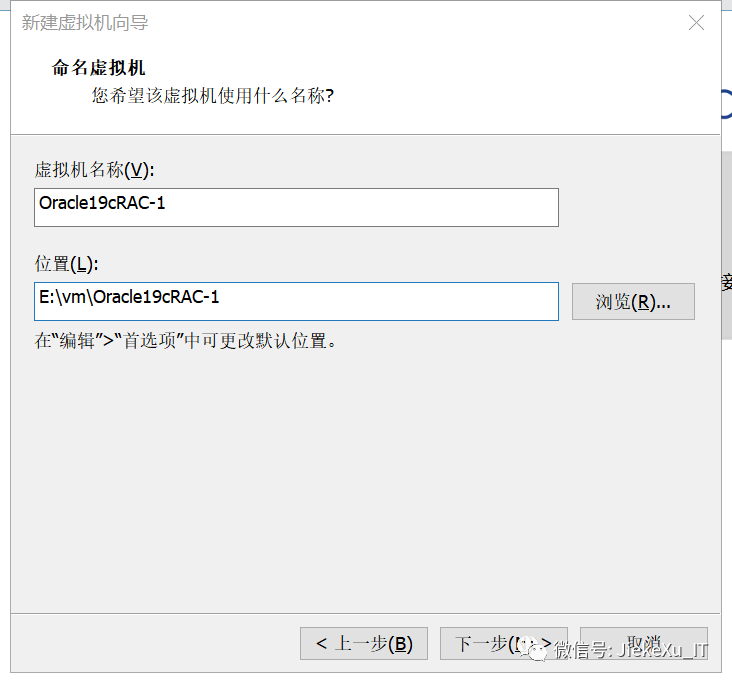
2.3 命名虚拟机
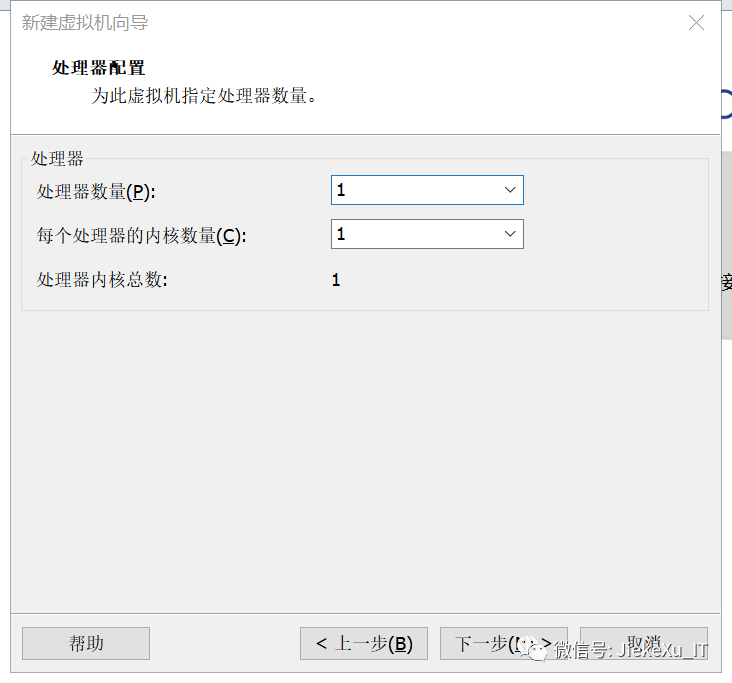
2.4 CPU
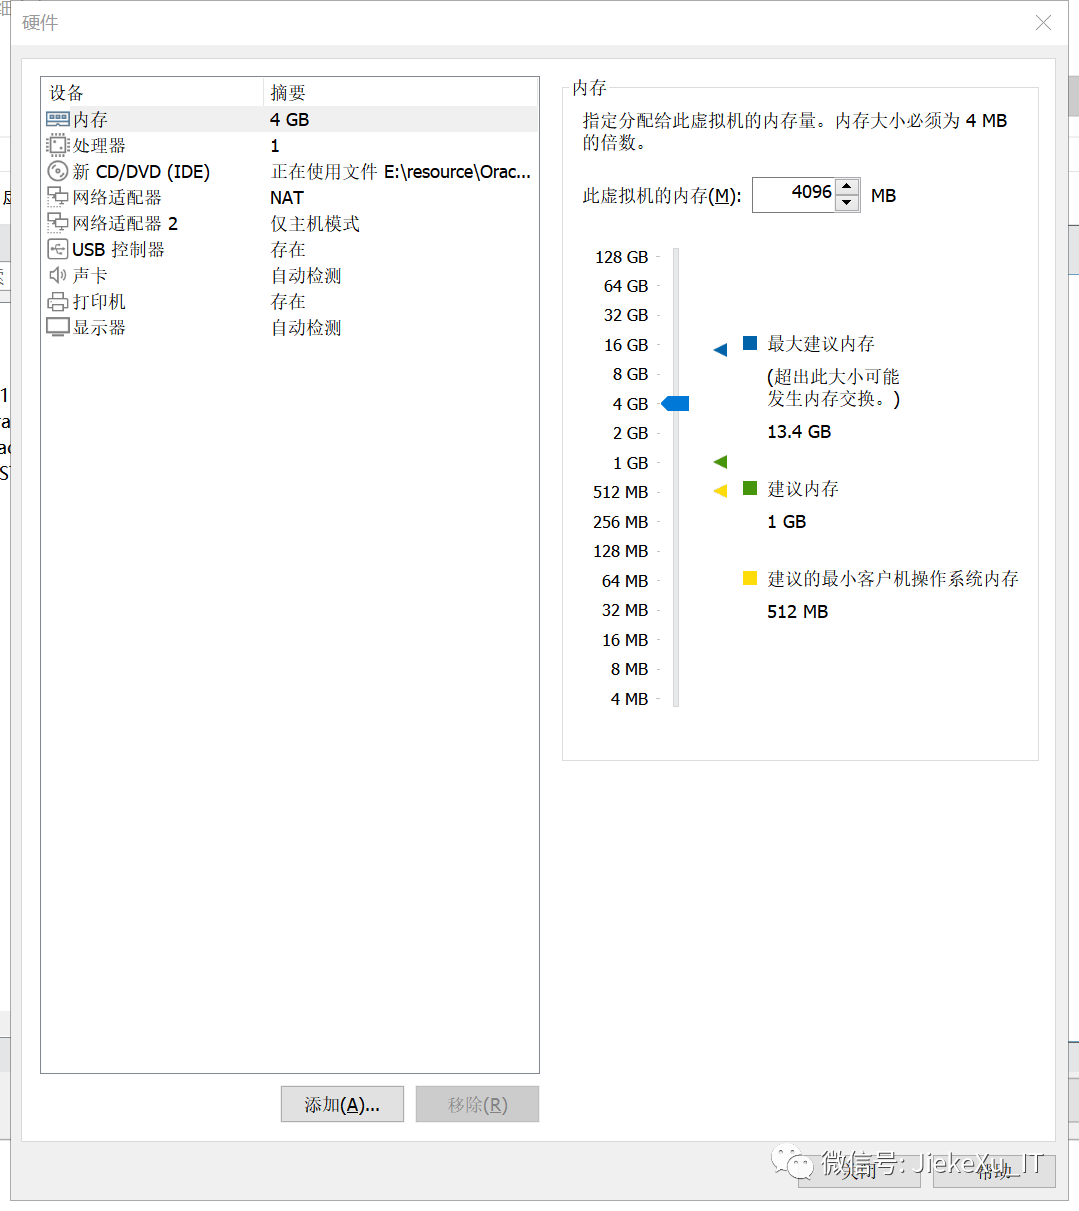
2.5 内存
编者注:内存这块虽是个人学习,但也需要至少 8GB 的内存方可,GI 安装官方文档说明最低需要 8GB 内存。

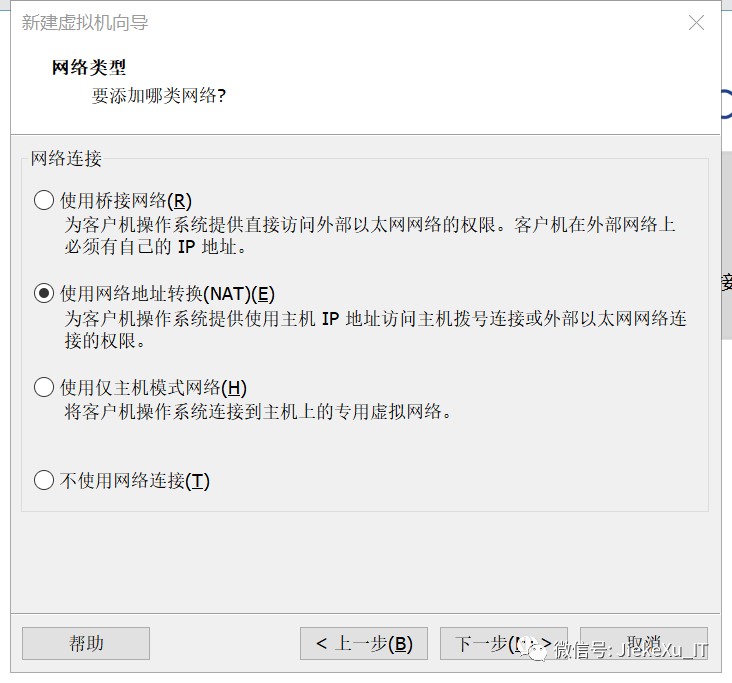
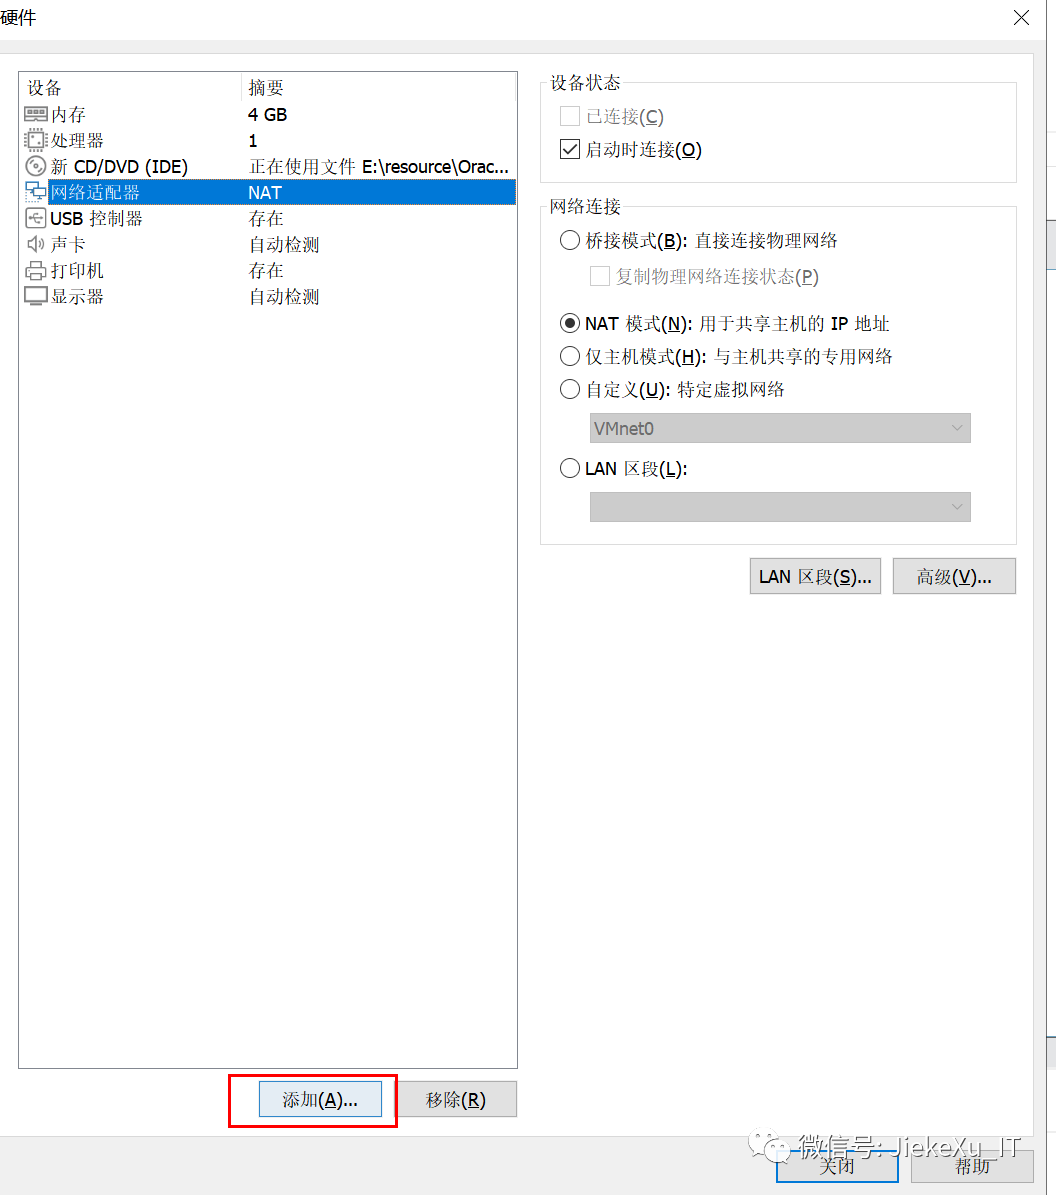
2.6 网卡
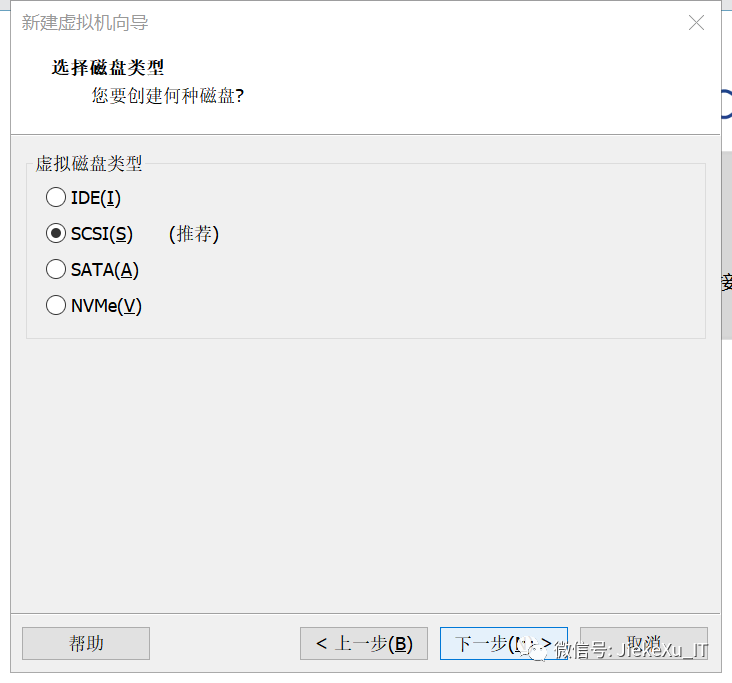
2.7 硬盘

2.8 添加网卡
2.9 同样方式创建 RAC2 节点
过程省略……
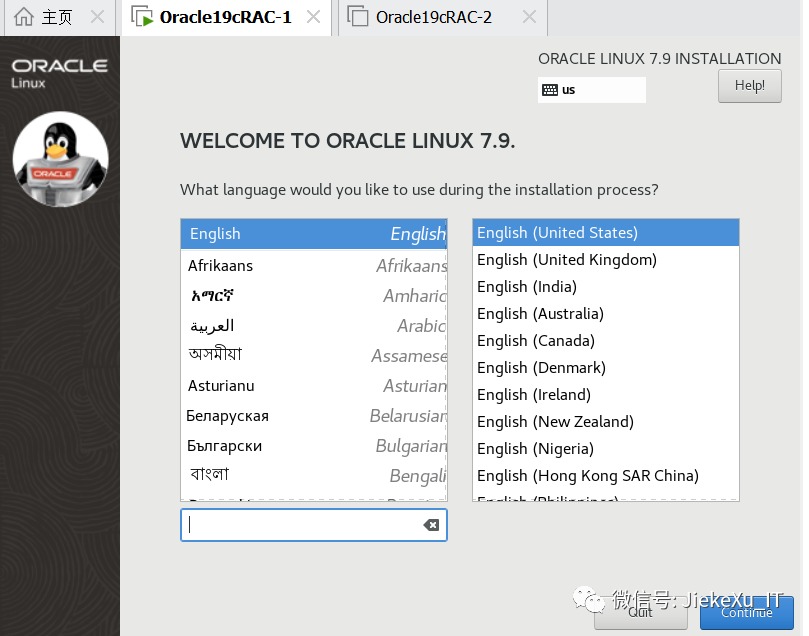
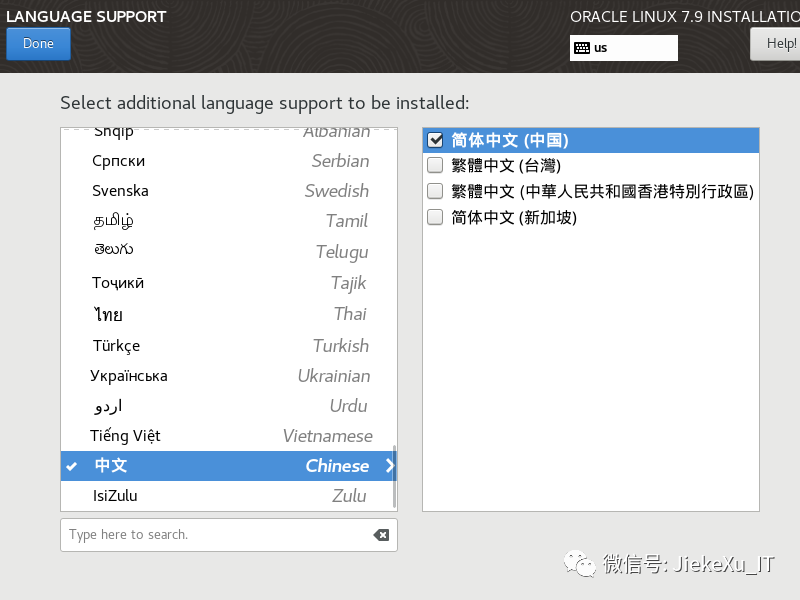
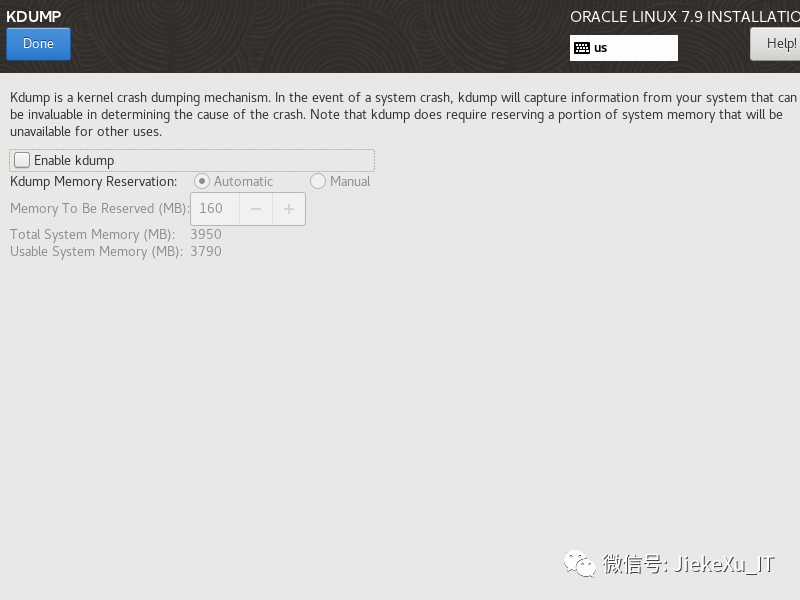
2.10 分别安装操作系统


2.11 安装完成之后,加快 SSH 登录
--配置LoginGraceTime参数为0, 将timeout wait设置为无限制cp etc/ssh/sshd_config etc/ssh/sshd_config_`date +"%Y%m%d_%H%M%S"` && sed -i '/#LoginGraceTime 2m/ s/#LoginGraceTime 2m/LoginGraceTime 0/' etc/ssh/sshd_config && grep LoginGraceTime etc/ssh/sshd_config--加快SSH登陆速度,禁用DNScp /etc/ssh/sshd_config /etc/ssh/sshd_config_`date +"%Y%m%d_%H%M%S"` && sed -i '/#UseDNS yes/ s/#UseDNS yes/UseDNS no/' /etc/ssh/sshd_config && grep UseDNS /etc/ssh/sshd_config
三、共享存储配置
3.1 创建共享磁盘-命令行
vmware-vdiskmanager.exe -c -s 2g -a lsilogic -t 2 "E:\vm\sharedisk19c\share-ocr01.vmdk"vmware-vdiskmanager.exe -c -s 2g -a lsilogic -t 2 "E:\vm\sharedisk19c\share-ocr02.vmdk"vmware-vdiskmanager.exe -c -s 2g -a lsilogic -t 2 "E:\vm\sharedisk19c\share-ocr03.vmdk"vmware-vdiskmanager.exe -c -s 10GB -a lsilogic -t 2 "E:\vm\sharedisk19c\share-data01.vmdk"vmware-vdiskmanager.exe -c -s 10GB -a lsilogic -t 2 "E:\vm\sharedisk19c\share-data02.vmdk"执行过程:PS D:\app\vmware16> .\vmware-vdiskmanager.exe -c -s 2g -a lsilogic -t 2 "E:\vm\sharedisk19c\share-ocr01.vmdk"Creating disk 'E:\vm\sharedisk19c\share-ocr01.vmdk'Create: 100% done.Virtual disk creation successful.PS D:\app\vmware16> .\vmware-vdiskmanager.exe -c -s 2g -a lsilogic -t 2 "E:\vm\sharedisk19c\share-ocr02.vmdk"Creating disk 'E:\vm\sharedisk19c\share-ocr02.vmdk'Create: 100% done.Virtual disk creation successful.PS D:\app\vmware16>PS D:\app\vmware16> .\vmware-vdiskmanager.exe -c -s 2g -a lsilogic -t 2 "E:\vm\sharedisk19c\share-ocr03.vmdk"Creating disk 'E:\vm\sharedisk19c\share-ocr03.vmdk'Create: 100% done.Virtual disk creation successful.PS D:\app\vmware16>PS D:\app\vmware16> .\vmware-vdiskmanager.exe -c -s 10GB -a lsilogic -t 2 "E:\vm\sharedisk19c\share-data01.vmdk"Creating disk 'E:\vm\sharedisk19c\share-data01.vmdk'Create: 100% done.Virtual disk creation successful.PS D:\app\vmware16> .\vmware-vdiskmanager.exe -c -s 10GB -a lsilogic -t 2 "E:\vm\sharedisk19c\share-data02.vmdk"Creating disk 'E:\vm\sharedisk19c\share-data02.vmdk'Create: 100% done.Virtual disk creation successful.相关命令说明:vmware-vdiskmanager [选项]这里的选项你必须包含以下的一些选择项或参数选项和参数描述虚拟磁盘文件的名字。虚拟磁盘文件必须是.vmdk为扩展名。你能够指定一个你想要储存的虚拟磁盘文件的路径。如果你在你的宿主机中映射了网络共享,你也可以提供确切的虚拟磁盘文件的路径信息来创建虚拟磁盘在这个网络共享中-c创建虚拟磁盘。你必须用-a, -s 和 -t 并指定选项参数,然后你需要指定所要创建的虚拟磁盘文件的文件名。-s [GB|MB]指定虚拟磁盘的大小。确定大小用GB或MB做单位。你必须在创建磁盘时指定其大小。尽管你必须指定虚拟磁盘的大小,但当你增长它的大小时,你不能用-s这个选项。可以指定的磁盘大小规定:IDE和SCSI适配器都为最小100MB,最大950GB。-a [ ide | buslogic | lsilogic ]指定磁盘适配器的类型。你在创建新的虚拟磁盘时必须指定其类型。选择以下类型之一:ide —— IDE接口适配器buslogic —— BusLogic SCSI接口适配器lsilogic —— LSI Logic SCSI接口适配器-t [0|1|2|3]你在创建一个新的虚拟磁盘或者重新配置一个虚拟磁盘时必须指定虚拟磁盘的类型。指定以下类型之一:0 —— 创建一个包含在单一虚拟文件中的可增长虚拟磁盘1 —— 创建一个被分割为每个文件2GB大小的可增长虚拟磁盘2 —— 创建一个包含在单一虚拟文件中的预分配虚拟磁盘3 —— 创建一个被分割为每个文件2GB大小的预分配虚拟磁盘因文章全文过长,未能全部同步过来,如需查看全部,点击或复制此链接查看全部内容: https://mp.weixin.qq.com/s/r1gddJ6Qsq-bU68YEbNQNQ
