MySQL 5.7 For RedHat Linux 6.10 源码安装
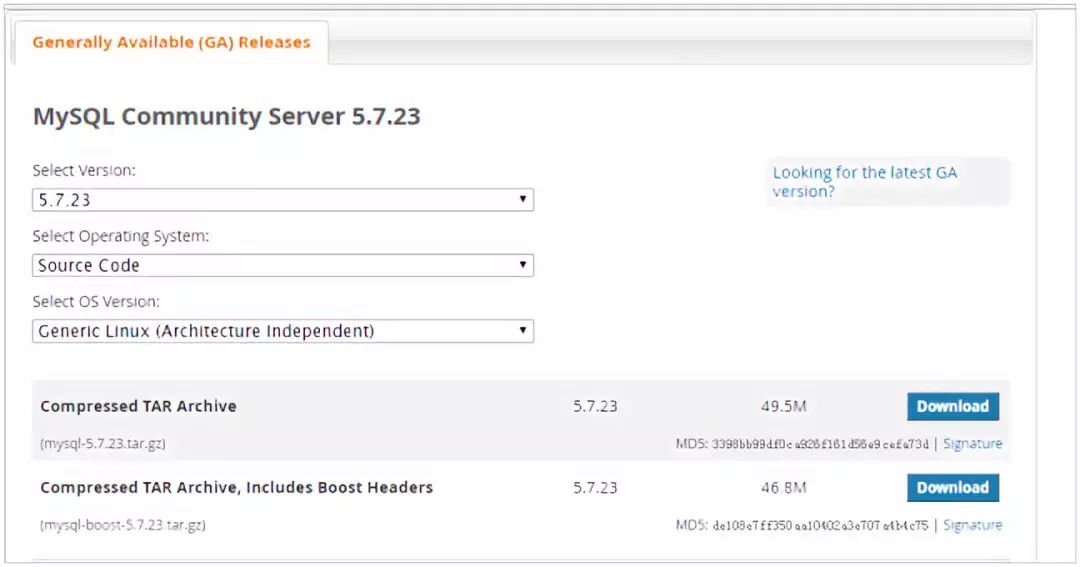
1、下载MySQL源码安装包,地址如下:
https://dev.mysql.com/downloads/mysql/5.7.html#downloads
作如下选择:

2、检测系统是否安装MySQL,没安装的,直接可以安装
执行 #rpm -qa | grep -i mysql
[root@redis4 ~]# rpm -qa | grep -i mysql
mysql-devel-5.1.73-8.el6_8.x86_64
mysql-libs-5.1.73-8.el6_8.x86_64
mysql-5.1.73-8.el6_8.x86_64
卸载MySQL:
[root@redis4 ~]# rpm -emysql-devel-5.1.73-8.el6_8.x86_64 mysql-libs-5.1.73-8.el6_8.x86_64mysql-5.1.73-8.el6_8.x86_64
error: Failed dependencies:
libmysqlclient.so.16()(64bit) is needed by (installed)postfix-2:2.6.6-8.el6.x86_64
libmysqlclient.so.16(libmysqlclient_16)(64bit) is needed by (installed)postfix-2:2.6.6-8.el6.x86_64
mysql-libs is needed by (installed) postfix-2:2.6.6-8.el6.x86_64
用下面的方式卸载,干净彻底:
[root@redis4 ~]# rpm -ev --nodepsmysql-devel-5.1.73-8.el6_8.x86_64 mysql-libs-5.1.73-8.el6_8.x86_64mysql-5.1.73-8.el6_8.x86_64
[root@redis4 ~]# rpm -qa | grep -i mysql
3、检查依赖包
rpm -qa | grep -i libgcc
rpm -qa | grep -i libstdc++-devel
rpm -qa | grep -i gcc
rpm -qa | grep -i gcc-c++
rpm -qa | grep -i bison
rpm -qa | grep -i ncurses-devel
结果如下:
[root@redis4 ~]# rpm -qa | grep -i libgcc
libgcc-4.4.7-23.el6.i686
libgcc-4.4.7-23.el6.x86_64
[root@redis4 ~]# rpm -qa | grep -i libstdc++-devel
libstdc++-devel-4.4.7-23.el6.x86_64
[root@redis4 ~]# rpm -qa | grep -i gcc
gcc-gfortran-4.4.7-23.el6.x86_64
gcc-4.4.7-23.el6.x86_64
gcc-c++-4.4.7-23.el6.x86_64
libgcc-4.4.7-23.el6.i686
libgcc-4.4.7-23.el6.x86_64
[root@redis4 ~]# rpm -qa | grep -i gcc-c++
gcc-c++-4.4.7-23.el6.x86_64
[root@redis4 ~]# rpm -qa | grep -i bison
bison-2.4.1-5.el6.x86_64
[root@redis4 ~]# rpm -qa | grep -i ncurses-devel
ncurses-devel-5.7-4.20090207.el6.x86_64
4、安装cmake
如果已经安装,可忽略
[root@redis4 cmake]# rpm -ivh /media/RHEL-6.10\Server.x86_64/Packages/cmake-2.8.12.2-4.el6.x86_64.rpm
warning: /media/RHEL-6.10Server.x86_64/Packages/cmake-2.8.12.2-4.el6.x86_64.rpm: Header V3 RSA/SHA256Signature, key ID fd431d51: NOKEY
Preparing... ########################################### [100%]
1:cmake ########################################### [100%]
5、安装boost
如果已经安装,可忽略
tar xzf boost_1_59_0.tar.gz
cd boost_1_59_0
./bootstrap.sh
./b2 install
6、安装MySQL
创建MySQL用户:
groupadd dba
groupadd mysql
useradd -g mysql -G dba -s /sbin/nologin mysql
安装文件放在/home/mysql下面:
tar xzf mysql-5.7.23.tar.gz
mv mysql-5.7.23 mysql
mkdir -p /data/mysql
cd mysql
cmake . \
-DCMAKE_INSTALL_PREFIX=/usr/local/mysql \
-DMYSQL_DATADIR=/data/mysql \
-DDOWNLOAD_BOOST=1 \
-DWITH_BOOST=/root/boost_1_59_0 \
-DSYSCONFDIR=/etc \
-DWITH_INNOBASE_STORAGE_ENGINE=1 \
-DWITH_PARTITION_STORAGE_ENGINE=1 \
-DWITH_FEDERATED_STORAGE_ENGINE=1 \
-DWITH_BLACKHOLE_STORAGE_ENGINE=1 \
-DWITH_MYISAM_STORAGE_ENGINE=1 \
-DENABLED_LOCAL_INFILE=1 \
-DENABLE_DTRACE=0 \
-DDEFAULT_CHARSET=utf8mb4 \
-DDEFAULT_COLLATION=utf8mb4_general_ci \
-DWITH_EMBEDDED_SERVER=1
接着执行
make
make install
说明:
-DCMAKE_INSTALL_PREFIX=/usr/local/mysql //安装目录
-DINSTALL_DATADIR=/usr/local/mysql/data //数据库存放目录
-DDEFAULT_CHARSET=utf8 //使用utf8字符
-DDEFAULT_COLLATION=utf8_general_ci //校验字符
-DEXTRA_CHARSETS=all //安装所有扩展字符集
-DENABLED_LOCAL_INFILE=1 //允许从本地导入数据
将MySQL加入服务,随服务器自启动
cp /usr/local/mysql/support-files/mysql.server/etc/init.d/mysql
chmod +x /etc/init.d/mysql
chkconfig --add mysql
chkconfig mysql on
配置/etc/my.cnf
[client]
port = 3306
socket = /tmp/mysql.sock
default-character-set = utf8mb4
[mysqld]
port = 3306
socket = /tmp/mysql.sock
basedir = /usr/local/mysql
datadir = /data/mysql
pid-file = /data/mysql/mysql.pid
user = mysql
bind-address = 0.0.0.0
server-id = 1
init-connect = 'SET NAMES utf8mb4'
character-set-server = utf8mb4
#skip-name-resolve
#skip-networking
back_log = 300
max_connections = 1000
max_connect_errors = 6000
open_files_limit = 65535
table_open_cache = 128
max_allowed_packet = 4M
binlog_cache_size = 1M
max_heap_table_size = 8M
tmp_table_size = 16M
read_buffer_size = 2M
read_rnd_buffer_size = 8M
sort_buffer_size = 8M
join_buffer_size = 8M
key_buffer_size = 4M
thread_cache_size = 8
query_cache_type = 1
query_cache_size = 8M
query_cache_limit = 2M
ft_min_word_len = 4
log_bin = mysql-bin
binlog_format = mixed
expire_logs_days = 30
log_error = /data/mysql/mysql-error.log
slow_query_log = 1
long_query_time = 1
slow_query_log_file = /data/mysql/mysql-slow.log
performance_schema = 0
explicit_defaults_for_timestamp
#lower_case_table_names = 1
skip-external-locking
default_storage_engine = InnoDB
#default-storage-engine = MyISAM
innodb_file_per_table = 1
innodb_open_files = 500
innodb_buffer_pool_size = 64M
innodb_write_io_threads = 4
innodb_read_io_threads = 4
innodb_thread_concurrency = 0
innodb_purge_threads = 1
innodb_flush_log_at_trx_commit = 2
innodb_log_buffer_size = 2M
innodb_log_file_size = 32M
innodb_log_files_in_group = 3
innodb_max_dirty_pages_pct = 90
innodb_lock_wait_timeout = 120
bulk_insert_buffer_size = 8M
myisam_sort_buffer_size = 8M
myisam_max_sort_file_size = 10G
myisam_repair_threads = 1
interactive_timeout = 28800
wait_timeout = 28800
[mysqldump]
quick
max_allowed_packet = 16M
[myisamchk]
key_buffer_size = 8M
sort_buffer_size = 8M
read_buffer = 4M
write_buffer = 4M
7、初始化并启动数据库
/usr/local/mysql/bin/mysqld --initialize-insecure--user=mysql --basedir=/usr/local/mysql --datadir=/data/mysql
注:之前版本mysql_install_db是在mysql_basedir/script下,5.7放在了mysql_install_db/bin目录下,且已被废弃
“–initialize”会生成一个随机密码(~/.mysql_secret),而”–initialize-insecure”不会生成密码
cat /data/mysql/mysql-error.log |grep password
2018-07-31T02:24:14.992420Z 1 [Warning] root@localhostis created with an empty password ! Please consider switching off the--initialize-insecure option.
启动MySQL服务
service mysql start
[root@redis4 ~]# service mysql start
Starting MySQL. [ OK ]
8、修改root密码
[root@redis4 ~]# mysql -uroot -p
Enter password:
Welcome to the MySQL monitor. Commands end with ; or \g.
Your MySQL connection id is 3
Server version: 5.7.23-log Source distribution
Copyright (c) 2000, 2018, Oracle and/or itsaffiliates. All rights reserved.
Oracle is a registered trademark of Oracle Corporationand/or its
affiliates. Other names may be trademarks of theirrespective
owners.
Type 'help;' or '\h' for help. Type '\c' to clear thecurrent input statement.
mysql> alter user 'root'@'localhost' identifiedby '1qaz@wsx';
Query OK, 0 rows affected (0.00 sec)
mysql> exit
Bye
[root@redis4 ~]# mysql -uroot -p //输入密码,正常登陆
Enter password:
Welcome to the MySQL monitor. Commands end with ; or \g.
Your MySQL connection id is 4
Server version: 5.7.23-log Source distribution
Copyright (c) 2000, 2018, Oracle and/or itsaffiliates. All rights reserved.
Oracle is a registered trademark of Oracle Corporationand/or its
affiliates. Other names may be trademarks of theirrespective
owners.
Type 'help;' or '\h' for help. Type '\c' to clear thecurrent input statement.
mysql> exit
Bye
[root@redis4 ~]# mysql -uroot -p //没有密码,登陆被拒绝
Enter password:
ERROR 1045 (28000): Access denied for user'root'@'localhost' (using password: NO)
9、创建远程访问账号
MySQL数据库完成后,不允许直接远程访问:
mysql> select user,host,plugin from user;
+---------------+-----------+-----------------------+
| user | host | plugin |
+---------------+-----------+-----------------------+
| root | localhost | mysql_native_password |
| mysql.session | localhost | mysql_native_password |
| mysql.sys | localhost | mysql_native_password |
+---------------+-----------+-----------------------+
只允许本地访问,需要把root的远程访问权限打开,如下:
mysql>use mysql;
Database changed
mysql> grant all privileges on *.* to root@'%' identified by"1qaz@wsx";
Query OK, 0 rows affected, 1 warning (0.00 sec)
但是这样只适合于开发阶段,在生产环境不建议这样设置,建议创建专用的远程访问账号,如下:
收回root远程可访问权限:
RENAME USER `root`@`%` TO `root`@``;
下面的方法也可以:
grant all on *.* to 'root'@'localhost' IDENTIFIED BY'1qaz@wsx' with grant option;
创建专用账号:
CREATE USER `micky`@`%` IDENTIFIED BY '1qaz@wsx';
GRANT ALL PRIVILEGES ON *.* TO `micky`@`%` IDENTIFIEDBY '1qaz@wsx' WITH GRANT OPTION;


