配置互信
配置三台主机 gbase 用户 ssh 互信
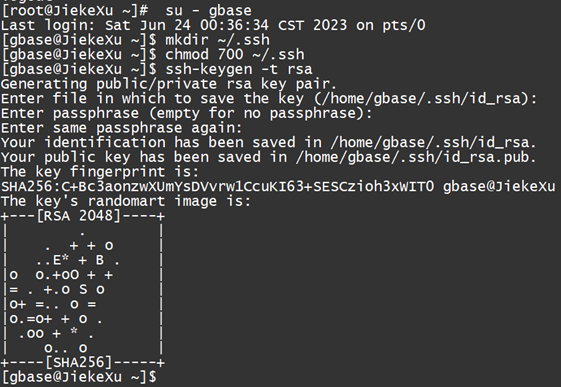
(1) 切换到 gbase 用户下
[root@JiekeXu ~]# su - gbase
(2) 创建秘钥目录和必要的授权
[gbase@JiekeXu ~]$ mkdir ~/.ssh
[gbase@JiekeXu ~]$ chmod 700 ~/.ssh
(3) 生成秘钥文件(连续回车即可)
[gbase@JiekeXu ~]$ ssh-keygen -t rsa
(4) 将公钥文件上传至其他节点即可实现免密登录
此操作需输入 yes 和 gbase 用户的密码,所有节点执行如下 copy 命令。
$ ssh-copy-id gbase@192.168.32.31
$ ssh-copy-id gbase@192.168.32.32
$ ssh-copy-id gbase@192.168.32.33
然后检查 authorized_keys 文件可查看包含主机名的三行记录。
[gbase@JiekeXu ~]$ cat ~/.ssh/authorized_keys
(5) 通过 ssh 命令验证是否已实现互信免密:ssh gbase@hostip
for h in jiekexu test19crac1 test19crac2;do
ssh -l gbase -o StrictHostKeyChecking=no $h date;
done
不需要输入密码即可登录,表明配置互信成功。
配置 ssh 服务加速 CRT 连接
--配置LoginGraceTime参数为0, 将timeout wait设置为无限制
cp /etc/ssh/sshd_config /etc/ssh/sshd_config_`date +"%Y%m%d_%H%M%S"` && sed -i '/#LoginGraceTime 2m/ s/#LoginGraceTime 2m/LoginGraceTime 0/' /etc/ssh/sshd_config && grep LoginGraceTime /etc/ssh/sshd_config
--加快SSH登陆速度,禁用DNS
cp /etc/ssh/sshd_config /etc/ssh/sshd_config_`date +"%Y%m%d_%H%M%S"` && sed -i '/#UseDNS yes/ s/#UseDNS yes/UseDNS no/' /etc/ssh/sshd_config && grep UseDNS /etc/ssh/sshd_config
配置 NTP 时间同步
(1) 检查所有服务器上 NTP 服务的状态
sudo systemctl status ntpd.service
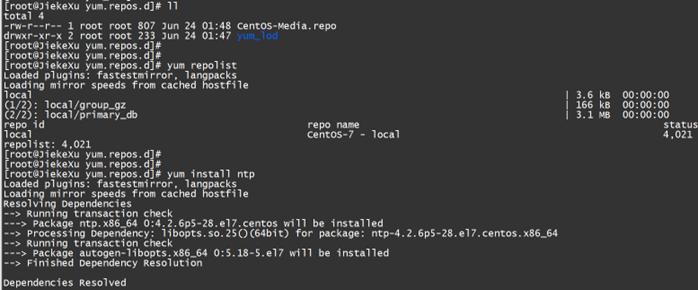
如果没有启动 ntp 服务,需要 start 启动 sudo systemctl start ntpd.service 但是如果没有安装 ntp 服务,则需要配置 yum 源,安装 ntp 服务。
[gbase@JiekeXu etc]$ sudo service ntpd start
Redirecting to /bin/systemctl start ntpd.service
Failed to start ntpd.service: Unit not found.
[root@JiekeXu yum.repos.d]# yum install ntp -y
(2) 配置 NTP 服务
cat /etc/hosts
##############GBase 8c IP ##############
192.168.32.31 JiekeXu
192.168.32.32 test19crac1
192.168.32.33 test19crac2
#####################################
在集群所有服务器上, 以 gbase 用户身份执行。
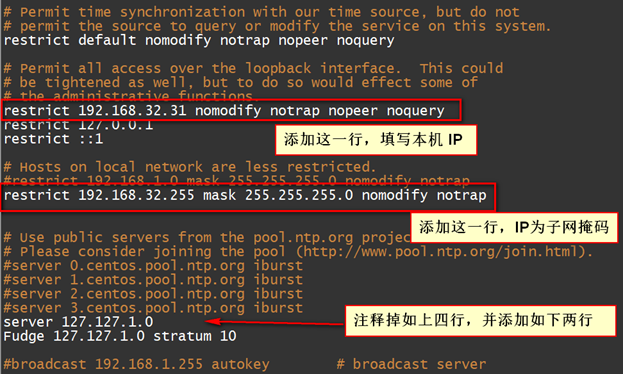
人为选取 NTP 主节点,通常是 GTM 主节点。在所有节点上编辑配置文件:vim /etc/ntp.conf,并“:wq”保存退出。
NTP主节点:设置127.127.1.0(本地时钟)
NTP 从节点:设置主节点 IP
systemctl enable ntpd ----设置开机自启动
其他两节点,写入如下内容:
节点二
driftfile /var/lib/ntp/drift
restrict default nomodify notrap nopeer noquery
restrict 192.168.32.32 nomodify notrap nopeer noquery ##本机 IP
restrict 127.0.0.1
restrict ::1
restrict 192.168.32.255 mask 255.255.255.0 nomodify notrap
server 192.168.32.31
Fudge 192.168.32.31 stratum 10
节点三
driftfile /var/lib/ntp/drift
restrict default nomodify notrap nopeer noquery
restrict 192.168.32.33 nomodify notrap nopeer noquery
restrict 127.0.0.1
restrict ::1
restrict 192.168.32.255 mask 255.255.255.0 nomodify notrap
server 192.168.32.31
Fudge 192.168.32.31 stratum 10
ntp.conf 文件保存退出后,启动 ntp 服务并设置开机自启动。
$ sudo service ntpd start # 启动NTP服务
$ sudo chkconfig ntpd on # 设置 NTP 服务开机自启
注意:
¬ 某些虚拟机环境下无法配置 NTP 开机自启动, 需要每次重启后进行手工启动。
¬ 时间同步会影响数据库集群部署及一致性操作, 须提前配置生效。
(3)配置完毕后, 在各节点执行以下命令 ntpstat , 查看 NTP 服务是否连通。
NTP 主节点应返回:
[gbase@JiekeXu ~]$ ntpstat
synchronised to local net at stratum 6
time correct to within 12 ms
polling server every 64 s
另外节点返回:
[gbase@test19crac1 ~]$ ntpstat
synchronised to NTP server (192.168.32.31) at stratum 7
time correct to within 30 ms
polling server every 128 s
节点三返回:
[gbase@test19crac2 ~]$ ntpstat
unsynchronised
time server re-starting
polling server every 8 s
注意: NTP 服务器配置完毕后, 需要等待 5~20 分钟才能完成时间同步, 如果在配置后提示
unsynchronised time server re-starting polling server every 8 s 或 unsynchronised polling server every 8 s 均属正常,等待一段时间再次执行 ntpstat 命令查看即可。


