


好好好,好久不见,最近偶然了解到了pg_bulkload这一插件,然后花了点时间看了看它是如何实现的,又想到好久没有写东西了,咕了太久,有点怪不好意思的,所以决定写点东西,摆脱鸽子🕊的嫌疑。
一、pg_bulkload简单介绍
pg_bulkload 为PostgreSQL提供高速加载数据的插件。相关链接如下:
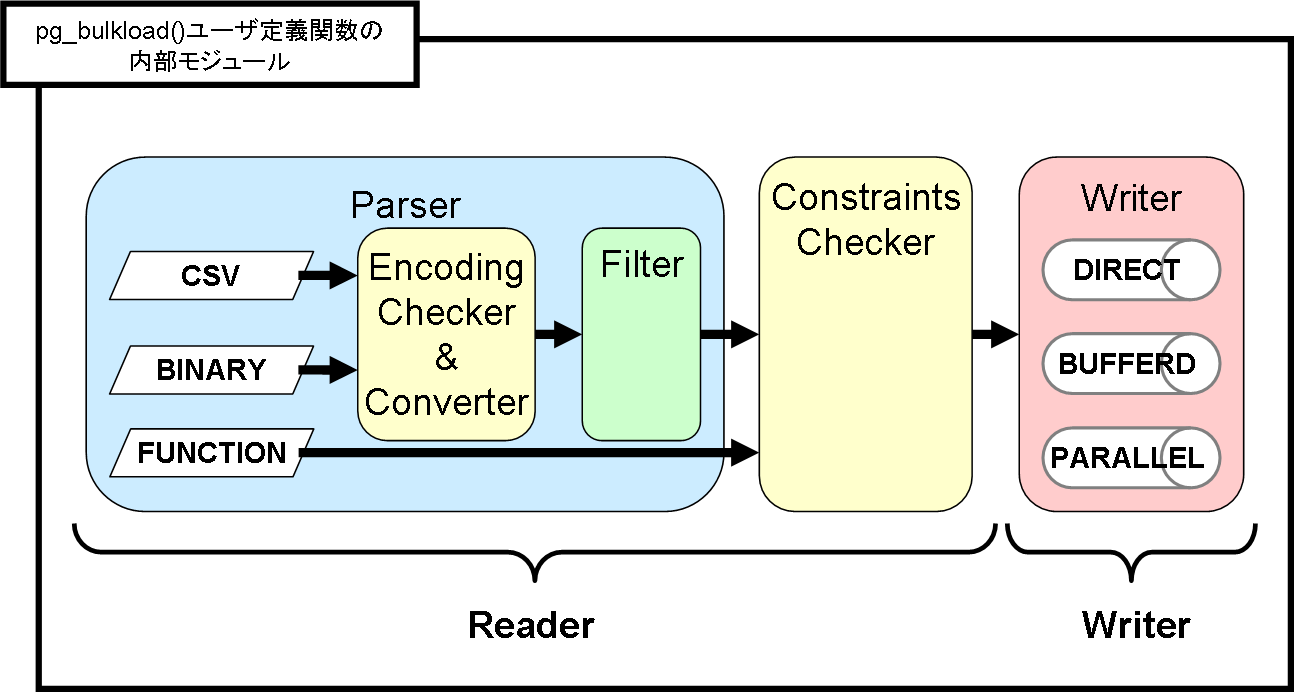
pg_bulkload内部结构图如下,后续章节我会以CSV格式文件,对pg_bulkload进行分析,源码分析从第四节开始,对前面比较熟悉的同学,可以直接调转至第四节。
二、拓展插件安装
我此次采用的是源码安装,PostgreSQL版本14.10,你可以点击上述的pg_bulkload项目地址,下载源码文件,或者使用git clone命令,和我一同操作进行编译安装。
# 拉取pg_bulkload源代码
git clone https://github.com/ossc-db/pg_bulkload.git
# 进入源码目录
cd pg_bulkload/
# 如果此时你的源码下载路径不是位于PostgreSQL源码的contrib目录下可以使用以下命令进行编译安装
make USE_PGXS=1
make install
如果此时你的源码下载路径刚好是位于PostgreSQL的contrib目录下 此时使用make去编译 会存在一个编译的问题 编译不成功 大致报错如下(仅当前的版本的pg_bulkload)
make[1]: --pkglibdir: Command not found
gcc -Wall -Wmissing-prototypes -Wpointer-arith -Wdeclaration-after-statement -Werror=vla -Wendif-labels -Wmissing-format-attribute -Wimplicit-fallthrough=3 -Wcast-function-type -Wformat-security -fno-strict-aliasing -fwrapv -fexcess-precision=standard -Wno-format-truncation -Wno-stringop-truncation -g -O0 pg_bulkload.o recovery.o pgut/pgut.o pgut/pgut-fe.o pgut/pgut-list.o  -L../../../src/port -L../../../src/common   -Wl,--as-needed -Wl,-rpath,'/var/lib/pgsql/postgresql_14/lib',--enable-new-dtags -Wl,--build-id  -L../../../src/interfaces/libpq -lpq -L -lpgcommon -lpgport -lz -lreadline -lpthread -lrt -ldl -lm -o pg_bulkload
pgut/pgut.o: In function `pgut_init':
/var/lib/pgsql/14code/postgres/contrib/pg_bulkload/bin/pgut/pgut.c:79: undefined reference to `set_pglocale_pgservice'
pgut/pgut.o: In function `prompt_for_password':
/var/lib/pgsql/14code/postgres/contrib/pg_bulkload/bin/pgut/pgut.c:395: undefined reference to `simple_prompt'
pgut/pgut-list.o: In function `new_list':
/var/lib/pgsql/14code/postgres/contrib/pg_bulkload/bin/pgut/pgut-list.c:114: undefined reference to `palloc'
pgut/pgut-list.o: In function `enlarge_list':
/var/lib/pgsql/14code/postgres/contrib/pg_bulkload/bin/pgut/pgut-list.c:174: undefined reference to `repalloc'
pgut/pgut-list.o: In function `list_free_private':
/var/lib/pgsql/14code/postgres/contrib/pg_bulkload/bin/pgut/pgut-list.c:1565: undefined reference to `pfree'
/var/lib/pgsql/14code/postgres/contrib/pg_bulkload/bin/pgut/pgut-list.c:1568: undefined reference to `pfree'
/var/lib/pgsql/14code/postgres/contrib/pg_bulkload/bin/pgut/pgut-list.c:1569: undefined reference to `pfree'
collect2: error: ld returned 1 exit status
make[1]: *** [../../../src/makefiles/pgxs.mk:475: pg_bulkload] Error 1
make[1]: Leaving directory '/var/lib/pgsql/14code/postgres/contrib/pg_bulkload/bin'
make: *** [Makefile:27: all] Error 2
此时需要修改pg_bulkload下bin目录中的Makefile
cd pg_bulkload/
cd bin/
vim Makefile
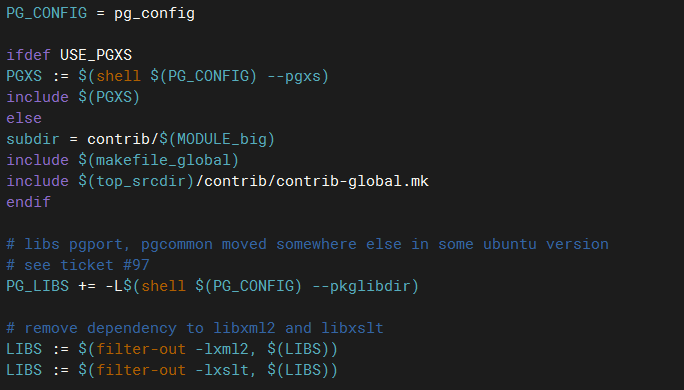
# 你可以选择注释掉 PG_LIBS += -L$(shell $(PG_CONFIG) --pkglibdir) 或者是将
# ifdef USE_PGXS
# PG_CONFIG = pg_config
# PGXS := $(shell $(PG_CONFIG) --pgxs)
# 此处的PG_CONFIG = pg_config 放到ifdef前 我更倾向于第二种做法
# 修改完毕 进行编译
make && make install 我的Makefile修改如图所示
编译已通过、接下来进行插件安装,使用create extension pg_bulkload;即可
[postgres@halo-centos-8-release ~]$ psql
psql (14.10)
Type "help" for help.

postgres=# create extension pg_bulkload;
CREATE EXTENSION
postgres=# \dx
                                     List of installed extensions
    Name     | Version |   Schema   |                           Description
-------------+---------+------------+-----------------------------------------------------------------
 pg_bulkload | 3.1.21  | public     | pg_bulkload is a high speed data loading utility for PostgreSQL
 plpgsql     | 1.0     | pg_catalog | PL/pgSQL procedural language
(2 rows)

postgres=#
三、简单使用
其实有很多大佬已经给出了非常详细的使用方式了,所以此处我就简单巴拉巴拉两嘴。
-- 使用halo用户在postgres数据库下 创建表foo
create table foo(a int, b varchar);
-- 退出数据库
\q
生成点数据
seq 100000| awk '{print $0",foo"}' > foo.csv接下来使用pg_bulkload 导入数据,有两种方式,一种是不使用ctl文件
# 此处输入文件为foo.csv 输出对应到foo表 指定生成日志为test_foo.log 处理以csv的处理方式处理输入文件 分隔符为"," 端口号 数据库名 操作用户 依据自己的实际情况进行更改
[postgres@halo-centos-8-release ~]$ pg_bulkload -i ./foo.csv -O foo -l test_foo.log -p 5434 -o "TYPE=csv" -o "DELIMITER=," -d postgres -U halo
NOTICE: BULK LOAD START
NOTICE: BULK LOAD END
        0 Rows skipped.
        100000 Rows successfully loaded.
        0 Rows not loaded due to parse errors.
        0 Rows not loaded due to duplicate errors.
        0 Rows replaced with new rows.
# 查看日志
[postgres@halo-centos-8-release ~]$ cat test_foo.log

pg_bulkload 3.1.21 on 2024-02-05 10:55:03.159387+08

INPUT = /var/lib/pgsql/foo.csv
PARSE_BADFILE = /var/lib/pgsql/14/pg_bulkload/20240205105503_postgres_public_foo.prs.csv
LOGFILE = /var/lib/pgsql/test_foo.log
LIMIT = INFINITE
PARSE_ERRORS = 0
CHECK_CONSTRAINTS = NO
TYPE = CSV
SKIP = 0
DELIMITER = ,
QUOTE = "\""
ESCAPE = "\""
NULL =
OUTPUT = public.foo
MULTI_PROCESS = NO
VERBOSE = NO
WRITER = DIRECT
DUPLICATE_BADFILE = /var/lib/pgsql/14/pg_bulkload/20240205105503_postgres_public_foo.dup.csv
DUPLICATE_ERRORS = 0
ON_DUPLICATE_KEEP = NEW
TRUNCATE = NO


  0 Rows skipped.
  100000 Rows successfully loaded.
  0 Rows not loaded due to parse errors.
  0 Rows not loaded due to duplicate errors.
  0 Rows replaced with new rows.

Run began on 2024-02-05 10:55:03.159387+08
Run ended on 2024-02-05 10:55:03.218338+08

CPU 0.00s/0.05u sec elapsed 0.06 sec
第二种是编写ctl文件 将部分需要传入的参数写入ctl文件中
[postgres@halo-centos-8-release ~]$ vim sample_csv.ctl
[postgres@halo-centos-8-release ~]$ cat sample_csv.ctl
#
# sample_csv.ctl -- Control file to load CSV input data
#
#    Copyright (c) 2007-2024, NIPPON TELEGRAPH AND TELEPHONE CORPORATION
#
OUTPUT = foo                   # [<schema_name>.]table_name
INPUT = /var/lib/pgsql/foo.csv  # Input data location (absolute path)
TYPE = CSV                            # Input file type
QUOTE = "\""                          # Quoting character
ESCAPE = \                            # Escape character for Quoting
DELIMITER = ","                       # Delimiter

[postgres@halo-centos-8-release ~]$ pg_bulkload ./sample_csv.ctl -d postgres -U halo
NOTICE: BULK LOAD START
NOTICE: BULK LOAD END
        0 Rows skipped.
        100000 Rows successfully loaded.
        0 Rows not loaded due to parse errors.
        0 Rows not loaded due to duplicate errors.
        0 Rows replaced with new rows.
[postgres@halo-centos-8-release ~]$
当然你也可以将ctl文件写的更加丰富详细 比如说是否在导数据前 执行truncate 是否需要跳过多少行数据 具体写入方式是什么之类的 具体可以参考pg_bulkload详细使用文档
[postgres@halo-centos-8-release ~]$ vim sample_csv.ctl
[postgres@halo-centos-8-release ~]$ cat sample_csv.ctl
OUTPUT = foo
INPUT = /var/lib/pgsql/foo.csv
LOGFILE = /var/lib/pgsql/test_table_foo.log
LIMIT = INFINITE
PARSE_ERRORS = 0
CHECK_CONSTRAINTS = NO
TYPE = CSV
SKIP = 0
DELIMITER = ","
QUOTE = "\""
ESCAPE = "\""
MULTI_PROCESS = NO
WRITER = DIRECT
DUPLICATE_ERRORS = 0
ON_DUPLICATE_KEEP = NEW
TRUNCATE = YES
[postgres@halo-centos-8-release ~]$ pg_bulkload ./sample_csv.ctl -d postgres -U halo
NOTICE: BULK LOAD START
NOTICE: BULK LOAD END
        0 Rows skipped.
        100000 Rows successfully loaded.
        0 Rows not loaded due to parse errors.
        0 Rows not loaded due to duplicate errors.
        0 Rows replaced with new rows.
[postgres@halo-centos-8-release ~]$ cat test_table_foo.log

pg_bulkload 3.1.21 on 2024-02-05 11:58:33.765146+08

INPUT = /var/lib/pgsql/foo.csv
PARSE_BADFILE = /var/lib/pgsql/14/pg_bulkload/20240205115833_postgres_public_foo.prs.csv
LOGFILE = /var/lib/pgsql/test_table_foo.log
LIMIT = INFINITE
PARSE_ERRORS = 0
CHECK_CONSTRAINTS = NO
TYPE = CSV
SKIP = 0
DELIMITER = ,
QUOTE = "\""
ESCAPE = "\""
NULL =
OUTPUT = public.foo
MULTI_PROCESS = NO
VERBOSE = NO
WRITER = DIRECT
DUPLICATE_BADFILE = /var/lib/pgsql/14/pg_bulkload/20240205115833_postgres_public_foo.dup.csv
DUPLICATE_ERRORS = 0
ON_DUPLICATE_KEEP = NEW
TRUNCATE = YES


  0 Rows skipped.
  100000 Rows successfully loaded.
  0 Rows not loaded due to parse errors.
  0 Rows not loaded due to duplicate errors.
  0 Rows replaced with new rows.

Run began on 2024-02-05 11:58:33.765146+08
Run ended on 2024-02-05 11:58:33.827364+08

CPU 0.01s/0.05u sec elapsed 0.06 sec
四、简单分析pg_bulkload程序
接下来让我们来看看pg_bulkload到底是如何实现的?因此我们先来瞅瞅main函数(精简版本)/* main 函数精简之后大概就如下所示 大概五个部分 */
int main(int argc, char *argv[])
{
/* ...省略部分代码... */
pgut_init(argc, argv);
/* ...省略部分代码... */
i = pgut_getopt(argc, argv, options);
if (recovery)
{
/* ...省略部分代码... */
return LoaderRecoveryMain();
}
else
{
/* ...省略部分代码... */
if (control_file[0])
bulkload_options = list_concat(
ParseControlFile(control_file), bulkload_options);
/* ...省略部分代码... */
return LoaderLoadMain(bulkload_options);
}
}4.1、pgut_init
初始化函数做一些相关的初始化的动作,注意些处理函数,此处不展开。
4.2、pgut_getopt
解析传入的命令行相关选项,此函数精简一下 如下所示
int pgut_getopt(int argc, char **argv, pgut_option options[])
{
	/* Help message and version are handled at first. */
    /* ...省略部分代码... */

	/* Merge default and user options. */
	longopts = option_merge(default_options, options);
	optstring = longopts_to_optstring(longopts);

	/* Assign named options */
	while ((c = getopt_long(argc, argv, optstring, longopts, &optindex)) != -1)
	{
		opt = option_find(c, default_options, options);
		pgut_setopt(opt, optarg, SOURCE_CMDLINE);
	}
    /* ...省略部分代码... */
}
而此处的支持处理的default_options和options分别是
static pgut_option default_options[] =
{
{ 'b', 'e', "echo" , &pgut_echo },
{ 'f', 'E', "elevel" , set_elevel },
{ 's', 'd', "dbname" , &dbname },
{ 's', 'h', "host" , &host },
{ 's', 'p', "port" , &port },
{ 's', 'U', "username" , &username },
{ 'Y', 'w', "no-password" , &prompt_password },
{ 'y', 'W', "password" , &prompt_password },
{ 0 }
};
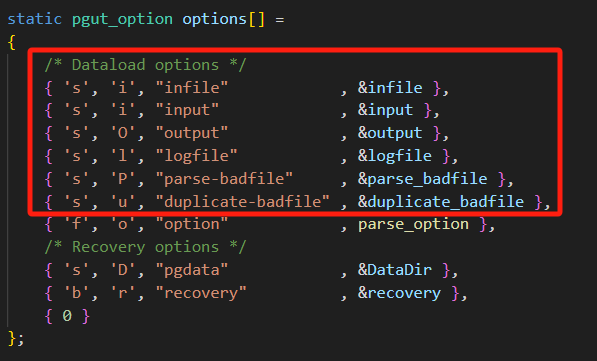
static pgut_option options[] =
{
/* Dataload options */
{ 's', 'i', "infile" , &infile },
{ 's', 'i', "input" , &input },
{ 's', 'O', "output" , &output },
{ 's', 'l', "logfile" , &logfile },
{ 's', 'P', "parse-badfile" , &parse_badfile },
{ 's', 'u', "duplicate-badfile" , &duplicate_badfile },
{ 'f', 'o', "option" , parse_option },
/* Recovery options */
{ 's', 'D', "pgdata" , &DataDir },
{ 'b', 'r', "recovery" , &recovery },
{ 0 }
};当经过option_merge和longopts_to_optstring 此时能够支持处理的选项就变成了eE:d:h:p:U:wWi:i:O:l:P:u:o:D:r
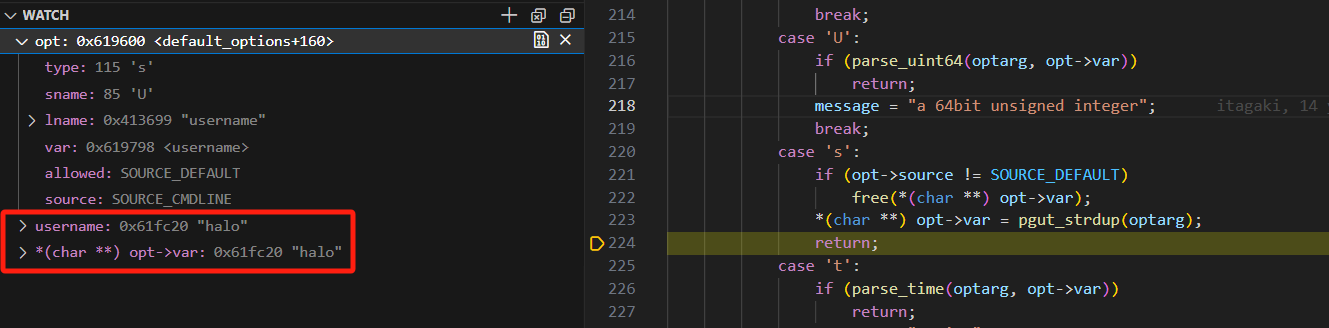
然后再配合getopt_long、option_find和pgut_setopt将传入的相关信息保存到程序中,如pg_bulkload -i ./foo.csv -O foo -l test_foo.log -p 5434 -o "TYPE=csv" -o "DELIMITER=," -d postgres -U halo 中的-U halo选项,
getopt_long函数识别并返回字符'U'的ASCii码 85
option_find函数根据'U'的ASCii码 找到对应的pgut_option的结构体对象
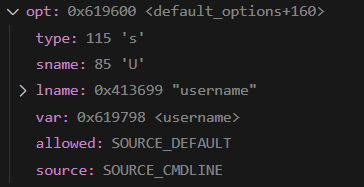
pgut_setopt函数再将对应的var的值 也就是对应的全局变量username的值 修改成传入的数据"halo",其他以此类推
4.3、ParseControlFile
解析控制文件,也就是ctl文件,如pg_bulkload ./sample_csv.ctl -d postgres -U halo 中的sample_csv.ctl文件
在执行ParseControlFile函数前 如果不是绝对路径 会先获取完整的绝对路径
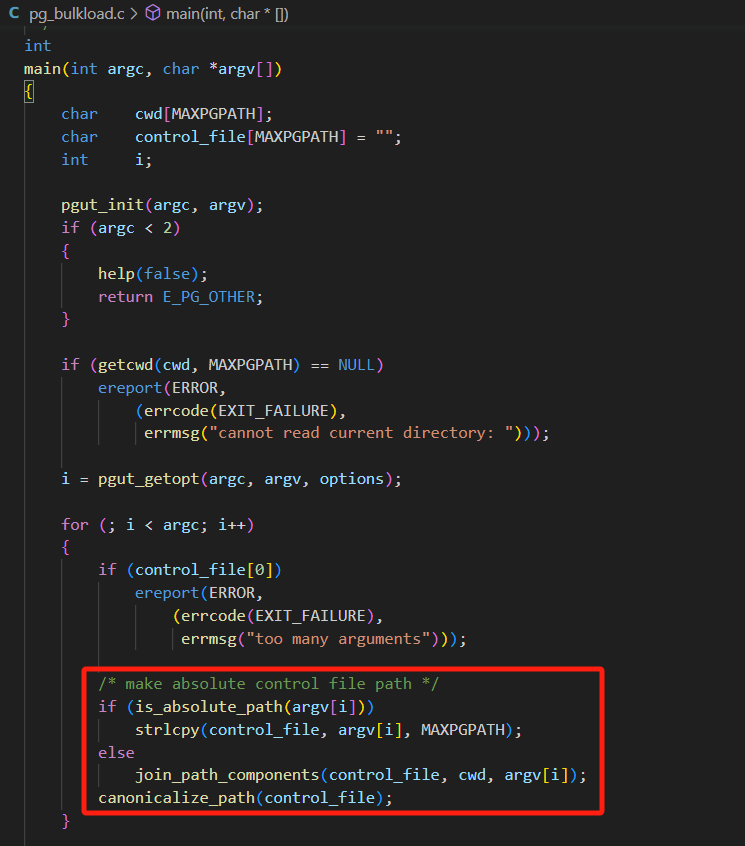
接着回到ParseControlFile函数 输入参数即为之前获取到的绝对路径
static List * ParseControlFile(const char *path)
{
       /* ...省略部分代码... */
	file = pgut_fopen(path, "rt");
	for (lineno = 1; fgets(buf, LINEBUF, file); lineno++)
	{
		/* ...省略部分代码... */
		for (i = 0; i < NUM_PATH_OPTIONS; i++)
		{
			pgut_option *opt = &options[i];
			if (pgut_keyeq(keyword, opt->lname))
			{
				pgut_setopt(opt, value, SOURCE_FILE);
				break;
			}
		}

		/* Other options */
		if (i >= NUM_PATH_OPTIONS)
		{
			size_t	len;
			char   *item;
			len = strlen(keyword) + strlen(value) + 2;
			item = pgut_malloc(len);
			snprintf(item, len, "%s=%s", keyword, value);
			items = lappend(items, item);
			if (pg_strcasecmp(item, "TYPE=FUNCTION") == 0)
				type_function = true;
			if (pg_strcasecmp(item, "TYPE=BINARY") == 0 ||
				pg_strcasecmp(item, "TYPE=FIXED") == 0)
				type_binary = true;
			if (pg_strcasecmp(item, "WRITER=BINARY") == 0)
				writer_binary = true;
		}
	}

	fclose(file);
    /* ...省略部分代码... */
}这个函数由于和pgut_getopt 类似 所以提到LoaderRecoveryMain函数之前 他的处理逻辑其实就是通过fgets函数一行一行的获取数据 然后去解析 最后和pgut_getopt 函数一样 通过pgut_setopt去设置相关数据
由于#define NUM_PATH_OPTIONS 6此处他仅仅匹配处理这六个参数
当超过六个时 他会当成Other options处理,会lappend保留相关数据用于后续处理 同时判断处理类型 或者 写入方式,此处不涉及Recovery options
4.4、LoaderRecoveryMain
此函数用于进行数据恢复,本次描述主要pg_bulkload是如何进行加载数据,感兴趣的同学可以自行查看学习此函数。
4.5、LoaderLoadMain
来到LoaderLoadMain函数,前面讲了相关的参数解析 一直都还没到最终处理 官方提供的pg_bulkload内部结构图也并没有得到体现 那么pg_bulkload内部结构图是否就体现在这个函数中呢?我们接着再来瞅瞅
static int LoaderLoadMain(List *options)
{
    /* ...省略部分代码... */
	reconnect(ERROR);

    /* ...省略部分代码... */
	/* form options as text[] */
	appendStringInfoString(&buf, "{\"");
	foreach (cell, options)
	{
		const char *item = lfirst(cell);

		if (buf.len > 2)
			appendStringInfoString(&buf, "\",\"");

		/* escape " and \ */
		while (*item)
		{
			if (*item == '"' || *item == '\\')
			{
				appendStringInfoChar(&buf, '\\');
				appendStringInfoChar(&buf, *item);
				item++;
			}
			else if (!IS_HIGHBIT_SET(*item))
			{
				appendStringInfoChar(&buf, *item);
				item++;
			}
			else
			{
				int	n = PQmblen(item, encoding);
				appendBinaryStringInfo(&buf, item, n);
				item += n;
			}
		}
	}
	appendStringInfoString(&buf, "\"}");

	command("BEGIN", 0, NULL);
	params[0] = buf.data;
	res = execute("SELECT * FROM pgbulkload.pg_bulkload($1)", 1, params);
	if (PQresultStatus(res) == PGRES_COPY_IN)
	{
		PQclear(res);
		res = RemoteLoad(connection, stdin, type_binary);
		if (PQresultStatus(res) != PGRES_TUPLES_OK)
			elog(ERROR, "copy failed: %s", PQerrorMessage(connection));
	}
	command("COMMIT", 0, NULL);

	errors = atoi(PQgetvalue(res, 0, 2)) +	/* parse errors */
			 atoi(PQgetvalue(res, 0, 3));	/* duplicate errors */

	elog(NOTICE, "BULK LOAD END\n"
				 "\t%s Rows skipped.\n"
				 "\t%s Rows successfully loaded.\n"
				 "\t%s Rows not loaded due to parse errors.\n"
				 "\t%s Rows not loaded due to duplicate errors.\n"
				 "\t%s Rows replaced with new rows.",
				 PQgetvalue(res, 0, 0), PQgetvalue(res, 0, 1),
				 PQgetvalue(res, 0, 2), PQgetvalue(res, 0, 3),
				 PQgetvalue(res, 0, 4));
	PQclear(res);

	disconnect();
	termStringInfo(&buf);

    /* ...省略部分代码... */
}
可以看到的是如果简单分成三段的话 其实就是通过reconnect获取了一个新的连接 然后执行了一个名为pgbulkload.pg_bulkload的数据库函数 完成之后打印出我们熟悉的身影BULK LOAD END ... 并调用disconnect关闭连接。
而reconnect通过先前解析存储的username、dbname等数据通过pgut_connect 最后调用libpq的接口PQconnectdb获取到了新的连接
void reconnect(int elevel)
{
    /* ...省略部分代码... */
	if (dbname && dbname[0])
		escape_param_str(&buf, "dbname", dbname);
	if (host && host[0])
		escape_param_str(&buf, "host", host);
	if (port && port[0])
		escape_param_str(&buf, "port", port);
	if (username && username[0])
		escape_param_str(&buf, "user", username);
	if (password && password[0])
		escape_param_str(&buf, "password", password);

	connection = pgut_connect(buf.data, prompt_password, elevel); /* pgut_connect --》conn = PQconnectdb(info); */
    /* ...省略部分代码... */
}
那么截至目前我们也并没有看到pg_bulkload内部结构图有所体现 而通过execute--》pgut_execute--》pgut_execute_elevel--》PQexecParams调用pgbulkload.pg_bulkload之后 就能打印最终的处理结果了 那看样子pgbulkload.pg_bulkload才是真正的pg_bulkload程序
pgbulkload.pg_bulkload是pg_bulkload插件中创建的一个函数,创建语句如下:
CREATE SCHEMA pgbulkload;

CREATE FUNCTION pgbulkload.pg_bulkload(
	IN options text[],
	OUT skip bigint,
	OUT count bigint,
	OUT parse_errors bigint,
	OUT duplicate_new bigint,
	OUT duplicate_old bigint,
	OUT system_time float8,
	OUT user_time float8,
	OUT duration float8
)
AS '$libdir/pg_bulkload', 'pg_bulkload' LANGUAGE C VOLATILE STRICT;
而这一段则是在构造pgbulkload.pg_bulkload 输入参数options text[]
	/* form options as text[] */
	appendStringInfoString(&buf, "{\"");
	foreach (cell, options)
	{
		const char *item = lfirst(cell);

		if (buf.len > 2)
			appendStringInfoString(&buf, "\",\"");

		/* escape " and \ */
		while (*item)
		{
			if (*item == '"' || *item == '\\')
			{
				appendStringInfoChar(&buf, '\\');
				appendStringInfoChar(&buf, *item);
				item++;
			}
			else if (!IS_HIGHBIT_SET(*item))
			{
				appendStringInfoChar(&buf, *item);
				item++;
			}
			else
			{
				int	n = PQmblen(item, encoding);
				appendBinaryStringInfo(&buf, item, n);
				item += n;
			}
		}
	}
	appendStringInfoString(&buf, "\"}");
当执行完之后SELECT * FROM pgbulkload.pg_bulkload之后,就解析返回的out参数的数据,然后就有了类似如下的显示
NOTICE: BULK LOAD START
NOTICE: BULK LOAD END
        0 Rows skipped.
        100000 Rows successfully loaded.
        0 Rows not loaded due to parse errors.
        0 Rows not loaded due to duplicate errors.
        0 Rows replaced with new rows.
五、简单分析pgbulkload.pg_bulkload函数
接下来让我们瞅瞅pgbulkload.pg_bulkload对应的c函数的具体实现
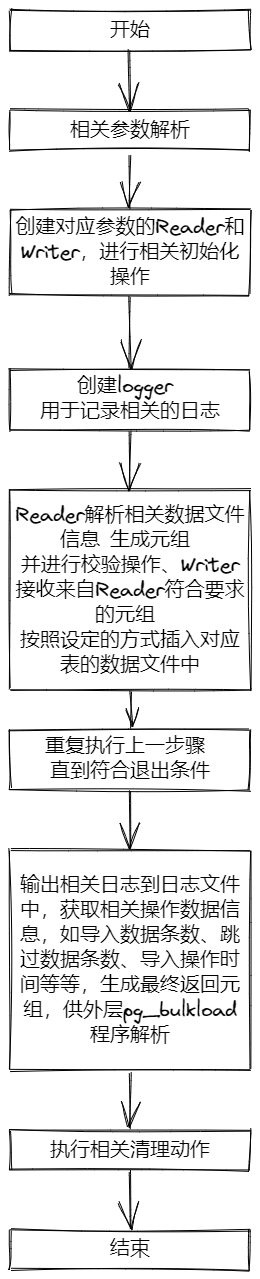
Datum pg_bulkload(PG_FUNCTION_ARGS)
{
	Reader		   *rd = NULL;
	Writer		   *wt = NULL;
    /* ...省略部分代码... */

	/*
	 * STEP 1: Initialization
	 */

	/* parse options and create reader and writer */
	ParseOptions(options, &rd, &wt, ru0.tv.tv_sec);

	/* initialize reader */
	ReaderInit(rd);

	/*
	 * We need to split PG_TRY block because gcc optimizes if-branches with
	 * longjmp codes too much. Local variables initialized in either branch
	 * cannot be handled another branch.
	 */
	PG_TRY();
	{
		/* truncate heap */
		if (wt->truncate)
			TruncateTable(wt->relid);

		/* initialize writer */
		WriterInit(wt);

		/* initialize checker */
		CheckerInit(&rd->checker, wt->rel, wt->tchecker);

		/* initialize parser */
		ParserInit(rd->parser, &rd->checker, rd->infile, wt->desc,
				   wt->multi_process, PG_GET_COLLATION());
	}
	PG_CATCH();
	{
		if (rd)
			ReaderClose(rd, true);
		if (wt)
			WriterClose(wt, true);
		PG_RE_THROW();
	}
	PG_END_TRY();

	/* No throwable codes here! */

	PG_TRY();
	{
		/* create logger */
		CreateLogger(rd->logfile, wt->verbose, rd->infile[0] == ':');

		start = timeval_to_cstring(ru0.tv);
		LoggerLog(INFO, "\npg_bulkload %s on %s\n\n",
				   PG_BULKLOAD_VERSION, start);

		ReaderDumpParams(rd);
		WriterDumpParams(wt);
		LoggerLog(INFO, "\n");

		BULKLOAD_PROFILE(&prof_init);

		/*
		 * STEP 2: Build heap
		 */

		/* Switch into its memory context */
		Assert(wt->context);
		ctx = MemoryContextSwitchTo(wt->context);

		/* Loop for each input file record. */
		while (wt->count < rd->limit)
		{
			HeapTuple	tuple;

			CHECK_FOR_INTERRUPTS();

			/* read tuple */
			BULKLOAD_PROFILE_PUSH();
			tuple = ReaderNext(rd);
			BULKLOAD_PROFILE_POP();
			BULKLOAD_PROFILE(&prof_reader);
			if (tuple == NULL)
				break;

			/* write tuple */
			BULKLOAD_PROFILE_PUSH();
			WriterInsert(wt, tuple);
			wt->count += 1;
			BULKLOAD_PROFILE_POP();
			BULKLOAD_PROFILE(&prof_writer);

			MemoryContextReset(wt->context);
			BULKLOAD_PROFILE(&prof_reset);
		}

		MemoryContextSwitchTo(ctx);

		/*
		 * STEP 3: Finalize heap and merge indexes
		 */

		count = wt->count;
		parse_errors = rd->parse_errors;

		/*
		 * close writer first and reader second because shmem_exit callback
		 * is managed by a simple stack.
		 */
		ret = WriterClose(wt, false);
		wt = NULL;
		skip = ReaderClose(rd, false);
		rd = NULL;
	}
	PG_CATCH();
	{
		ErrorData	   *errdata;
		MemoryContext	ecxt;

		ecxt = MemoryContextSwitchTo(ccxt);
		errdata = CopyErrorData();
		LoggerLog(INFO, "%s\n", errdata->message);
		FreeErrorData(errdata);

		/* close writer first, and reader second */
		if (wt)
			WriterClose(wt, true);
		if (rd)
			ReaderClose(rd, true);

		MemoryContextSwitchTo(ecxt);
		PG_RE_THROW();
	}
	PG_END_TRY();

	count -= ret.num_dup_new;

	LoggerLog(INFO, "\n"
			  "  " int64_FMT " Rows skipped.\n"
			  "  " int64_FMT " Rows successfully loaded.\n"
			  "  " int64_FMT " Rows not loaded due to parse errors.\n"
			  "  " int64_FMT " Rows not loaded due to duplicate errors.\n"
			  "  " int64_FMT " Rows replaced with new rows.\n\n",
			  skip, count, parse_errors, ret.num_dup_new, ret.num_dup_old);

	pg_rusage_init(&ru1);
	system = diffTime(ru1.ru.ru_stime, ru0.ru.ru_stime);
	user = diffTime(ru1.ru.ru_utime, ru0.ru.ru_utime);
	duration = diffTime(ru1.tv, ru0.tv);
	end = timeval_to_cstring(ru1.tv);

	memset(nulls, 0, sizeof(nulls));
	values[0] = Int64GetDatum(skip);
	values[1] = Int64GetDatum(count);
	values[2] = Int64GetDatum(parse_errors);
	values[3] = Int64GetDatum(ret.num_dup_new);
	values[4] = Int64GetDatum(ret.num_dup_old);
	values[5] = Float8GetDatumFast(system);
	values[6] = Float8GetDatumFast(user);
	values[7] = Float8GetDatumFast(duration);

	LoggerLog(INFO,
		"Run began on %s\n"
		"Run ended on %s\n\n"
		"CPU %.2fs/%.2fu sec elapsed %.2f sec\n",
		start, end, system, user, duration);

	LoggerClose();

	result = heap_form_tuple(tupdesc, values, nulls);

	BULKLOAD_PROFILE(&prof_fini);
	BULKLOAD_PROFILE_POP();
	BULKLOAD_PROFILE_PRINT();

	PG_RETURN_DATUM(HeapTupleGetDatum(result));
}不难看出整个函数就三个步骤,如果顺带对应着pg_bulkload内部结构图来看的话 其实就能很好的理解了
按照结构图来看其实就分为Reader,Writer。然后Reader的Parser支持处理三种类型,如果是csv、binary这些格式,Reader的Parser还会承当一些检查转换过滤的操作,然后经过约束检查之后就可以交由Writer了,而Writer也同时支持三种处理。
那么如何确认Reader的Parser是处理什么类型的以及Writer应该以什么样的方式插入呢?所以整个工作就交由了Initialization
5.1、Initialization
对于如何确认Reader的Parser是处理什么类型的以及Writer应该以什么样的方式插入呢,我们可以看一下ParseOptions函数
	/* parse options and create reader and writer */
	ParseOptions(options, &rd, &wt, ru0.tv.tv_sec);
它用于解析和创建reader and writer 内部解析处理代码如下
	/* parse for each option */
	defs = untransformRelOptions(options);
	foreach (cell, defs)
	{
		opt = lfirst(cell);
		if (opt->arg == NULL)
			ereport(ERROR, (errcode(ERRCODE_INVALID_PARAMETER_VALUE),
					errmsg("option \"%s\" has no value", opt->defname)));

		keyword = opt->defname;
		value = strVal(opt->arg);

		if (CompareKeyword(keyword, "TYPE"))
		{
			ASSERT_ONCE(type == NULL);
			type = value;
		}
		else if (CompareKeyword(keyword, "WRITER") ||
				 CompareKeyword(keyword, "LOADER"))
		{
			ASSERT_ONCE(writer == NULL);
			writer = value;
		}
		else if (CompareKeyword(keyword, "MULTI_PROCESS"))
		{
			multi_process = ParseBoolean(value);
		}
		else
		{
			rest_defs = lappend(rest_defs, opt);
			continue;
		}
	}

	*wt = WriterCreate(writer, multi_process);
	*rd = ReaderCreate(type);
再来看看WriterCreate、ReaderCreate
Writer *
WriterCreate(char *writer, bool multi_process)
{
	const char *keys[] =
	{
		"DIRECT",
		"BUFFERED",
		"BINARY"
	};
	const CreateWriter values[] =
	{
		CreateDirectWriter,
		CreateBufferedWriter,
		CreateBinaryWriter
	};

	Writer *self;

	/* default of writer is DIRECT */
	if (writer == NULL)
		writer = "DIRECT";

	/* alias for backward compatibility. */
	if (pg_strcasecmp(writer, "PARALLEL") == 0)
	{
		multi_process = true;
		writer = "DIRECT";
	}

	self = values[choice("WRITER", writer, keys, lengthof(keys))](NULL);

	if (multi_process)
		self = CreateParallelWriter(self);

	self->multi_process = multi_process;

	return self;
}


Reader *
ReaderCreate(char *type)
{
	const char *keys[] =
	{
		"BINARY",
		"FIXED",	/* alias for backward compatibility. */
		"CSV",
		"TUPLE",
		"FUNCTION",
	};
	const ParserCreate values[] =
	{
		CreateBinaryParser,
		CreateBinaryParser,
		CreateCSVParser,
		CreateTupleParser,
		CreateFunctionParser,
	};

	Reader	   *self;

	/* default of type is CSV */
	if (type == NULL)
		type = "CSV";

	self = palloc0(sizeof(Reader));
	self->max_parse_errors = -2;
	self->limit = INT64_MAX;
	self->checker.encoding = -1;

	self->parser = values[choice("TYPE", type, keys, lengthof(keys))]();

	return self;
}
可以看到完完全全和结构图对应上了,再多的内容就不展开了,后续就是对应的初始化指针初始化reader(parser、checker)、writer ,如果是设置了导数据前先truncate 也是在初始化阶段执行的 ,以及创建对应的logger 用于输出日志
	/* initialize reader */
	ReaderInit(rd);

	/*
	 * We need to split PG_TRY block because gcc optimizes if-branches with
	 * longjmp codes too much. Local variables initialized in either branch
	 * cannot be handled another branch.
	 */
	PG_TRY();
	{
		/* truncate heap */
		if (wt->truncate)
			TruncateTable(wt->relid);

		/* initialize writer */
		WriterInit(wt);

		/* initialize checker */
		CheckerInit(&rd->checker, wt->rel, wt->tchecker);

		/* initialize parser */
		ParserInit(rd->parser, &rd->checker, rd->infile, wt->desc,
				   wt->multi_process, PG_GET_COLLATION());
	}
	PG_CATCH();
	{
		if (rd)
			ReaderClose(rd, true);
		if (wt)
			WriterClose(wt, true);
		PG_RE_THROW();
	}
	PG_END_TRY();

        /* ...省略部分代码... */
		/* create logger */
		CreateLogger(rd->logfile, wt->verbose, rd->infile[0] == ':');

		start = timeval_to_cstring(ru0.tv);
		LoggerLog(INFO, "\npg_bulkload %s on %s\n\n",
				   PG_BULKLOAD_VERSION, start);

		ReaderDumpParams(rd);
		WriterDumpParams(wt);
		LoggerLog(INFO, "\n");
5.2、Build heap
这个部分的代码很清晰,这个阶段就是由Reader读取解析数据生成元组(关系型数据库的基础概念)检查校验完之后 然后交由Writer使用指定的方式插入指定的表中
		/* Loop for each input file record. */
		while (wt->count < rd->limit)
		{
			HeapTuple	tuple;

			CHECK_FOR_INTERRUPTS();

			/* read tuple */
			BULKLOAD_PROFILE_PUSH();
			tuple = ReaderNext(rd);
			BULKLOAD_PROFILE_POP();
			BULKLOAD_PROFILE(&prof_reader);
			if (tuple == NULL)
				break;

			/* write tuple */
			BULKLOAD_PROFILE_PUSH();
			WriterInsert(wt, tuple);
			wt->count += 1;
			BULKLOAD_PROFILE_POP();
			BULKLOAD_PROFILE(&prof_writer);

			MemoryContextReset(wt->context);
			BULKLOAD_PROFILE(&prof_reset);
		}
ReaderNext函数
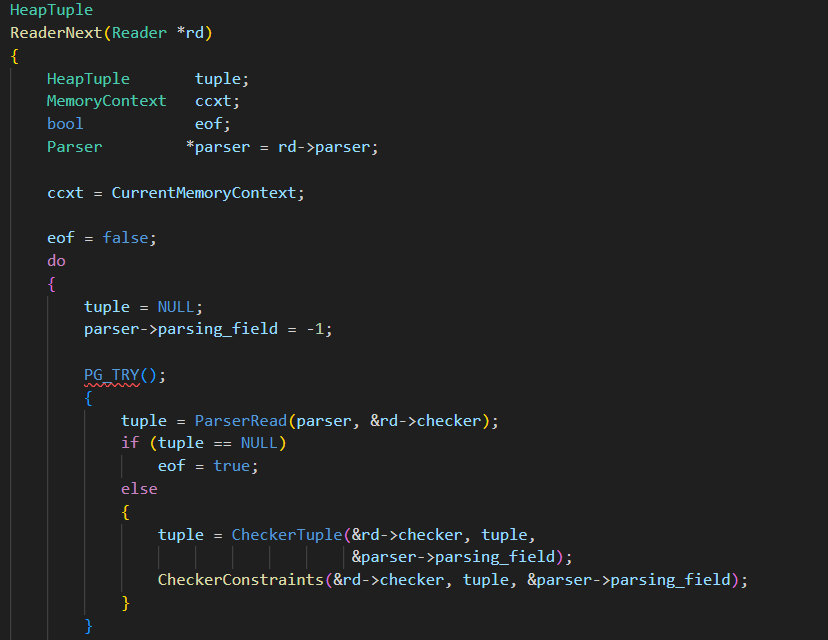
5.3、Finalize heap and merge indexes
这一部分就是完成对writer、reader的清理、记录一些日志数据、还有一步就是生成最终的返回元组,完成函数调用,就此闭环了。
		/* close writer first, and reader second */
		if (wt)
			WriterClose(wt, true);
		if (rd)
			ReaderClose(rd, true)
LoggerLog(INFO, "\n"
" " int64_FMT " Rows skipped.\n"
" " int64_FMT " Rows successfully loaded.\n"
" " int64_FMT " Rows not loaded due to parse errors.\n"
" " int64_FMT " Rows not loaded due to duplicate errors.\n"
" " int64_FMT " Rows replaced with new rows.\n\n",
skip, count, parse_errors, ret.num_dup_new, ret.num_dup_old);
pg_rusage_init(&ru1);
system = diffTime(ru1.ru.ru_stime, ru0.ru.ru_stime);
user = diffTime(ru1.ru.ru_utime, ru0.ru.ru_utime);
duration = diffTime(ru1.tv, ru0.tv);
end = timeval_to_cstring(ru1.tv);
memset(nulls, 0, sizeof(nulls));
values[0] = Int64GetDatum(skip);
values[1] = Int64GetDatum(count);
values[2] = Int64GetDatum(parse_errors);
values[3] = Int64GetDatum(ret.num_dup_new);
values[4] = Int64GetDatum(ret.num_dup_old);
values[5] = Float8GetDatumFast(system);
values[6] = Float8GetDatumFast(user);
values[7] = Float8GetDatumFast(duration);
LoggerLog(INFO,
"Run began on %s\n"
"Run ended on %s\n\n"
"CPU %.2fs/%.2fu sec elapsed %.2f sec\n",
start, end, system, user, duration);
LoggerClose();
result = heap_form_tuple(tupdesc, values, nulls);
BULKLOAD_PROFILE(&prof_fini);
BULKLOAD_PROFILE_POP();
BULKLOAD_PROFILE_PRINT();
PG_RETURN_DATUM(HeapTupleGetDatum(result));六、总结
来个简单的总结 只是梳理了一下 pg_bulkload大概的加载数据的过程 具体细节方面 各位可以自行调试。
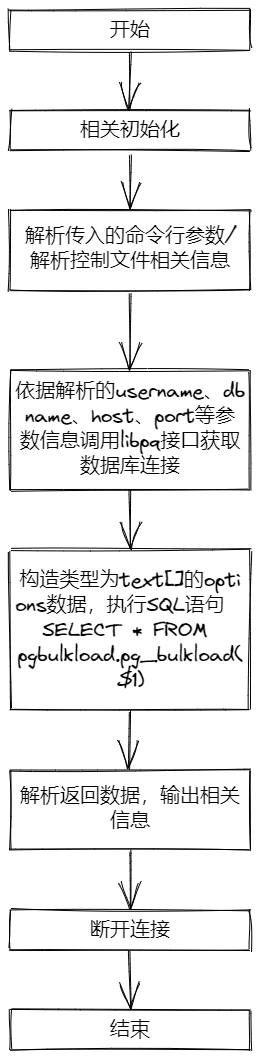
对于pg_bulkload程序而言,
主要就是依据解析到的信息创建数据库连接,
执行SELECT * FROM pgbulkload.pg_bulkload($1)
解析返回数据 关闭连接
其实主要就是调用pgbulkload.pg_bulkload数据库函数,和给出的pg_bulkload内部结构图没有什么太大的关系,
或者是说pgbulkload.pg_bulkload对应的c函数才是真正的意义上的"pg_bulkload"程序。
此处给出pg_bulkload程序的一个大概的执行流程图
此处给出pgbulkload.pg_bulkload数据库内核c函数的一个大概的执行流程图
七、声明
由于篇幅的原因诸多细节未完全展开(又是冗长的一篇... 这个篇幅还真是有点不好控制),若文中存在错误或不当之处,敬请指出,以便我进行修正和完善。希望这篇文章能够帮助到你。
文章转载请联系,谢谢合作。
