


nginx使用yum源安装,可能导致业务上很多需要的功能模块没有开启,还是按需自己编译比较合适。日常生产环境使用nginx,编译模块按照nginx官方yum安装的模块,基本能满足95%以上的生产需求。
下载源码
# 下载源码
wget http://nginx.org/download/nginx-1.25.1.tar.gz
#解压
tar -zxf nginx-1.25.1.tar.gz
cd nginx-1.25.1复制
源码目录结构
nginx-1.25.1/
├── auto		#auto内部文件大部分用于支持conf各项配置、特性判定支持
│   ├── cc  	#cc目录用于编译
│   ├── lib		#lib目录编译依赖
│   ├── os		#os目录操作系统判断支持
│   ├── types
│   └── unix
├── CHANGES		#版本变更信息
├── CHANGES.ru	#俄文版本变更信息
├── conf		#示例配置文件目录
│   └── nginx.conf
├── configure   #configure脚本,用于生成编译前的中间文件
├── contrib		#contrib高亮文本提示,将vim下所有文件拷贝到系统~/.vim/下即可提供conf文件在vim中的高亮显示
│   └── vim
│       └── syntax
│           └── nginx.vim
├── html		#标准html文件
│   ├── 50x.html	#错误页面
│   └── index.html	#欢迎页面
├── LICENSE
├── man		#linux中man的帮助文件
│   └── nginx.8
├── README
└── src		#nginx源代码
    ├── core
    ├── event
    ├── http
    ├── mail
    ├── misc
    ├── os
    └── stream复制
高亮vim文本提示:
mkdir /root/.vim
cp -r contrib/vim/* ~/.vim/复制
前置依赖
基本模块依赖下载后可以执行./configure进行默认安装,但是无法满足生产环境要求
#centos依赖,生产环境集成图片处理、perl等模块
yum install -y gcc-c++ pcre pcre-devel zlib zlib-devel openssl openssl-devel libxml2/libxslt libxml2 libxml2-dev libxslt-devel gd gd-devel perl-ExtUtils-Embed google-perftools google-perftools-devel复制
#ubuntu下依赖
sudo apt-get install libxml2-dev build-essential openssl  libssl-dev make curl  libcurl4-gnutls-dev libjpeg-dev  libpng-dev libtool-bin bison  zlib1g-dev libpcre3 libpcre3-dev libssl-dev libxslt1-dev  libgeoip-dev libgoogle-perftools-dev libperl-dev libtool复制
创建用户和组
默认使用的就是nginx,如果自定义修改nginx.conf配置即可
groupadd nginx
useradd nginx -g nginx -s /sbin/nologin -M复制
预编译-configure
configure预编译脚本执行后会生成objs目录下的中间文件。
configure参数
#查看预编译可选参数
./configure --help复制
- 其中
--prefix用于指定nginx编译路径,对应相关的其他nginx编译路径会相对prefix路径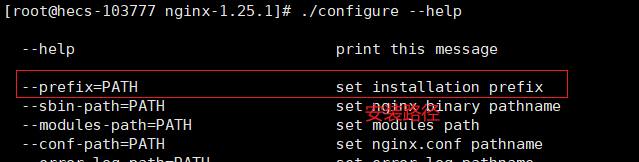
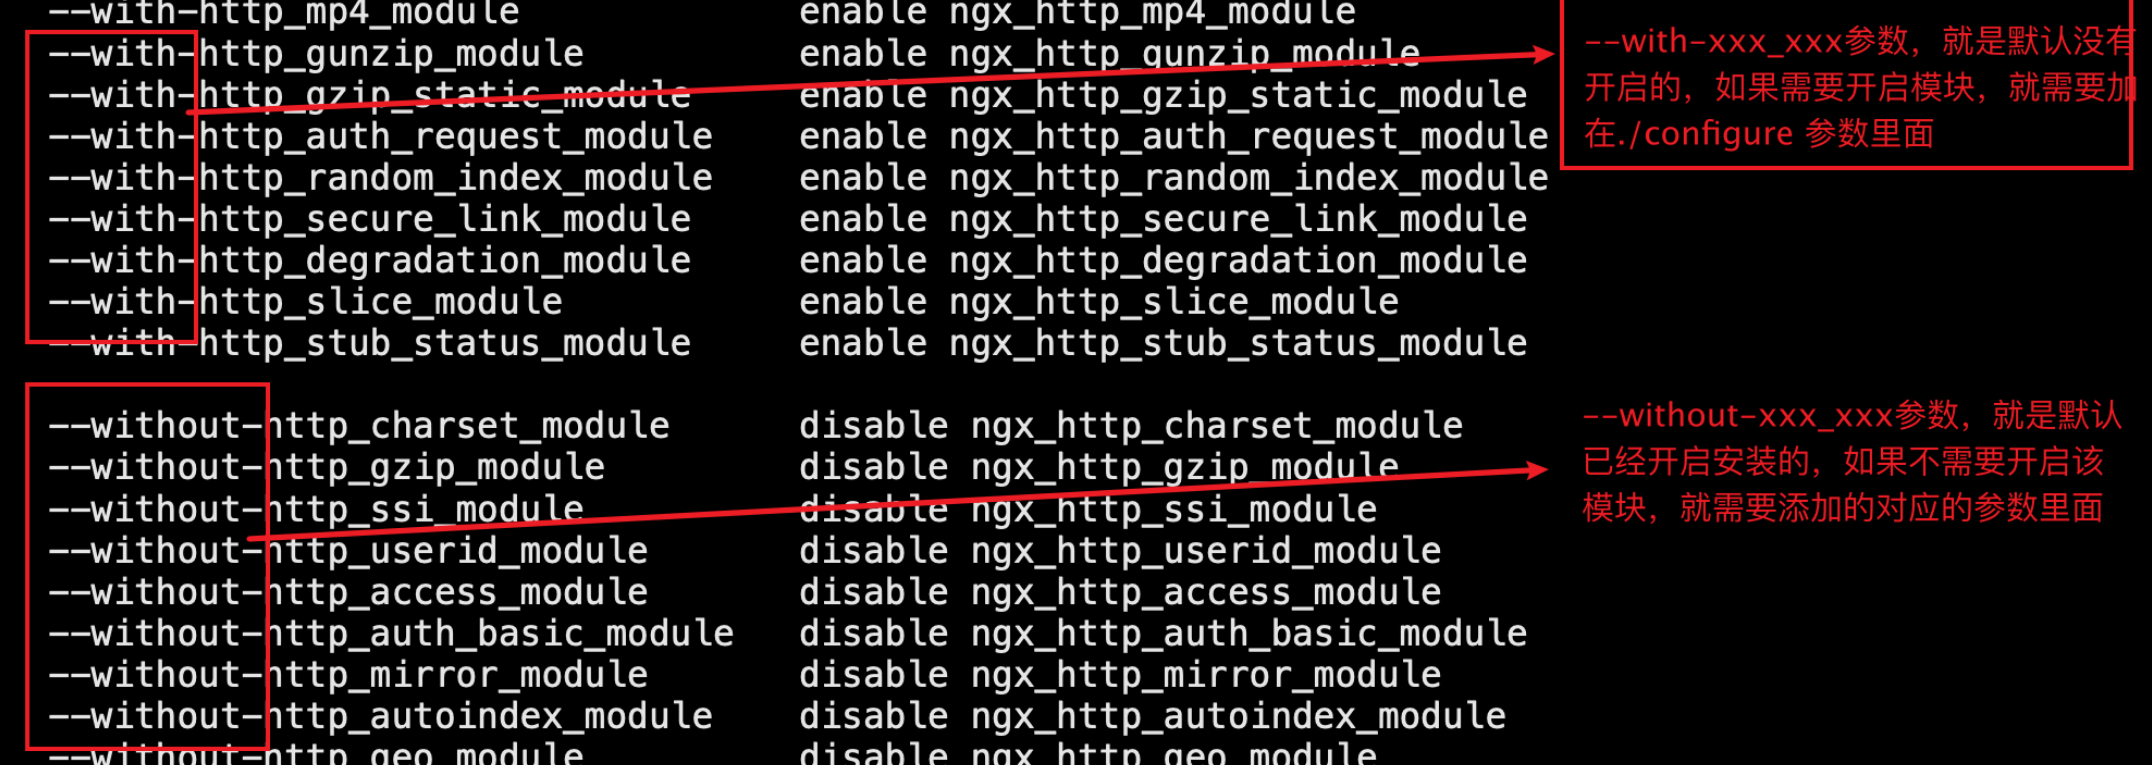
- --with-xxx,代表开启默认不开启的模块进行编译
- --without-xxx,代表关闭默认开启的模块不进行编译
执行configure
#默认安装,不推荐
./configure
#生产环境安装
./configure --prefix=/usr/local/nginx --user=nginx --group=nginx  \
--with-file-aio \
--with-threads \
--with-http_ssl_module \
--with-http_v2_module \
--with-http_realip_module \
--with-http_addition_module \
--with-http_xslt_module=dynamic \
--with-http_image_filter_module=dynamic \
--with-http_sub_module --with-http_dav_module \
--with-http_flv_module --with-http_mp4_module \
--with-http_gunzip_module \
--with-http_gzip_static_module \
--with-http_auth_request_module \
--with-http_random_index_module \
--with-http_secure_link_module \
--with-http_degradation_module \
--with-http_slice_module \
--with-http_stub_status_module \
--with-http_perl_module=dynamic \
--with-mail=dynamic \
--with-mail_ssl_module \
--with-stream=dynamic \
--with-stream_ssl_module \
--with-stream_ssl_preread_module \
--with-google_perftools_module \
--with-compat \
--with-cc-opt='-O2 -g -pipe -Wall -Wp,-D_FORTIFY_SOURCE=2 -fexceptions -fstack-protector-strong --param=ssp-buffer-size=4 -grecord-gcc-switches -m64 -mtune=generic -fPIC' \
--with-ld-opt='-Wl,-z,relro -Wl,-z,now -pie' \
--with-pcre \
--with-pcre-jit \
--with-debug复制
中间文件objs
预编译configure执行后会生成objs目录,objs目录结构如下:
objs/
├── autoconf.err
├── Makefile
├── ngx_auto_config.h
├── ngx_auto_headers.h
├── ngx_modules.c			#nginx当前编译包含的所有模块
└── src复制
安装-make
make会将中间文件编译成二进制文件并将文件都拷贝到prefix目录下。
如果是升级,就不能执行install命令,要把objs目录下生成nginx二进制文件拷贝到原老版本的nginx目录下进行覆盖
#当前目录执行
make
#如果是第一次安装,执行make install命令
make install复制
「喜欢这篇文章,您的关注和赞赏是给作者最好的鼓励」
关注作者
【版权声明】本文为墨天轮用户原创内容,转载时必须标注文章的来源(墨天轮),文章链接,文章作者等基本信息,否则作者和墨天轮有权追究责任。如果您发现墨天轮中有涉嫌抄袭或者侵权的内容,欢迎发送邮件至:contact@modb.pro进行举报,并提供相关证据,一经查实,墨天轮将立刻删除相关内容。
评论
相关阅读
东方通TongHttpServer的安全特性解析
严少安
65次阅读
2025-03-17 23:15:48
Nginx实现TCP四层转发(实现代理MySQL)
IT那活儿
47次阅读
2025-03-05 11:09:26
Nginx 的基础原理篇
巴韭特锁螺丝
12次阅读
2025-03-16 19:37:40
通过nginx代理对SSL请求进行隧道化
IT那活儿
11次阅读
2025-03-11 10:12:46
nginx-ui:全新的 Nginx 在线管理平台
Linux技术宅
9次阅读
2025-03-08 07:03:18
Nginx 解决做反向代理时 静态资源图片、 js、css 访问不到
巴韭特锁螺丝
7次阅读
2025-03-14 00:02:06
nginx 服务器篇
巴韭特锁螺丝
7次阅读
2025-03-17 10:03:41
控制器- deployment01
喵呜
6次阅读
2025-03-31 13:45:40
