


上一篇文章中我们rocketMq存储系统的概要,本篇接着上篇,分析rocketMq存储系统的一些底层实现,我们简单回顾下消息的写入过程,大家也可以去看之前写的相关文章
消息写入流程图

本篇文章主要分析3个东西
映射文件(mappedFile)的创建与获取
文件预热
消息写入
1.获取并创建映射文件
1.1.获取映射文件
CommitLog.putMessage (入口)
上面的的代码上篇文章已经分析过,大家直接去看上一篇,接下来直接看内部是怎么获取到映射文件的复制
MappedFileQueue
public MappedFile getLastMappedFile(final long startOffset, boolean needCreate) {
long createOffset = -1;
MappedFile mappedFileLast = getLastMappedFile();
//从来没创建过 offset从0开始
if (mappedFileLast == null) {
createOffset = startOffset - (startOffset % this.mappedFileSize);
}
//创建过,但是文件已经写满了 偏移量=获取最新一个mappedFile偏移量+mappedFile的大小
if (mappedFileLast != null && mappedFileLast.isFull()) {
createOffset = mappedFileLast.getFileFromOffset() + this.mappedFileSize;
}
//mappedFiled创建时会把下次的文件提前创建好
if (createOffset != -1 && needCreate) {
//本次的文件路径
String nextFilePath = this.storePath + File.separator + UtilAll.offset2FileName(createOffset);
//下次文件的路径
String nextNextFilePath = this.storePath + File.separator
+ UtilAll.offset2FileName(createOffset + this.mappedFileSize);
MappedFile mappedFile = null;
if (this.allocateMappedFileService != null) {
//创建映射文件
mappedFile = this.allocateMappedFileService.putRequestAndReturnMappedFile(nextFilePath,
nextNextFilePath, this.mappedFileSize);
} else {
try {
mappedFile = new MappedFile(nextFilePath, this.mappedFileSize);
} catch (IOException e) {
log.error("create mappedFile exception", e);
}
}
if (mappedFile != null) {
if (this.mappedFiles.isEmpty()) {
mappedFile.setFirstCreateInQueue(true);
}
this.mappedFiles.add(mappedFile);
}
return mappedFile;
}
return mappedFileLast;
}
//获取最新的那个mappedFile
public MappedFile getLastMappedFile() {
MappedFile mappedFileLast = null;
while (!this.mappedFiles.isEmpty()) {
try {
mappedFileLast = this.mappedFiles.get(this.mappedFiles.size() - 1);
break;
} catch (IndexOutOfBoundsException e) {
//continue;
} catch (Exception e) {
log.error("getLastMappedFile has exception.", e);
break;
}
}
return mappedFileLast;
}复制
上面的代码大家有没有一个疑问呢,我们知道每个commitLog都会对应mappedFile,那么如果broker宕机了,那么之前生成的mappedFile怎么在获取呢?
//booker启动时会生成之前的mappedFile
public boolean load() {
//storePath commitLog的存储路径
File dir = new File(this.storePath);
File[] files = dir.listFiles();
if (files != null) {
// ascending order
Arrays.sort(files);
for (File file : files) {
if (file.length() != this.mappedFileSize) {
log.warn(file + "\t" + file.length()
+ " length not matched message store config value, please check it manually");
return false;
}
try {
MappedFile mappedFile = new MappedFile(file.getPath(), mappedFileSize);
mappedFile.setWrotePosition(this.mappedFileSize);
mappedFile.setFlushedPosition(this.mappedFileSize);
mappedFile.setCommittedPosition(this.mappedFileSize);
this.mappedFiles.add(mappedFile);
log.info("load " + file.getPath() + " OK");
} catch (IOException e) {
log.error("load file " + file + " error", e);
return false;
}
}
}
return true;
}复制
1.2.创建映射文件
//入口
AllocateMappedFileService#putRequestAndReturnMappedFile(String nextFilePath, String nextNextFilePath, int fileSize)复制
public MappedFile putRequestAndReturnMappedFile(String nextFilePath, String nextNextFilePath, int fileSize) {
//默认提交的请求数
int canSubmitRequests = 2;
//如果开启的是堆外内存(我们知道mappedFile创建是有两种方式,一种是pacheCache,一种是基于堆外内存,堆外内存的好处,可以使读写分离)
if (this.messageStore.getMessageStoreConfig().isTransientStorePoolEnable()) {
if (this.messageStore.getMessageStoreConfig().isFastFailIfNoBufferInStorePool()
&& BrokerRole.SLAVE != this.messageStore.getMessageStoreConfig().getBrokerRole()) { //if broker is slave, don't fast fail even no buffer in pool
//可以提交的请求数=推文内存可以获取的buffed数量[默认是5个,用完就没有了,它会回收之前已经用完的]-requestQueue的数量
//requestQueue下面会介绍
canSubmitRequests = this.messageStore.getTransientStorePool().availableBufferNums() - this.requestQueue.size();
}
}
//下一个请求
AllocateRequest nextReq = new AllocateRequest(nextFilePath, fileSize);
//请求放入requestTable
boolean nextPutOK = this.requestTable.putIfAbsent(nextFilePath, nextReq) == null;
if (nextPutOK) {
//说明堆外内存已经用完了
if (canSubmitRequests <= 0) {
log.warn("[NOTIFYME]TransientStorePool is not enough, so create mapped file error, " +
"RequestQueueSize : {}, StorePoolSize: {}", this.requestQueue.size(), this.messageStore.getTransientStorePool().availableBufferNums());
this.requestTable.remove(nextFilePath);
return null;
}
//请求放入requestQueue
boolean offerOK = this.requestQueue.offer(nextReq);
if (!offerOK) {
log.warn("never expected here, add a request to preallocate queue failed");
}
canSubmitRequests--;
}
//下一个请求
AllocateRequest nextNextReq = new AllocateRequest(nextNextFilePath, fileSize);
//放入requestTable
boolean nextNextPutOK = this.requestTable.putIfAbsent(nextNextFilePath, nextNextReq) == null;
if (nextNextPutOK) {
//堆外内存用完了
if (canSubmitRequests <= 0) {
log.warn("[NOTIFYME]TransientStorePool is not enough, so skip preallocate mapped file, " +
"RequestQueueSize : {}, StorePoolSize: {}", this.requestQueue.size(), this.messageStore.getTransientStorePool().availableBufferNums());
this.requestTable.remove(nextNextFilePath);
} else {
//请求放入requestQueue
boolean offerOK = this.requestQueue.offer(nextNextReq);
if (!offerOK) {
log.warn("never expected here, add a request to preallocate queue failed");
}
}
}
if (hasException) {
log.warn(this.getServiceName() + " service has exception. so return null");
return null;
}
//获取当前请求
//不知道大家有没有一个疑问,为啥,放入后 ,马上又取,直接取不就好了嘛
//是为了来处理重试的,上一次放入后,因为某些原因失败了,缓存空间又不够了,这样重试时可以直接获取
AllocateRequest result = this.requestTable.get(nextFilePath);
try {
if (result != null) {
//等待第一个文件的创建
boolean waitOK = result.getCountDownLatch().await(waitTimeOut, TimeUnit.MILLISECONDS);
if (!waitOK) {
log.warn("create mmap timeout " + result.getFilePath() + " " + result.getFileSize());
return null;
} else {
//删除本次的的请求
this.requestTable.remove(nextFilePath);
//返回创建好的mappedFile
return result.getMappedFile();
}
} else {
log.error("find preallocate mmap failed, this never happen");
}
} catch (InterruptedException e) {
log.warn(this.getServiceName() + " service has exception. ", e);
}
return null;
}复制
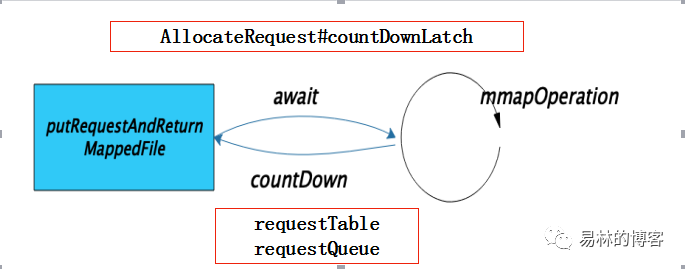
上面是整个mappedFile的创建流程,大家跟着注释读,应该比较清楚,接下来我们继续分析,当我们调用conutDownLatch.await后,是哪个地方完成的我们的创建呢
1.3.真正的创建映射文件
入口 AllocateMappedFileService.mmapOperation复制
private boolean mmapOperation() {
boolean isSuccess = false;
AllocateRequest req = null;
try {
//获取本次的请求,并删除队列中本次请求的数据
req = this.requestQueue.take();
//从requestTable获取本次请求
AllocateRequest expectedRequest = this.requestTable.get(req.getFilePath());
//比较两个对象是否一样,不一样则异常
if (null == expectedRequest) {
log.warn("this mmap request expired, maybe cause timeout " + req.getFilePath() + " "
+ req.getFileSize());
return true;
}
if (expectedRequest != req) {
log.warn("never expected here, maybe cause timeout " + req.getFilePath() + " "
+ req.getFileSize() + ", req:" + req + ", expectedRequest:" + expectedRequest);
return true;
}
if (req.getMappedFile() == null) {
long beginTime = System.currentTimeMillis();
MappedFile mappedFile;
//如果开启了堆外内存
if (messageStore.getMessageStoreConfig().isTransientStorePoolEnable()) {
try {
//默认情况下,这段代码是不会走的,你可以通过spi,扩展mappedFile这个类
mappedFile = ServiceLoader.load(MappedFile.class).iterator().next();
mappedFile.init(req.getFilePath(), req.getFileSize(), messageStore.getTransientStorePool());
} catch (RuntimeException e) {
log.warn("Use default implementation.");
//堆外内存创建mappedFile
mappedFile = new MappedFile(req.getFilePath(), req.getFileSize(), messageStore.getTransientStorePool());
}
} else {
//pacheCache创建mappedFile
mappedFile = new MappedFile(req.getFilePath(), req.getFileSize());
}
//消耗的时间
long elapsedTime = UtilAll.computeElapsedTimeMilliseconds(beginTime);
if (elapsedTime > 10) {
int queueSize = this.requestQueue.size();
log.warn("create mappedFile spent time(ms) " + elapsedTime + " queue size " + queueSize
+ " " + req.getFilePath() + " " + req.getFileSize());
}
// pre write mappedFile
if (mappedFile.getFileSize() >= this.messageStore.getMessageStoreConfig()
.getMappedFileSizeCommitLog()
&&
this.messageStore.getMessageStoreConfig().isWarmMapedFileEnable()) {
//文件预热
mappedFile.warmMappedFile(this.messageStore.getMessageStoreConfig().getFlushDiskType(),
this.messageStore.getMessageStoreConfig().getFlushLeastPagesWhenWarmMapedFile());
}
//把mappedFile放入当前请求中
req.setMappedFile(mappedFile);
this.hasException = false;
isSuccess = true;
}
} catch (InterruptedException e) {
log.warn(this.getServiceName() + " interrupted, possibly by shutdown.");
this.hasException = true;
return false;
} catch (IOException e) {
log.warn(this.getServiceName() + " service has exception. ", e);
this.hasException = true;
if (null != req) {
requestQueue.offer(req);
try {
Thread.sleep(1);
} catch (InterruptedException ignored) {
}
}
} finally {
if (req != null && isSuccess)
//唤醒等待的线程
req.getCountDownLatch().countDown();
}
return true;
}复制
到这里我们分析完了整个mappedFile的创建和获取操作,我们用张图总结下
2.文件预热
入口 MappedFile.warmMappedFile复制
//type 刷盘策略
//pages 默认4m
public void warmMappedFile(FlushDiskType type, int pages) {
//开始时间
long beginTime = System.currentTimeMillis();
//堆外内存
ByteBuffer byteBuffer = this.mappedByteBuffer.slice();
int flush = 0;
long time = System.currentTimeMillis();
for (int i = 0, j = 0; i < this.fileSize; i += MappedFile.OS_PAGE_SIZE, j++) {
//写入一些0值
byteBuffer.put(i, (byte) 0);
// force flush when flush disk type is sync
if (type == FlushDiskType.SYNC_FLUSH) {
if ((i / OS_PAGE_SIZE) - (flush / OS_PAGE_SIZE) >= pages) {
flush = i;
//同步刷盘
mappedByteBuffer.force();
}
}
// Thread.sleep(0); 的意思是,我们知道cpu底层是已那种时间片为单位进行运行的,这个目的就是,该方法是套在一个大的for循环里面的,会循环很多次,为了避免其它线程法生饿死,把线程调度自己抛出
// prevent gc
if (j % 1000 == 0) {
log.info("j={}, costTime={}", j, System.currentTimeMillis() - time);
time = System.currentTimeMillis();
try {
Thread.sleep(0);
} catch (InterruptedException e) {
log.error("Interrupted", e);
}
}
}
// force flush when prepare load finished
if (type == FlushDiskType.SYNC_FLUSH) {
log.info("mapped file warm-up done, force to disk, mappedFile={}, costTime={}",
this.getFileName(), System.currentTimeMillis() - beginTime);
mappedByteBuffer.force();
}
log.info("mapped file warm-up done. mappedFile={}, costTime={}", this.getFileName(),
System.currentTimeMillis() - beginTime);
//上面我们完成了写假值的过程,相当于是完成了映射文件到物理文件的映射,但是此时如果空间不够了,该内存空间会被交换的swap区中、这样整个写的速度会变慢
//告诉操作系统我要锁住这块内存,不管你内存够不够
this.mlock();
}复制
public void mlock() {
final long beginTime = System.currentTimeMillis();
final long address = ((DirectBuffer) (this.mappedByteBuffer)).address();
Pointer pointer = new Pointer(address);
{
int ret = LibC.INSTANCE.mlock(pointer, new NativeLong(this.fileSize));
log.info("mlock {} {} {} ret = {} time consuming = {}", address, this.fileName, this.fileSize, ret, System.currentTimeMillis() - beginTime);
}
{
int ret = LibC.INSTANCE.madvise(pointer, new NativeLong(this.fileSize), LibC.MADV_WILLNEED);
log.info("madvise {} {} {} ret = {} time consuming = {}", address, this.fileName, this.fileSize, ret, System.currentTimeMillis() - beginTime);
}
}复制
3.消息写入
具体的大家可以看上篇文章的分析
执行链
1. CommitLog#putMessage(final MessageExtBrokerInner msg)
2. MappedFile#appendMessage(final MessageExtBrokerInner msg, final AppendMessageCallback cb)
3. DefaultAppendMessageCallback#doAppend(final long fileFromOffset, final ByteBuffer byteBuffer, final int maxBlank,复制
3.1.文件写入过程的图片化分析
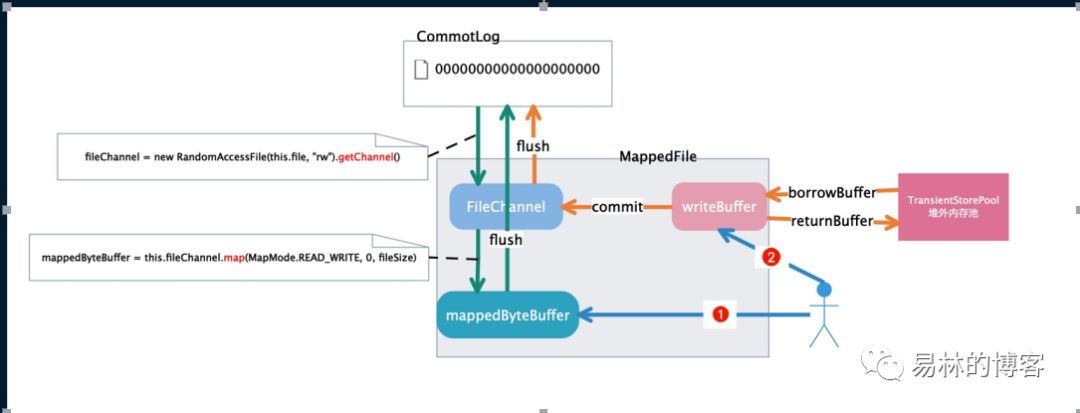
我们解释下上面的过程,上面总共是有两条颜色不一样的鲜艳的线,分表表示两种buffer
我们先说蓝色的,这个buffer里面的数据可以直接刷盘到commitLog中,另外一种颜色了,相当于两次提交动作,第一次commit是数据刷到pacheCache(这里就和第一种的一样的),然后在flush刷盘到commitlog
3.2.MappedFile的一些重要属性
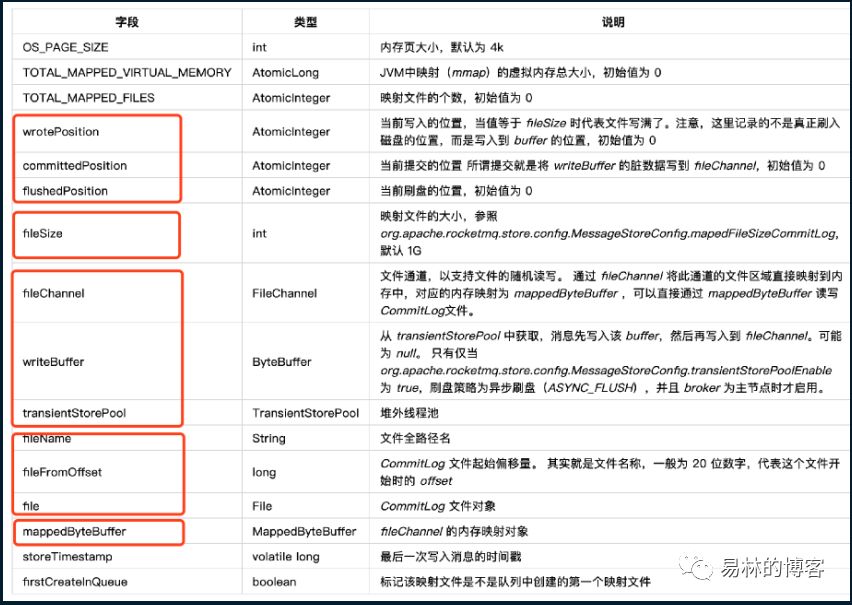
本篇文章到此就分析完了,有问题欢迎大家指出,谢谢,我们下次分析文件刷盘
备注:参考刘春龙老师到rocketMQ官方社区的分享
文章转载自易林的博客,如果涉嫌侵权,请发送邮件至:contact@modb.pro进行举报,并提供相关证据,一经查实,墨天轮将立刻删除相关内容。
评论
相关阅读
2025年4月中国数据库流行度排行榜:OB高分复登顶,崖山稳驭撼十强
墨天轮编辑部
2329次阅读
2025-04-09 15:33:27
数据库国产化替代深化:DBA的机遇与挑战
代晓磊
1075次阅读
2025-04-27 16:53:22
2025年3月国产数据库中标情况一览:TDSQL大单622万、GaussDB大单581万……
通讯员
671次阅读
2025-04-10 15:35:48
数据库,没有关税却有壁垒
多明戈教你玩狼人杀
538次阅读
2025-04-11 09:38:42
国产数据库需要扩大场景覆盖面才能在竞争中更有优势
白鳝的洞穴
515次阅读
2025-04-14 09:40:20
最近我为什么不写评论国产数据库的文章了
白鳝的洞穴
475次阅读
2025-04-07 09:44:54
2025年4月国产数据库中标情况一览:4个千万元级项目,GaussDB与OceanBase大放异彩!
通讯员
434次阅读
2025-04-30 15:24:06
【活动】分享你的压箱底干货文档,三篇解锁进阶奖励!
墨天轮编辑部
430次阅读
2025-04-17 17:02:24
天津市政府数据库框采结果公布,7家数据库产品入选!
通讯员
408次阅读
2025-04-10 12:32:35
优炫数据库成功入围新疆维吾尔自治区行政事业单位数据库2025年框架协议采购!
优炫软件
349次阅读
2025-04-18 10:01:22
