


我们知道java里面有单机的可重入锁,但是在当前的微服务的多节点情景下,单机的可重入锁就不是很适用了,那么我们怎么来实现一个分布式的可重入锁呢?
我们想想,单机的可重入锁的核心是什么呢
1. state: 来记录加锁的次数
2. owner: 来记录获取锁的线程
3. queue: 来进行排队
那么我们的分布式的可重入锁是不是也可以这样来设计呢?
我们猜测一下,它其实也是需要记录是那个客户端获取到了锁,然后这个客户端加锁了多少次,然后如果有客户端获取到这个锁,要阻塞住其他的节点,然后进行排队
那么我们来看看redisson是怎么来实现分布式可重入锁的,是不是和我们上面的猜测一样呢?
首先我们来看一下redisson的分布式可重入锁的简单使用
Config config = new Config();config.useClusterServers().addNodeAddress("redis://192.168.1.15:6379");RedissonClient client = Redisson.create(config);RLock lock = client.getLock("anyLock");lock.lock();TimeUnit.SECONDS.sleep(1);lock.unlock();复制
1. 使用起来很简单,先创建一个redis的配置
2. 根据配置去创建一个redis的客户端,通过客户端来进行操作redis
3. 通过客户端来根据指定的一个key来获取可重入锁
4. 加锁解锁操作就和java的单机锁是一样的
那么接下来我们就来分析下这个简单操作下面的实际原理吧,首先我们从获取锁看起
public RLock getLock(String name) {return new RedissonLock(commandExecutor, name);}public RedissonLock(CommandAsyncExecutor commandExecutor, String name) {super(commandExecutor, name);this.commandExecutor = commandExecutor;this.internalLockLeaseTime = commandExecutor.getConnectionManager().getCfg().getLockWatchdogTimeout();this.pubSub = commandExecutor.getConnectionManager().getSubscribeService().getLockPubSub();}public RedissonBaseLock(CommandAsyncExecutor commandExecutor, String name) {super(commandExecutor, name);this.commandExecutor = commandExecutor;this.id = commandExecutor.getConnectionManager().getId();this.internalLockLeaseTime = commandExecutor.getConnectionManager().getCfg().getLockWatchdogTimeout();this.entryName = id + ":" + name;}复制
1. 获取锁的方法就是直接new了一个RedissonLock对象,然后将锁的key和命令的执行器(CommandAsyncExecutor)给他
2. 然后我们看一下RedissonLock构造方法,保存了一下命令执行器并且还计算了一个锁的租用时间,再就是调用父类的构造器
3. 我们看到父类的构造器也是保存了一下命令执行器,还保存了一个id(这个id就是链接管理器的一个id,其实就是一个UUID),也是保存了一个锁的租用时间,还生成了一个entryName(链接管理器的id+锁的名字)
4. 再调用super构造器就是保存一下锁的key以及命令执行器而已
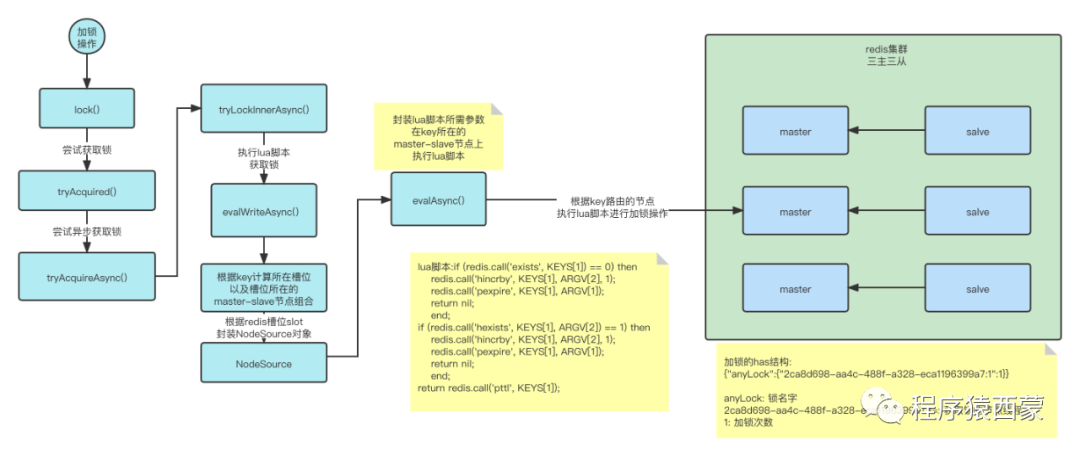
我们看到获取锁其实就是获取了一个RedissonLock对象,然后通过这个对象来进行加锁解锁,我们来分析一下加锁的原理是怎么来实现的吧
public void lock() {try {lock(-1, null, false);} catch (InterruptedException e) {throw new IllegalStateException();}}private void lock(long leaseTime, TimeUnit unit, boolean interruptibly) throws InterruptedException {long threadId = Thread.currentThread().getId();Long ttl = tryAcquire(-1, leaseTime, unit, threadId);// lock acquiredif (ttl == null) {return;}// 省略部分代码}private Long tryAcquire(long waitTime, long leaseTime, TimeUnit unit, long threadId) {return get(tryAcquireAsync(waitTime, leaseTime, unit, threadId));}private <T> RFuture<Long> tryAcquireAsync(long waitTime, long leaseTime, TimeUnit unit, long threadId) {RFuture<Long> ttlRemainingFuture;if (leaseTime != -1) {ttlRemainingFuture = tryLockInnerAsync(waitTime, leaseTime, unit, threadId, RedisCommands.EVAL_LONG);} else {ttlRemainingFuture = tryLockInnerAsync(waitTime, internalLockLeaseTime,TimeUnit.MILLISECONDS, threadId, RedisCommands.EVAL_LONG);}ttlRemainingFuture.onComplete((ttlRemaining, e) -> {if (e != null) {return;}// lock acquiredif (ttlRemaining == null) {if (leaseTime != -1) {internalLockLeaseTime = unit.toMillis(leaseTime);} else {scheduleExpirationRenewal(threadId);}}});return ttlRemainingFuture;}<T> RFuture<T> tryLockInnerAsync(long waitTime, long leaseTime, TimeUnit unit, long threadId, RedisStrictCommand<T> command) {return evalWriteAsync(getRawName(), LongCodec.INSTANCE, command,"if (redis.call('exists', KEYS[1]) == 0) then " +"redis.call('hincrby', KEYS[1], ARGV[2], 1); " +"redis.call('pexpire', KEYS[1], ARGV[1]); " +"return nil; " +"end; " +"if (redis.call('hexists', KEYS[1], ARGV[2]) == 1) then " +"redis.call('hincrby', KEYS[1], ARGV[2], 1); " +"redis.call('pexpire', KEYS[1], ARGV[1]); " +"return nil; " +"end; " +"return redis.call('pttl', KEYS[1]);",Collections.singletonList(getRawName()), unit.toMillis(leaseTime), getLockName(threadId));}复制
1. lock方法是没有传入等待时间的也就是无限期的等待下去,直到获取到锁为止
2. 首先获取到线程id
3. 然后根据线程id调用tryAcquired()尝试获取锁
4. 这里会调用tryAcquiedAsync来尝试获取锁,继续会调用tryLockInnerAsync()方法来执行一段lua脚本,我们来分析下这个lua脚本
if (redis.call('exists', KEYS[1]) == 0) thenredis.call('hincrby', KEYS[1], ARGV[2], 1);redis.call('pexpire', KEYS[1], ARGV[1]);return nil;end;if (redis.call('hexists', KEYS[1], ARGV[2]) == 1) thenredis.call('hincrby', KEYS[1], ARGV[2], 1);redis.call('pexpire', KEYS[1], ARGV[1]);return nil;end;return redis.call('pttl', KEYS[1]);复制
备注:
keys[1] 就是我们getLock是传入的name
argv[2] 就是我们hash接口的二级key
argv[1] 就是过期时间 30s
这段lua脚本的意思就是
1. 先判断lockKey是否存在,如果不存在则给 lockKey uniqueKey 设置一个value值为1 这个value值其实就是代表的加锁次数,然后给这个lockKey uniqueKey设置一个过期时间
2. 在判断lockKey uniqueKey是否存在,如果存在说明这个uniqueKey代表的线程获取到锁了,则给他的加锁次数在添加上1,然后给他设置一个过期时间
3. 最后返回这个lockKey的剩余过期时间
我们继续上面的分析
protected <T> RFuture<T> evalWriteAsync(String key, Codec codec, RedisCommand<T> evalCommandType, String script, List<Object> keys, Object... params) {CommandBatchService executorService = createCommandBatchService();RFuture<T> result = executorService.evalWriteAsync(key, codec, evalCommandType, script, keys, params);if (commandExecutor instanceof CommandBatchService) {return result;}RPromise<T> r = new RedissonPromise<>();RFuture<BatchResult<?>> future = executorService.executeAsync();future.onComplete((res, ex) -> {if (ex != null) {r.tryFailure(ex);return;}r.trySuccess(result.getNow());});return r;}private CommandBatchService createCommandBatchService() {if (commandExecutor instanceof CommandBatchService) {return (CommandBatchService) commandExecutor;}MasterSlaveEntry entry = commandExecutor.getConnectionManager().getEntry(getRawName());BatchOptions options = BatchOptions.defaults().syncSlaves(entry.getAvailableSlaves(), 1, TimeUnit.SECONDS);return new CommandBatchService(commandExecutor, options);}public <T, R> RFuture<R> evalWriteAsync(String key, Codec codec, RedisCommand<T> evalCommandType, String script, List<Object> keys, Object... params) {NodeSource source = getNodeSource(key);return evalAsync(source, false, codec, evalCommandType, script, keys, false, params);}private NodeSource getNodeSource(String key) {int slot = connectionManager.calcSlot(key);return new NodeSource(slot);}复制
1. 创建一个CommandBatchService,然后根据LockKey进行路由来计算这个key会落在集群的那个槽位上,然后根据槽位找到对应的master-slave组合
2. 通过批处理对象调用evalWriteAsync来执行加锁逻辑
3. 根据key算出来槽位然后封装NodeSource对象
4. 调用evalAsync来执行加锁逻辑
private <T, R> RFuture<R> evalAsync(NodeSource nodeSource, boolean readOnlyMode, Codec codec, RedisCommand<T> evalCommandType,String script, List<Object> keys, boolean noRetry, Object... params) {// 省略部分代码RPromise<R> mainPromise = createPromise();List<Object> args = new ArrayList<Object>(2 + keys.size() + params.length);args.add(script);args.add(keys.size());args.addAll(keys);args.addAll(Arrays.asList(params));async(readOnlyMode, nodeSource, codec, evalCommandType, args.toArray(), mainPromise, false, noRetry);return mainPromise;}复制
1. 封装参数来执行加锁操作
2. script就是上面的lua脚本,keys就是里面就是我们getLock是传入的name=anyLock, params就是过期时间以及线程的标识
3. 执行解锁的操作
经过我们的分析,我们整个的加锁操作的核心其实就是上面那段lua脚本 和上面我们的猜测很像,有一个state来记录加锁的次数 也就是hash接口的value值,也有一个owner来记录获取锁的线程标识,这里使用的是hash接口的secondKey来记录
加锁原理
那么接下来的文章要来分析一下他是怎么来进行阻塞排队的,敬请期待~
