目录
前言
将Oracle数据库的LPS&TPS查询导入Vertica数据库
- 将Oracle数据库的LPS&TPS查询保存为CSV文件
- 将所有CSV文件上传到Vertica服务器的/home/dbadmin目录下
- 用vsql客户端命令连接到Vertica数据库
- 在Vertica数据库中创建相关的LPS&TPS表
- 使用COPY命令将CSV文件导入刚创建的表中
将Oracle数据库的LPS&TPS查询保存为CSV文件
这里需要说明一下,LPS和TPS分别是Oracle度量的两个指标,我们使用一个SQL查询即可完成,但是我们需要从三个维度才能更详细地阐述LPS&TPS。这三个维度分别是:最近1小时(按每分钟间隔),最近24小时(按每小时间隔)和最近31天(按每小时间隔)。和上一篇博客文章类似的操作方法,我们在Oracle SQL Developer中以脚本方式查询出LPS&TPS,然后将其保存为CSV文件。由于文件中的数据行过长,所以不便在这里贴出,现已上传到我的GitHub,您可以从这里查看,它们分别是:oracle_lps_tps_in_last_1_hour.csv,oracle_lps_tps_in_last_24_hours.csv和oracle_lps_tps_in_last_31_days.csv。三个维度的SQL代码分别如下所示:
-- Logons Per Sec & User Transaction Per Sec in Last 1 Hour (interval by each minute).

SET FEEDBACK  off;
SET SQLFORMAT csv;

SET LINESIZE 200
SET PAGESIZE 200

COLUMN metric_name    FORMAT a12
COLUMN snap_date_time FORMAT a20
COLUMN psn            FORMAT 999,999.99

ALTER SESSION SET nls_date_format = 'yyyy-mm-dd hh24:mi:ss';

SELECT TO_CHAR(end_time, 'yyyy-mm-dd hh24:mi:ss') snap_date_time                                                -- the group column
     , DECODE(metric_name, 'User Transaction Per Sec', 'Transactions', 'Logons Per Sec', 'Logons') metric_name  -- the series column
     , ROUND(value, 2) psn                                                                                      -- the value column
FROM v$sysmetric_history
WHERE metric_name IN ('User Transaction Per Sec', 'Logons Per Sec')
AND   group_id = 2                                                                                              -- just retrieve the name with "System Metrics Long Duration" in v$metricgroup
-- ORDER BY snap_date_time
--        , metric_name
ORDER BY metric_name
       , snap_date_time
;复制
-- Logons Per Sec & User Transaction Per Sec in Last 24 Hours (interval by each hour).
SET FEEDBACK off;
SET SQLFORMAT csv;
SET LINESIZE 200
SET PAGESIZE 200
COLUMN metric_name FORMAT a12
COLUMN snap_date_time FORMAT a20
COLUMN psn FORMAT 999,999.99
ALTER SESSION SET nls_date_format = 'yyyy-mm-dd hh24:mi:ss';
SELECT TO_CHAR(end_time, 'yyyy-mm-dd hh24:mi:ss') snap_date_time -- the group column
, DECODE(metric_name, 'User Transaction Per Sec', 'Transactions', 'Logons Per Sec', 'Logons') metric_name -- the series column
, ROUND(average, 2) psn -- the value column
FROM dba_hist_sysmetric_summary
WHERE metric_name IN ('User Transaction Per Sec', 'Logons Per Sec')
AND end_time >= SYSDATE - 1
-- ORDER BY snap_date_time
-- , metric_name
ORDER BY metric_name
, snap_date_time
;复制-- Logons Per Sec & User Transaction Per Sec in Last 31 Days (interval by each hour).
SET FEEDBACK off;
SET SQLFORMAT csv;
SET LINESIZE 200
SET PAGESIZE 200
COLUMN metric_name FORMAT a12
COLUMN snap_date_time FORMAT a20
COLUMN psn FORMAT 999,999.99
ALTER SESSION SET nls_date_format = 'yyyy-mm-dd hh24:mi:ss';
SELECT TO_CHAR(end_time, 'yyyy-mm-dd hh24:mi:ss') snap_date_time -- the group column
, DECODE(metric_name, 'User Transaction Per Sec', 'Transactions', 'Logons Per Sec', 'Logons') metric_name -- the series column
, ROUND(average, 2) psn -- the value column
FROM dba_hist_sysmetric_summary
WHERE metric_name IN ('User Transaction Per Sec', 'Logons Per Sec')
AND end_time >= SYSDATE - 30
-- ORDER BY snap_date_time
-- , metric_name
ORDER BY metric_name
, snap_date_time
;复制将所有CSV文件上传到Vertica服务器的/home/dbadmin目录下
这里,省略了上传的过程和一些授权相关的步骤,最后的上传结果详见“<<==”所指向的三个CSV文件。
[dbadmin@test ~]$ ls -lrht
total 112K
drwxr-xr-x 5 dbadmin verticadba  134 Dec 15 14:06 vdb_oracle_perf
-rw-r--r-- 1 dbadmin verticadba  27K Dec 16 18:37 oracle_dbtime.csv
-rw-r--r-- 1 dbadmin verticadba 1.9K Dec 16 18:37 oracle_dbtime_2.csv
-rw-rw-r-- 1 dbadmin verticadba  390 Dec 16 18:44 imp.log
-rw-rw-r-- 1 dbadmin verticadba  393 Dec 16 18:45 imp_2.log
-rw-r--r-- 1 dbadmin verticadba 4.7K Dec 20 09:42 oracle_lps_tps_in_last_1_hour.csv    <<==
-rw-r--r-- 1 dbadmin verticadba 2.0K Dec 20 09:45 oracle_lps_tps_in_last_24_hours.csv  <<==
-rw-r--r-- 1 dbadmin verticadba 57K Dec 20 09:47 oracle_lps_tps_in_last_31_days.csv <<==复制用vsql客户端命令连接到Vertica数据库
这次我们不用DBeaver客户端工具去连接Vertica数据库了,哈哈!因为在Vertica中自带了一个客户端,vsql的Linux命令行工具(类似于Oracle的SQL*Plus),而且使用它在命令行接口上更加方便和快捷。连接过程详见下面的操作步骤:
[root@test ~]# su - dbadmin

[dbadmin@test ~]$ /opt/vertica/bin/vsql -h 127.0.0.1 vdb_oracle_perf dbadmin
Password:
Welcome to vsql, the Vertica Analytic Database interactive terminal.

Type:  \h or \? for help with vsql commands
       \g or terminate with semicolon to execute query
       \q to quit

vdb_oracle_perf=> 复制在Vertica数据库中创建相关的LPS&TPS表
在vsql下分别创建三个表,表名依次为:oracle_lps_tps_in_last_1_hour,oracle_lps_tps_in_last_24_hours和oracle_lps_tps_in_last_31_days。其操作步骤分别如下所示:
vdb_oracle_perf=> CREATE TABLE public.oracle_lps_tps_in_last_1_hour
vdb_oracle_perf=> (snap_date_time TIMESTAMP,
vdb_oracle_perf=>  metric_name    VARCHAR2(20),
vdb_oracle_perf=>  psn            NUMBER(8,2)
vdb_oracle_perf=> );
CREATE TABLE
vdb_oracle_perf=>
vdb_oracle_perf=> CREATE TABLE public.oracle_lps_tps_in_last_24_hours
vdb_oracle_perf=> (snap_date_time TIMESTAMP,
vdb_oracle_perf=>  metric_name    VARCHAR2(20),
vdb_oracle_perf=>  psn            NUMBER(8,2)
vdb_oracle_perf=> );
CREATE TABLE
vdb_oracle_perf=>
vdb_oracle_perf=> CREATE TABLE public.oracle_lps_tps_in_last_31_days
vdb_oracle_perf=> (snap_date_time TIMESTAMP,
vdb_oracle_perf=>  metric_name    VARCHAR2(20),
vdb_oracle_perf=>  psn            NUMBER(8,2)
vdb_oracle_perf=> );
CREATE TABLE
vdb_oracle_perf=> 复制使用COPY命令将CSV文件导入刚创建的表中
导入过程请看下面的具体步骤:
vdb_oracle_perf=>
vdb_oracle_perf=> COPY public.oracle_lps_tps_in_last_1_hour FROM '/home/dbadmin/oracle_lps_tps_in_last_1_hour.csv' EXCEPTIONS '/home/dbadmin/imp_lps_tps_1.log' DELIMITER AS ',';
NOTICE 7850:  In a multi-threaded load, rejected record data may be written to additional files
HINT:  Exceptions may be written to files [/home/dbadmin/imp_lps_tps_1.log], [/home/dbadmin/imp_lps_tps_1.log.1], etc
 Rows Loaded
-------------
         122
(1 row)

vdb_oracle_perf=> COPY public.oracle_lps_tps_in_last_24_hours FROM '/home/dbadmin/oracle_lps_tps_in_last_24_hours.csv' EXCEPTIONS '/home/dbadmin/imp_lps_tps_2.log' DELIMITER AS ',';
NOTICE 7850:  In a multi-threaded load, rejected record data may be written to additional files
HINT:  Exceptions may be written to files [/home/dbadmin/imp_lps_tps_2.log], [/home/dbadmin/imp_lps_tps_2.log.1], etc
 Rows Loaded
-------------
          48
(1 row)

vdb_oracle_perf=> COPY public.oracle_lps_tps_in_last_31_days FROM '/home/dbadmin/oracle_lps_tps_in_last_31_days.csv' EXCEPTIONS '/home/dbadmin/imp_lps_tps_3.log' DELIMITER AS ',';
NOTICE 7850:  In a multi-threaded load, rejected record data may be written to additional files
HINT:  Exceptions may be written to files [/home/dbadmin/imp_lps_tps_3.log], [/home/dbadmin/imp_lps_tps_3.log.1], etc
 Rows Loaded
-------------
        1440
(1 row)

vdb_oracle_perf=> 复制用Tableau可视化Vertica数据库的表
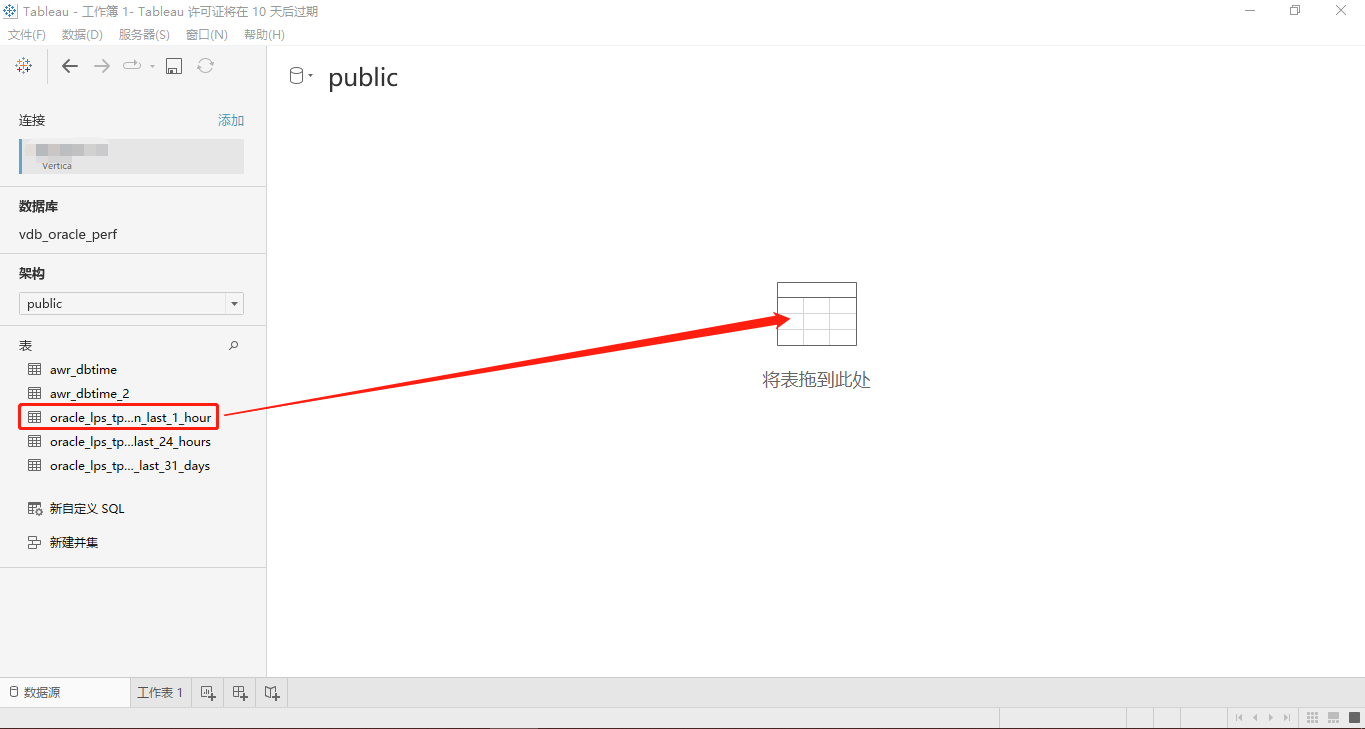
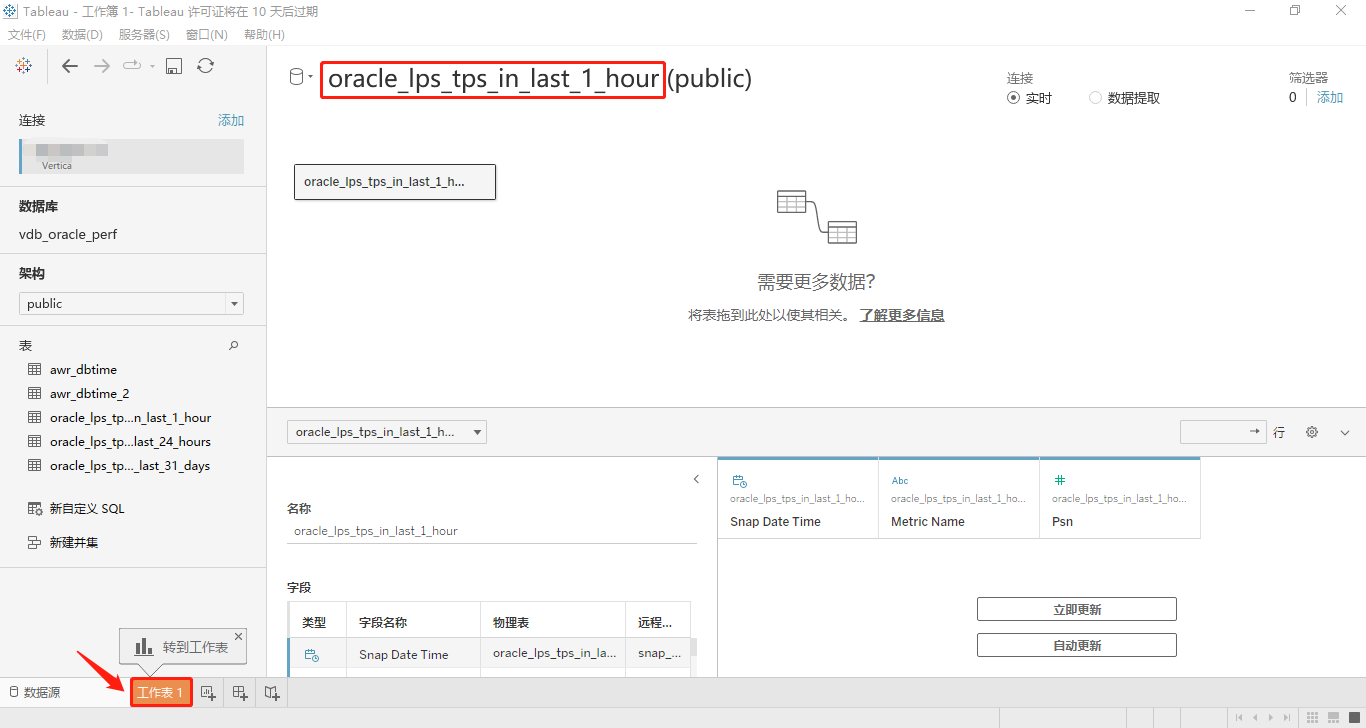
在Tableau中连接Vertica数据库并选择schema为public,将表oracle_lps_tps_in_last_1_hour用鼠标拖动到指定位置,然后转到工作表,准备下一步的可视化操作。对应的两个屏幕截图分别是:
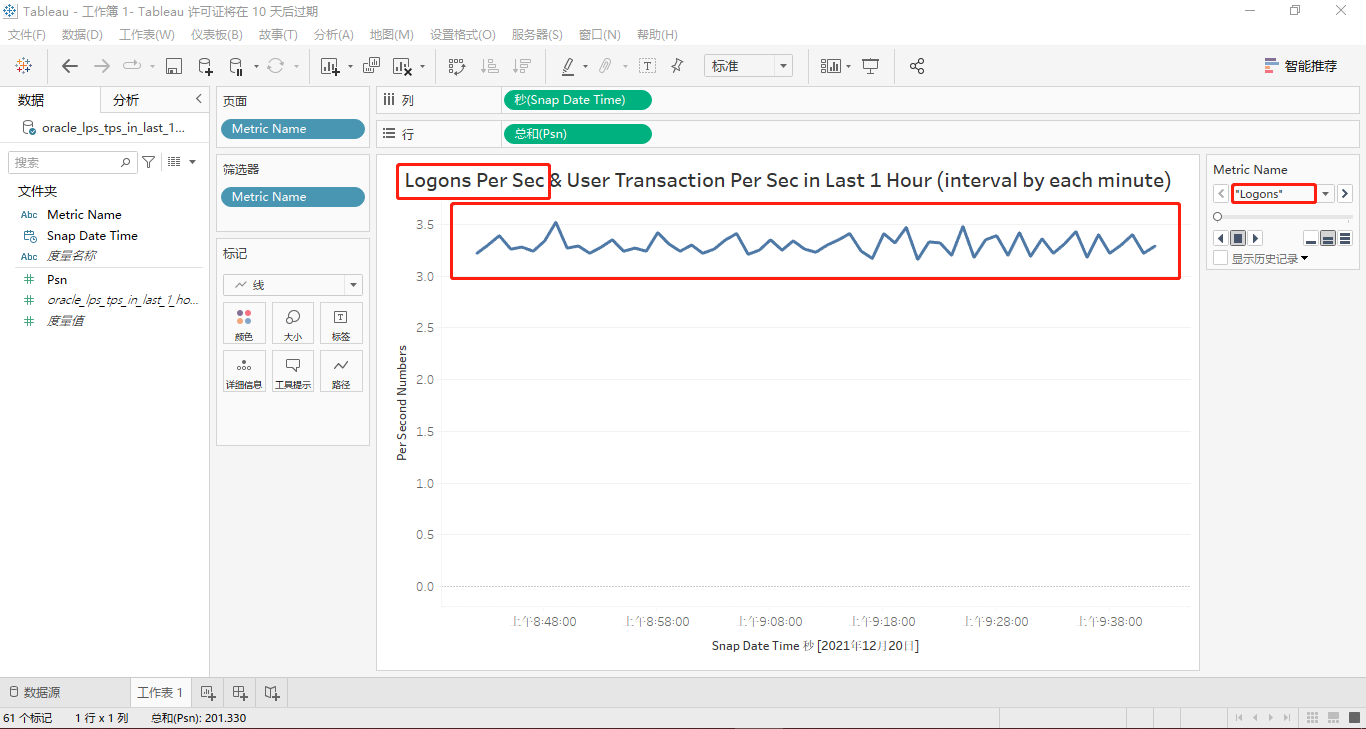
在工作表区域上,我们把度量名称Snap Date Time用鼠标拖动到标签名为“列”的标签框里(默认是年,将其展开到秒),把度量值Psn拖动到标签名为“行”的标签框中,再将度量名称Metric Name拖动到标签名为“页面”的标签里。与此同时,我们会看到在整个页面的右边区域上新增了一个Metric Name的标签。不幸的是,这两个度量“Logons”和“Transactions”不能同时出现在一个“折线图”中。我们需要在标签Metric Name上选择Logons或Transactions才能出现与其对应的折线图。详见如下两图的红框标明位置:
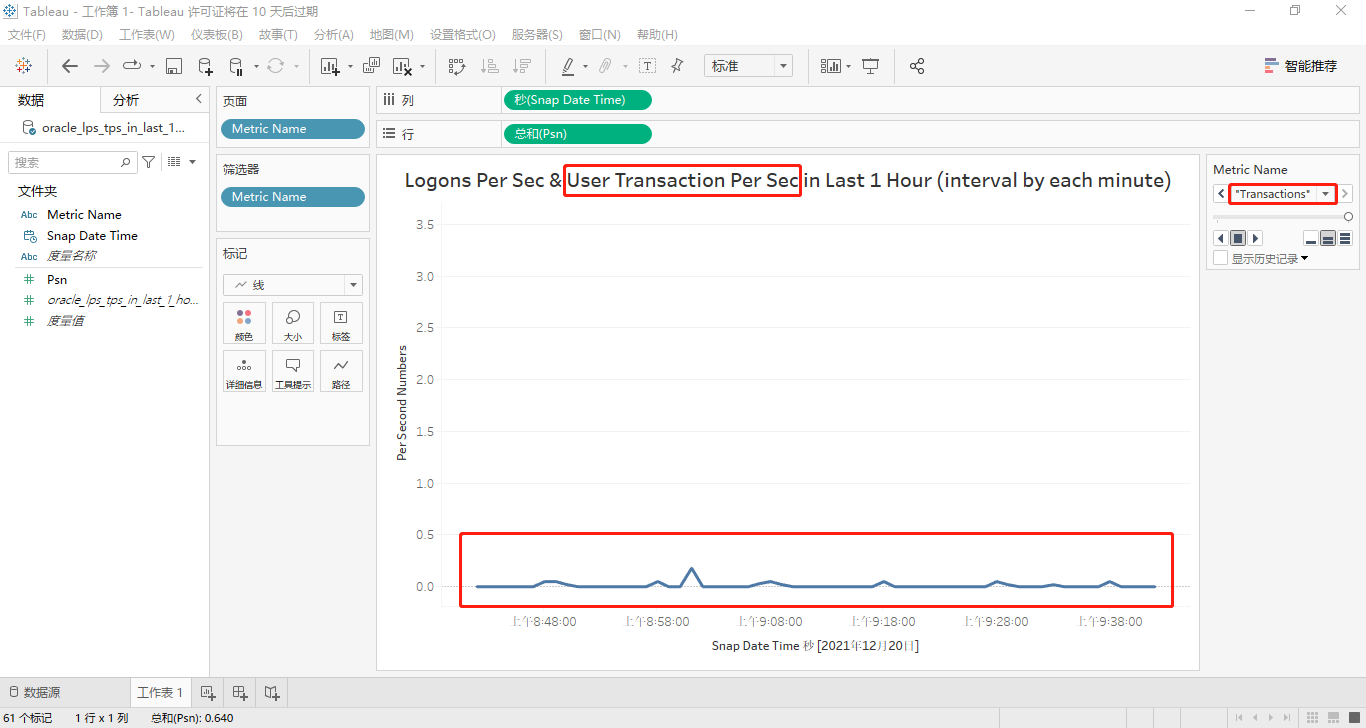
回头想想,造成这个问题的原因是表oracle_lps_tps_in_last_1_hour的列metric name的值Logons和Transactions在同一列,也就是其对应的度量值psn均在同一列,所以这两个度量各称无法出现在同一个折线图上。因此我们需要把metric name的两个值所在的行转变为两个列,在这两个列中分别保存各自的度量值psn,这个需求我们称之为行转列操作。接着在Tableau中的Vertica数据库表oracle_lps_tps_in_last_1_hour才会有两个不同的度量。到这里,我们就暂先放弃了对表oracle_lps_tps_in_last_24_hours和oracle_lps_tps_in_last_31_days的可视化操作。
对原始SQL进行行转列改造,再重复执行前两步
1. 三个维度的行转列部分SQL代码如下所示(由于代码过多,这里只贴出行转列的关键部分,其余内容和前面展示的SQL代码完全一致):
-- Converting rows TO columns Based on Logons Per Sec & User Transaction Per Sec in Last 1 Hour (interval by each minute).

......

WITH lps_tps_in_last_1_hour AS
(
  ......
)
SELECT *
FROM lps_tps_in_last_1_hour
PIVOT ( MAX(psn)
        FOR metric_name IN
        (  'Logons' AS "Logons"
         , 'Transactions' AS "Transactions"
        )
      )
ORDER BY snap_date_time
;复制
-- Converting rows TO columns Based on Logons Per Sec & User Transaction Per Sec in Last 24 Hours (interval by each hour).
......
WITH lps_tps_in_last_24_hours AS
(
......
)
SELECT *
FROM lps_tps_in_last_24_hours
PIVOT ( MAX(psn)
FOR metric_name IN
( 'Logons' AS "Logons"
, 'Transactions' AS "Transactions"
)
)
ORDER BY snap_date_time
;复制-- Converting rows TO columsn Based on Logons Per Sec & User Transaction Per Sec in Last 31 Days (interval by each hour).
......
WITH lps_tps_in_last_31_days AS
(
......
)
SELECT *
FROM lps_tps_in_last_31_days
PIVOT ( MAX(psn)
FOR metric_name IN
( 'Logons' AS "Logons"
, 'Transactions' AS "Transactions"
)
)
ORDER BY snap_date_time
;复制2. 同样,将上面的SQL代码分别在Oracle SQL Developer里以脚本方式运行并保存为CSV文件,您可以从这里查看,它们分别是:crbc_oracle_lps_tps_in_last_1_hour.csv,crbc_oracle_lps_tps_in_last_24_hours.csv和crbc_oracle_lps_tps_in_last_31_days.csv。
3. 将三个CSV文件上传到Vertica数据库服务器的/home/dbadmin/目录下,见“<<==”标明的位置。
[dbadmin@test ~]$ ls -lrht
total 156K
drwxr-xr-x 5 dbadmin verticadba  134 Dec 15 14:06 vdb_oracle_perf
-rw-r--r-- 1 dbadmin verticadba  27K Dec 16 18:37 oracle_dbtime.csv
-rw-r--r-- 1 dbadmin verticadba 1.9K Dec 16 18:37 oracle_dbtime_2.csv
-rw-rw-r-- 1 dbadmin verticadba  390 Dec 16 18:44 imp.log
-rw-rw-r-- 1 dbadmin verticadba  393 Dec 16 18:45 imp_2.log
-rw-r--r-- 1 dbadmin verticadba 4.7K Dec 20 09:42 oracle_lps_tps_in_last_1_hour.csv
-rw-r--r-- 1 dbadmin verticadba 2.0K Dec 20 09:45 oracle_lps_tps_in_last_24_hours.csv
-rw-r--r-- 1 dbadmin verticadba  57K Dec 20 09:47 oracle_lps_tps_in_last_31_days.csv
-rw-rw-r-- 1 dbadmin verticadba  425 Dec 20 10:06 imp_lps_tps_1.log
-rw-rw-r-- 1 dbadmin verticadba  428 Dec 20 10:06 imp_lps_tps_2.log
-rw-rw-r-- 1 dbadmin verticadba  428 Dec 20 10:07 imp_lps_tps_3.log
-rw-r--r-- 1 dbadmin verticadba 1.9K Dec 20 14:51 crbc_oracle_lps_tps_in_last_1_hour.csv    <<==
-rw-r--r-- 1 dbadmin verticadba  831 Dec 20 14:52 crbc_oracle_lps_tps_in_last_24_hours.csv  <<==
-rw-r--r-- 1 dbadmin verticadba  24K Dec 20 14:53 crbc_oracle_lps_tps_in_last_31_days.csv   <<==复制
4. 用vsql连接到Vertica数据库创建新表(表名在原表的基础上增加crbc前缀)并用COPY命令导入CSV文件中的数据。
vdb_oracle_perf=>
vdb_oracle_perf=> CREATE TABLE public.crbc_oracle_lps_tps_in_last_1_hour
vdb_oracle_perf=> (snap_date_time TIMESTAMP,
vdb_oracle_perf=>  logons         NUMBER(8,2),
vdb_oracle_perf=>  transactions   NUMBER(8,2)
vdb_oracle_perf=> );
CREATE TABLE
vdb_oracle_perf=>
vdb_oracle_perf=> CREATE TABLE public.crbc_oracle_lps_tps_in_last_24_hours
vdb_oracle_perf=> (snap_date_time TIMESTAMP,
vdb_oracle_perf=>  logons         NUMBER(8,2),
vdb_oracle_perf=>  transactions   NUMBER(8,2)
vdb_oracle_perf=> );
CREATE TABLE
vdb_oracle_perf=>
vdb_oracle_perf=> CREATE TABLE public.crbc_oracle_lps_tps_in_last_31_days
vdb_oracle_perf=> (snap_date_time TIMESTAMP,
vdb_oracle_perf=>  logons         NUMBER(8,2),
vdb_oracle_perf=>  transactions   NUMBER(8,2)
vdb_oracle_perf=> );
CREATE TABLE
vdb_oracle_perf=>
vdb_oracle_perf=> COPY public.crbc_oracle_lps_tps_in_last_1_hour FROM '/home/dbadmin/crbc_oracle_lps_tps_in_last_1_hour.csv' EXCEPTIONS '/home/dbadmin/imp_crbc_lps_tps_1.log' DELIMITER AS ',';
NOTICE 7850:  In a multi-threaded load, rejected record data may be written to additional files
HINT:  Exceptions may be written to files [/home/dbadmin/imp_crbc_lps_tps_1.log], [/home/dbadmin/imp_crbc_lps_tps_1.log.1], etc
 Rows Loaded
-------------
          61
(1 row)

vdb_oracle_perf=>
vdb_oracle_perf=> COPY public.crbc_oracle_lps_tps_in_last_24_hours FROM '/home/dbadmin/crbc_oracle_lps_tps_in_last_24_hours.csv' EXCEPTIONS '/home/dbadmin/imp_crbc_lps_tps_2.log' DELIMITER AS ',';
NOTICE 7850:  In a multi-threaded load, rejected record data may be written to additional files
HINT:  Exceptions may be written to files [/home/dbadmin/imp_crbc_lps_tps_2.log], [/home/dbadmin/imp_crbc_lps_tps_2.log.1], etc
 Rows Loaded
-------------
          24
(1 row)

vdb_oracle_perf=>
vdb_oracle_perf=> COPY public.crbc_oracle_lps_tps_in_last_31_days FROM '/home/dbadmin/crbc_oracle_lps_tps_in_last_31_days.csv' EXCEPTIONS '/home/dbadmin/imp_crbc_lps_tps_3.log' DELIMITER AS ',';
NOTICE 7850:  In a multi-threaded load, rejected record data may be written to additional files
HINT:  Exceptions may be written to files [/home/dbadmin/imp_crbc_lps_tps_3.log], [/home/dbadmin/imp_crbc_lps_tps_3.log.1], etc
 Rows Loaded
-------------
         720
(1 row)

vdb_oracle_perf=> 复制
5. 在Tableau中连接Vertica数据库并可视化新表
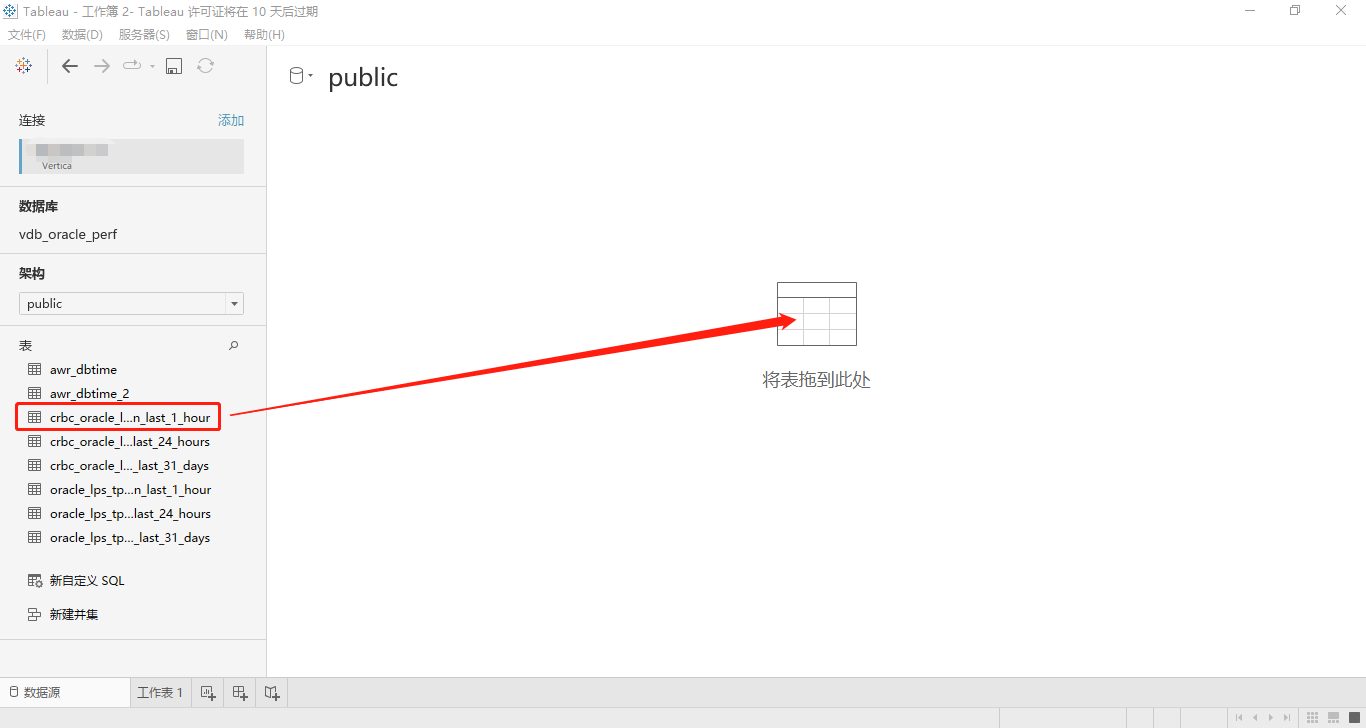
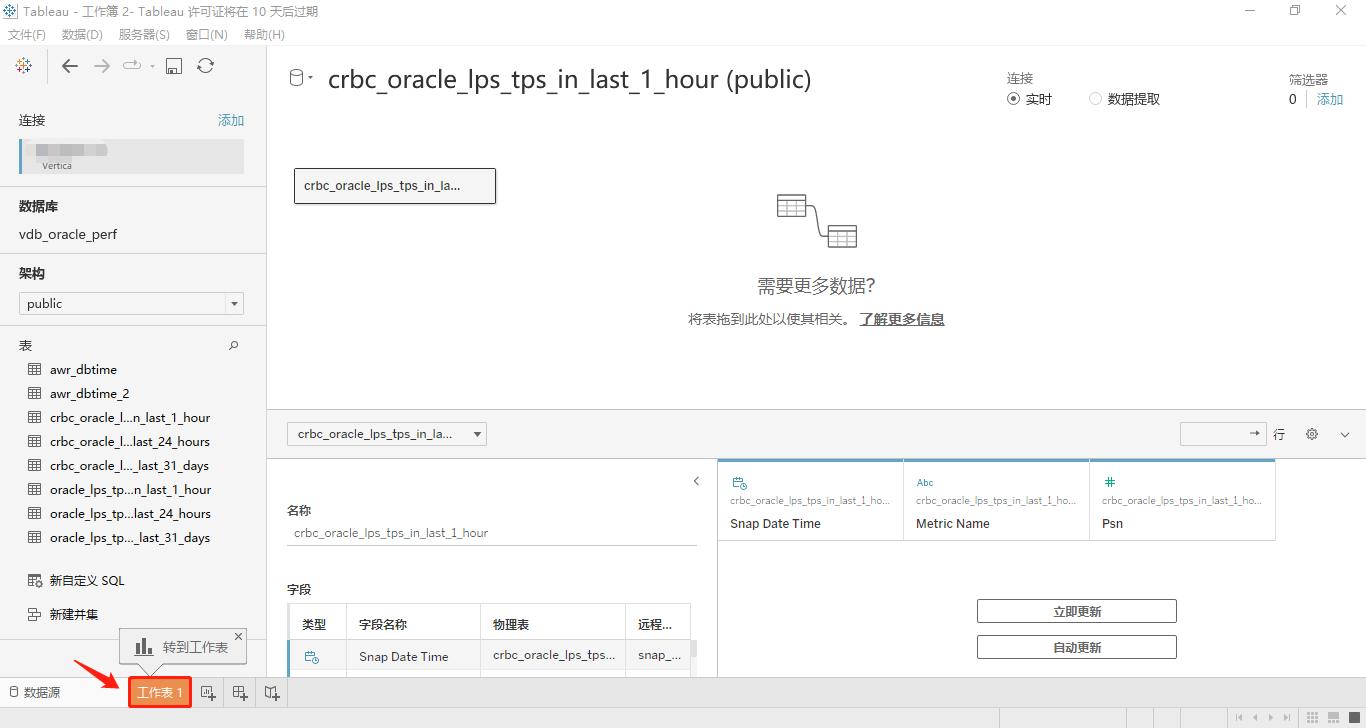
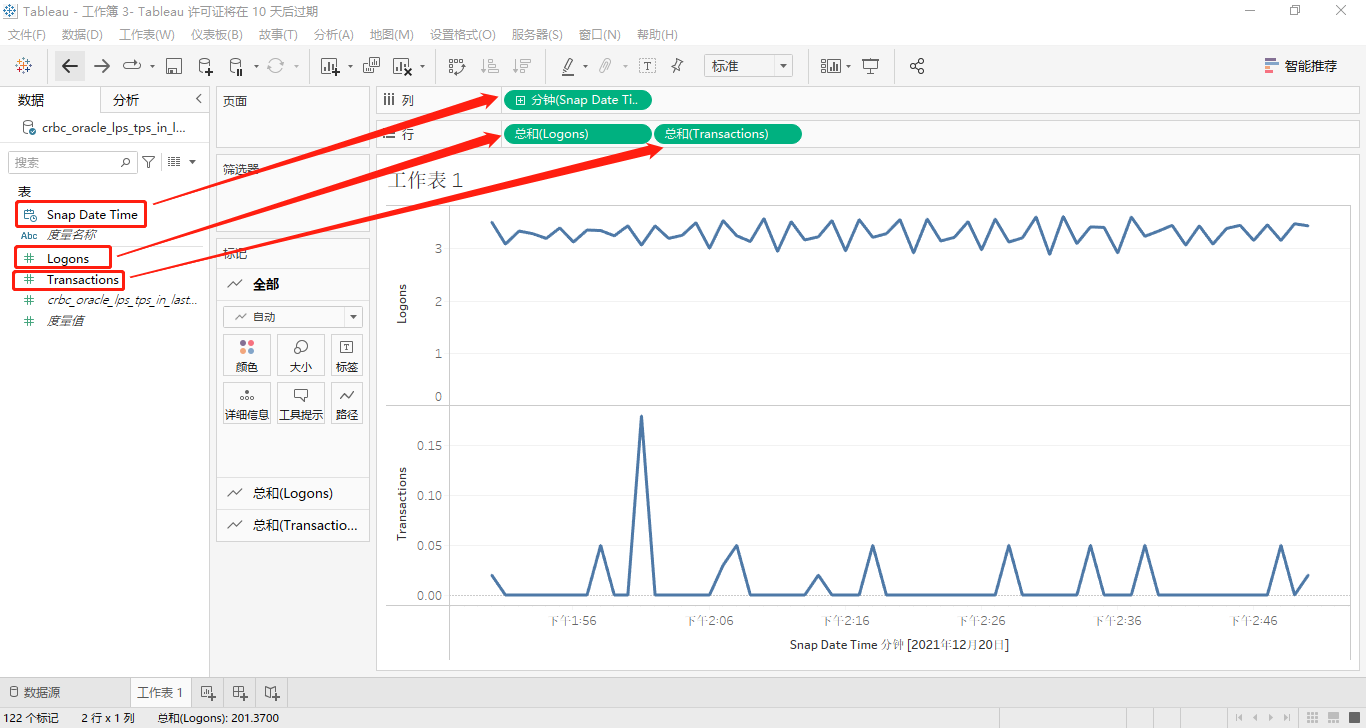
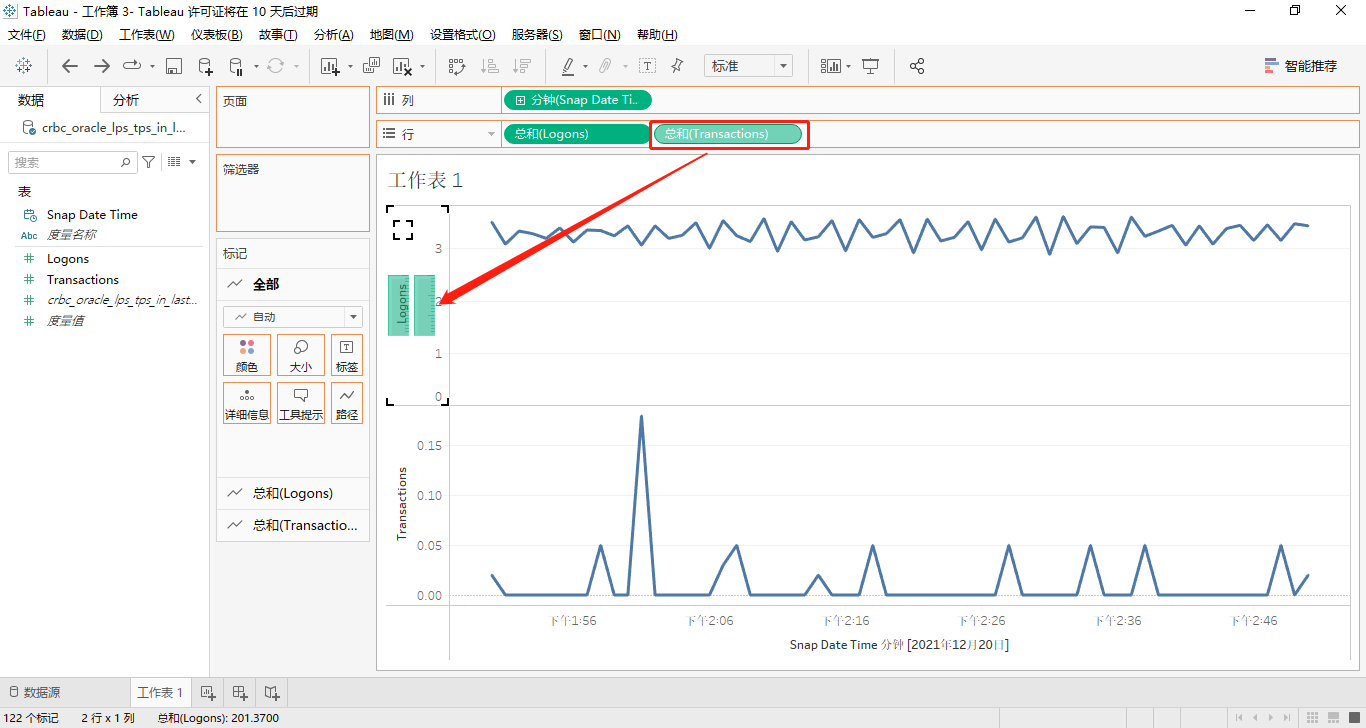
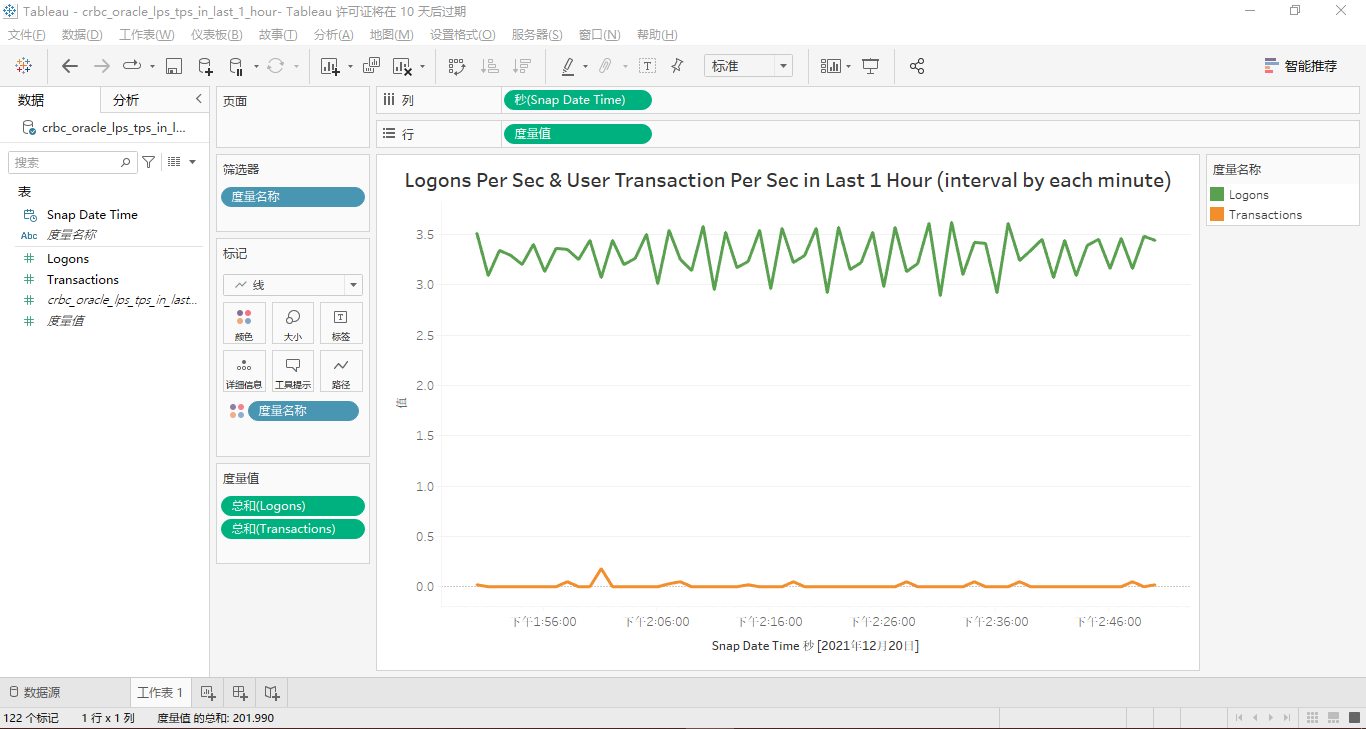
这次,我们终于可以将两个度量Logons和Transactions在同一个折线图中展示出来了,其中对新表crbc_oracle_lps_tps_in_last_1_hour的可视化操作依次见如下五个屏幕截图:
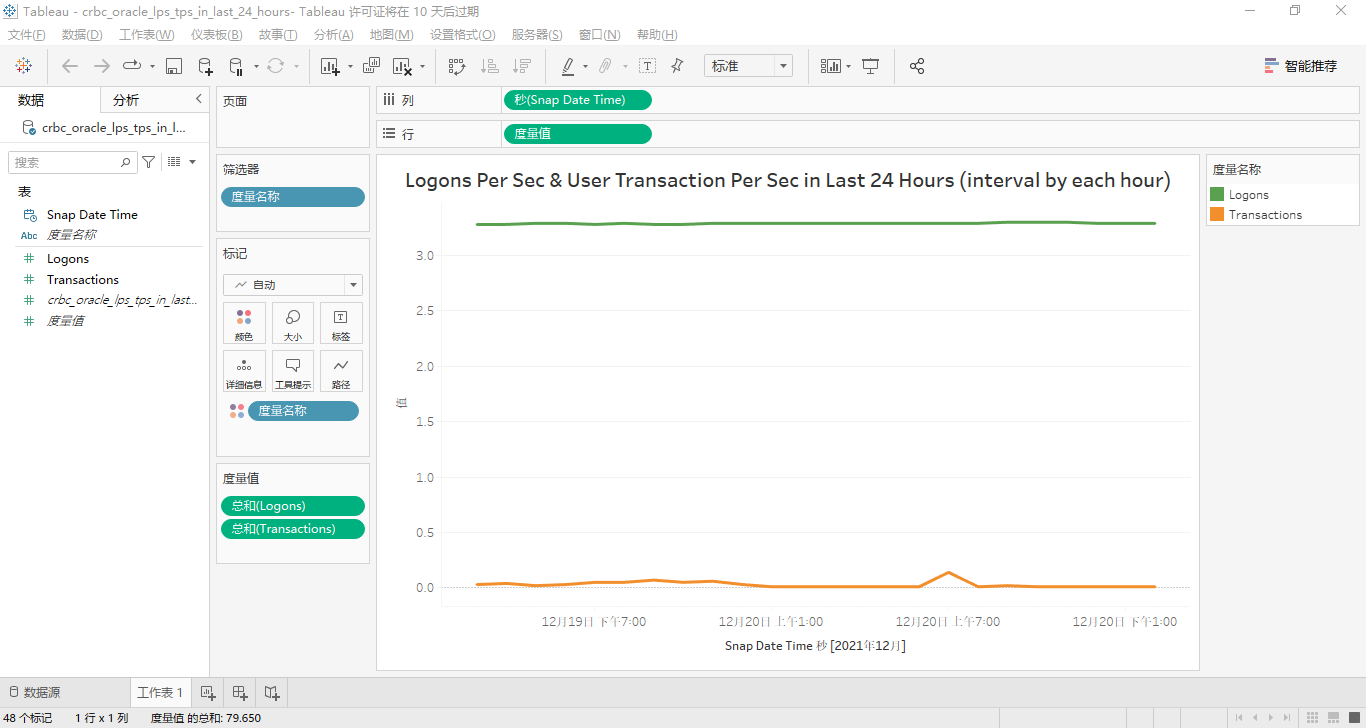
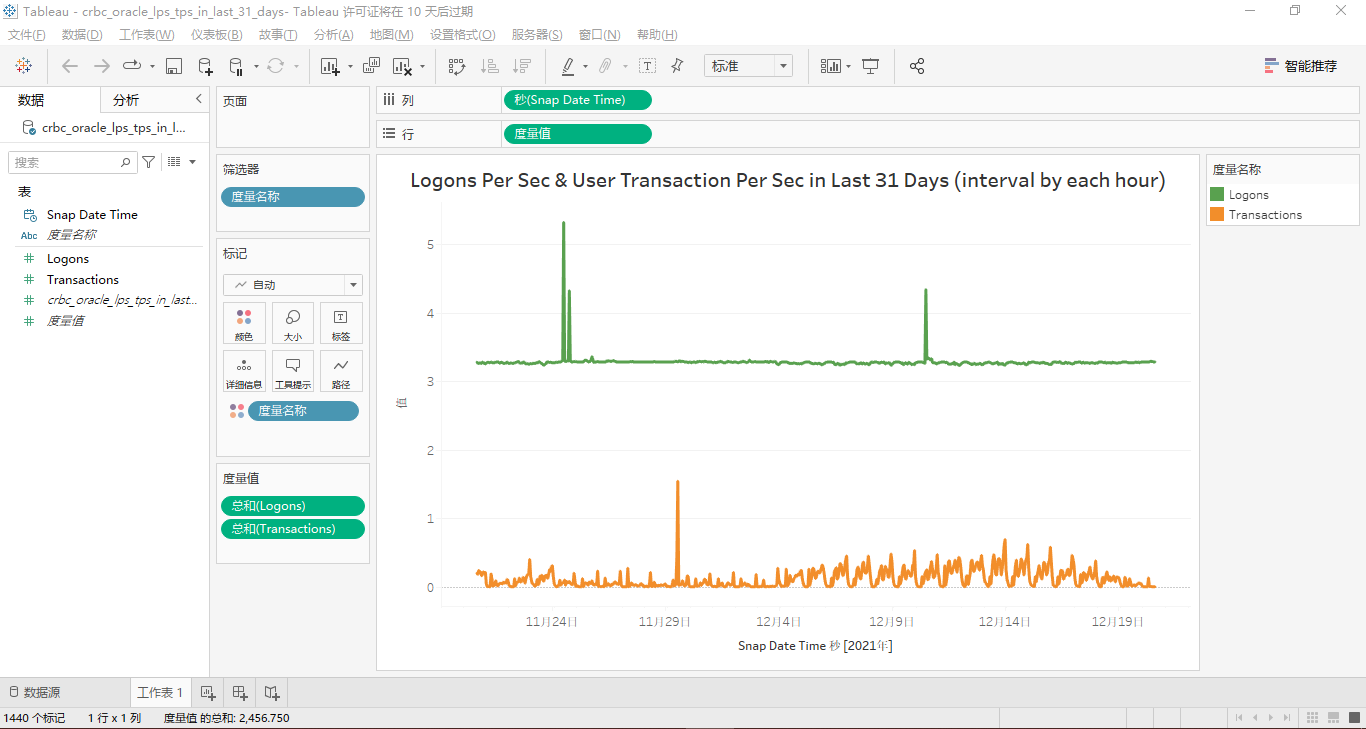
表crbc_oracle_lps_tps_in_last_24_hours和crbc_oracle_lps_tps_in_last_31_days的可视化结果分别如下所示:
以上就是用Tableau可视化Vertica数据库之“LPS&TPS”篇的所有内容。另外,您也可以在acquire_lps_union_tps.sql的第32-64行、第66-98行、第100-132行、第217-238行、第344-365行和第367-388行找到我前面提到的所有SQL源代码。欢迎业界各位朋友在文章底部的评论区提出您的反馈意见。
参考内容
评论
 点赞
点赞


