


Attention is all you need

本来最近在钻研diffusion的,然而感觉diffusion真的好吃计算资源,即使是stable diffusion都在4000块A100上训练了1个月,瞬间就有点气馁,所以打算歇一下,把之前学习到的东西整理成笔记,然后再说吧。
另外我发现了一款新的Markdown编辑器——MarkText,界面甚至比Typora还要简洁漂亮,我觉得不写点什么真的可惜。
Transformer的鼎鼎大名已经不需要任何介绍了,attention is all you need,抛弃了以前的CNN和RNN的结构,完全只包含attention和Feed Forward Networks,感觉有要统一CV和NLP的感觉。
代码已经放在了Github,就是原论文中的结构,后续可能还会完善哈。
https://github.com/Qiyuan-Ge/transformer.git
现在开始看模型结构吧。
Model Architecture
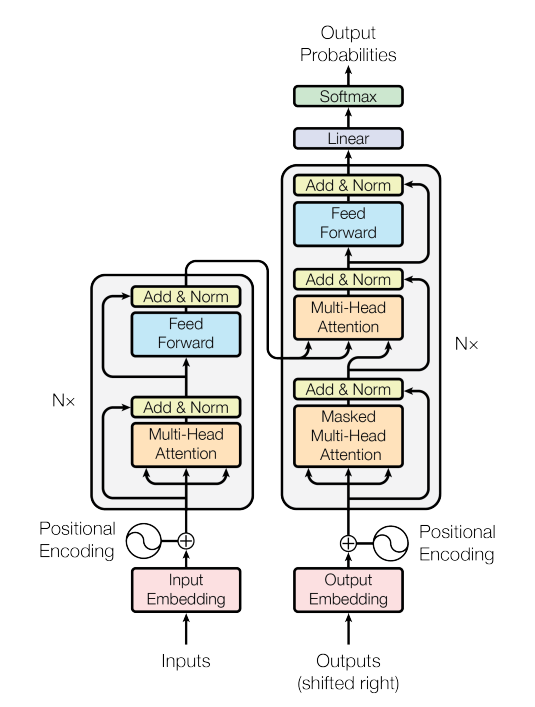
先大致讲一下训练过程,以机器翻译英译汉为例,src英语文本经过tokenizer后会变成token ids,输入的维度为(b, l1),经过input embedding后维度会变为(b, l1, d),然后加上position encoding位置编码,然后输入Encoder中;tgt汉语文本同样会经过tokenize, embedding, position encoding的步骤,以(b, l2, d)的维度输入Decoder中,但是最后要加一个Linear和softmax用于输出每个单词的概率,Decoder的输出维度为(b, l2, num_classes)。
我画个图吧:
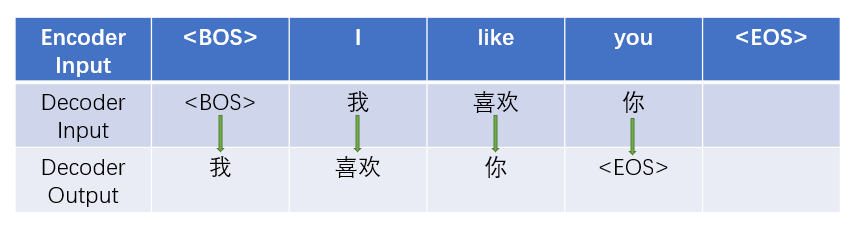
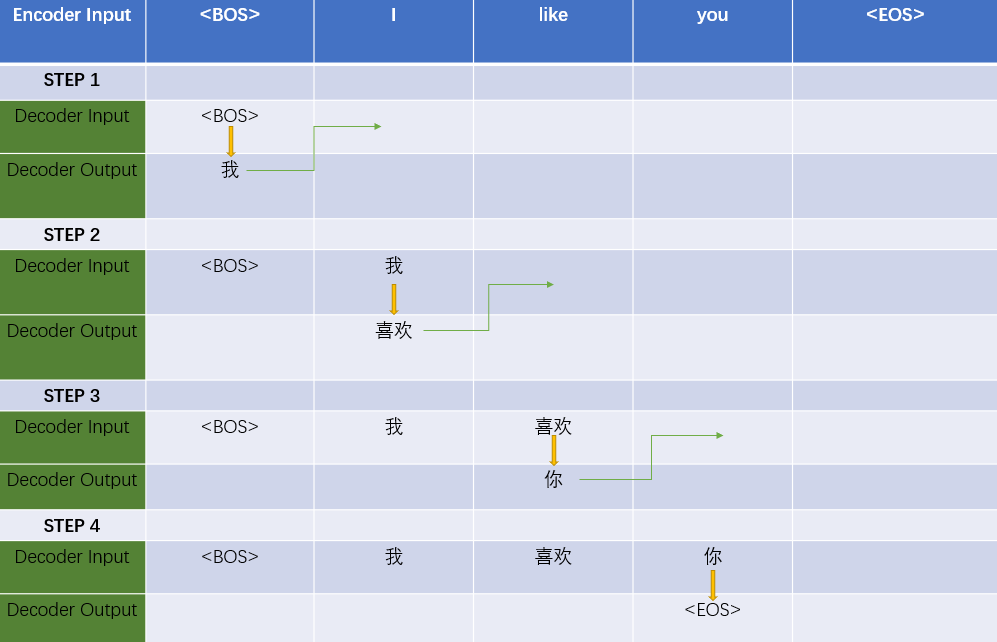
所以在训练时的目标是根据前面见过的单词准确预测下一个单词。
推理和测试时,Encoder的输入和训练时一样,但Decoder最开始的输入只有
下面是我们要用到的库和定义的一个simple function:
import math
import torch
import torch.nn as nn
import torch.nn.functional as F
def exists(x):
return x is not None复制
Positional Encoding and Embedding
和很多语言模型一样,单词tokens会先通过一个可学习的Embedding层转化为向量vecter,但因为模型没有RNN和CNN的结构,为了注入单词序列位置的信息,在词向量上还需要加上位置信息的编码。
上面这种位置编码是不用模型学习的,也可以让模型自己学习位置编码,就像word embedding一样,在BERT里好像就是这样。
class PositionalEncoding(nn.Module):
def __init__(self, d_x, max_len=5000, dropout=0.1):
super().__init__()
self.dropout = nn.Dropout(p=dropout)
pe = torch.zeros(max_len, d_x)
position = torch.arange(0, max_len).unsqueeze(1)
div_term = torch.exp(torch.arange(0, d_x, 2) * (-1 * math.log(10000) / d_x))
pe[:, 0::2] = torch.sin(position * div_term)
pe[:, 1::2] = torch.cos(position * div_term)
pe = pe.unsqueeze(0)
self.register_buffer("pe", pe)
def forward(self, x):
x = x + self.pe[:, :x.shape[1]].requires_grad_(False)
return self.dropout(x)
class Embedding(nn.Module):
def __init__(self, vocab_size, embedding_dim, max_len=5000, dropout=0.1):
super().__init__()
self.s = math.sqrt(embedding_dim)
self.word_embedding = nn.Embedding(vocab_size, embedding_dim)
self.pos_encoding = PositionalEncoding(embedding_dim, max_len, dropout)
def forward(self, x):
x = self.word_embedding(x)
x = self.pos_encoding(x * self.s)
return xself.dropout(x)复制
Attention
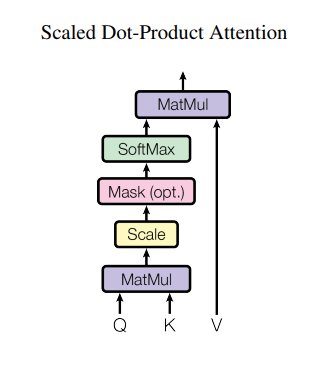
原文中说到了两种注意力机制,加性注意力(additive attention)和乘性注意力(dot-product attention)。原文采用了第二种,因为点乘的注意力运算速度更快,空间利用更高效。
对于较小的d_k,两种注意力表现是相似的,但是当d_k增大的时候,加性的注意力表现更好,原因是随着d_k增大,点积的结果也会迅速变大,这会将softmax推向梯度很小的区域。所以为了减弱这种影响,点积的结果会通过除以根号下d_k来缩放。
其实注意力似乎就是在计算单词和单词之间的相关性,在transformer中的是self-attention就是自注意力,即自己看自己。
query即查询,key即关键字,value即值,所以就是根据query和key的相关性或匹配程度来选择值,简单点总结就是给一个查询query后,我们要找到相关的键值对(key-value)
在另一篇Blog中有更形象的图片描述注意力机制的计算过程。
首先是由输入X生成Q,K,V
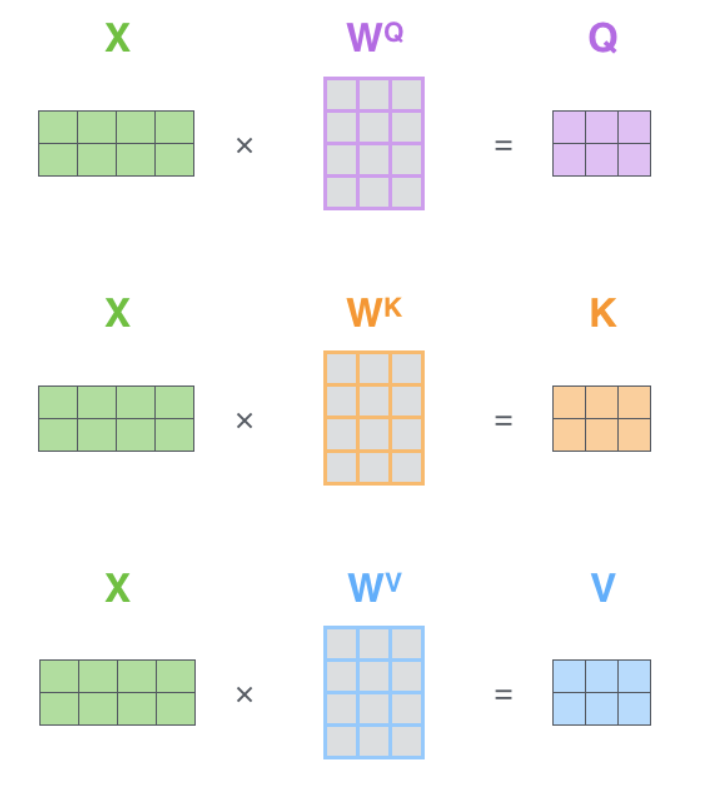
QK^T之后通过softmax,就得到了单词和单词之间的注意力分数(attenstion score),根据这个权重矩阵,每一个单词的vector会和其他单词的vector进行叠加,我们就得到了输出Z。

class Attention(nn.Module):
def __init__(self, dropout=0.1):
super().__init__()
self.dropout = nn.Dropout(p=dropout)
def forward(self, Q, K, V, mask=None):
d_k = Q.shape[-1]
scores = torch.matmul(Q, K.transpose(-2, -1)) / math.sqrt(d_k)
if exists(mask):
max_neg_value = -torch.finfo(scores.dtype).max
scores = scores.masked_fill(~mask, max_neg_value)
p_attn = F.softmax(scores, dim=-1)
p_attn = self.dropout(p_attn)
return torch.matmul(p_attn, V)复制
Multi-head Attention
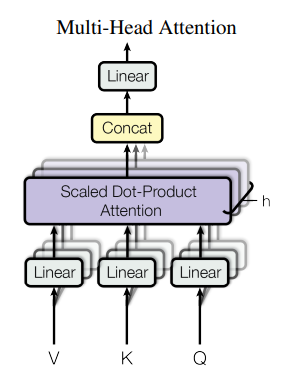
原论文里说,多头注意力机制可以让模型注意到不同表示空间的信息,其实就是把上面的注意力并进进行了多次。

复制
假设num_heads=8,那么多头注意力注意力机制会将x映射到8组不同的query,key,value,并行的执行上面的注意力运算后我们会得到8组输出,然后我们将8组输出拼接在一起,再映射回和x同样的维度。
class MultiHeadAttention(nn.Module):
def __init__(self, d_x, d_model, num_heads=8, dropout=0.1):
super().__init__()
assert d_model % num_heads == 0
self.d_k = d_model // num_heads
self.num_heads = num_heads
self.w_q = nn.Linear(d_x, d_model)
self.w_k = nn.Linear(d_x, d_model)
self.w_v = nn.Linear(d_x, d_model)
self.attention = Attention(dropout)
self.w_o = nn.Linear(d_model, d_x)
def forward(self, q, k, v, mask=None):
if exists(mask):
mask = mask.unsqueeze(1)
q = self.w_q(q)
k = self.w_k(k)
v = self.w_v(v)
q, k, v = [x.reshape(x.shape[0], x.shape[1], self.num_heads, self.d_k).transpose(1, 2) for x in (q, k, v)]
z = self.attention(q, k, v, mask)
z = z.transpose(1, 2).reshape(z.shape[0], -1, self.num_heads*self.d_k)
z = self.w_o(z)
return z复制
Add&Norm
这地方很简单,别的模型也都有,就是残差连接(residual connection)和层标准化(Normalization)。
只不过关于什么时候Normalization还有不同的版本,比如PreNorm就是x先进行Normalization。
class AddNorm(nn.Module):
def __init__(self, dim):
super().__init__()
self.norm = nn.LayerNorm(dim)
def forward(self, x, y):
return self.norm(x + y)复制
Position-wise Feed-Forward Networks
现在来看看这个Position-wise Feed-Forward Networks,这个名字真的相当的fancy啊。但它其实就是全连接啊,先是通过一个全连接然后通过一个ReLU激活函数,紧接着又通过一个全连接。
原论文中,激活函数函数是ReLU,但是之后(比如BERT)似乎换成了GeLU。
另外隐藏层的神经元数一般是输入的4倍大小,比如d_model=512,那么通过第一个全连接层会变成2048,但通过第二个全连接后输出会变回d_model=512大小。
class PositionwiseFeedForward(nn.Module):
def __init__(self, d_x, ffn_num_hiddens, dropout=0.1):
super().__init__()
self.w_1 = nn.Linear(d_x, ffn_num_hiddens)
self.act = nn.GELU()
self.dropout = nn.Dropout(p=dropout)
self.w_2 = nn.Linear(ffn_num_hiddens, d_x)
def forward(self, x):
x = self.w_1(x)
x = self.act(x)
x = self.dropout(x)
x = self.w_2(x)
return x复制
Encoder
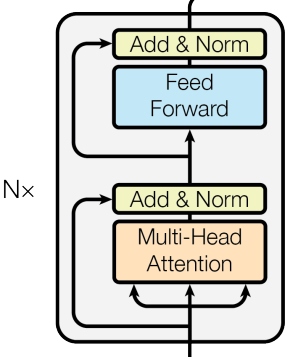
原论文中,编码器(Encoder)部分是由n个相同的层(Encoder Block)堆积而成的,每一层又由两个子层(sub-layer)组成,分别是一个多头注意力机制(multi-head attention)和一个Position-wise Feed-Forward Network(其实就是全连接层)。
最后,每个sub-layer后还要加上残差连接(residual connection)和Layer Normalization。
class EncoderBlock(nn.Module):
def __init__(self, d_x, d_model, ffn_num_hiddens, num_heads=8, dropout=0.1):
super().__init__()
self.atten = MultiHeadAttention(d_x, d_model, num_heads, dropout)
self.add_norm_1 = AddNorm(d_x)
self.ffn = PositionwiseFeedForward(d_x, ffn_num_hiddens, dropout)
self.add_norm_2 = AddNorm(d_x)
def forward(self, x, mask=None):
x = self.add_norm_1(x, self.atten(x, x, x, mask))
return self.add_norm_2(x, self.ffn(x))
class Encoder(nn.Module):
def __init__(self, d_x, d_model, ffn_num_hiddens, num_heads=8, num_blocks=6, dropout=0.1):
super().__init__()
self.blocks = nn.Sequential()
for i in range(num_blocks):
self.blocks.add_module("block" + str(i), EncoderBlock(d_x, d_model, ffn_num_hiddens, num_heads, dropout))
def forward(self, x, mask=None):
for block in self.blocks:
x = block(x, mask)
return x复制
Decoder
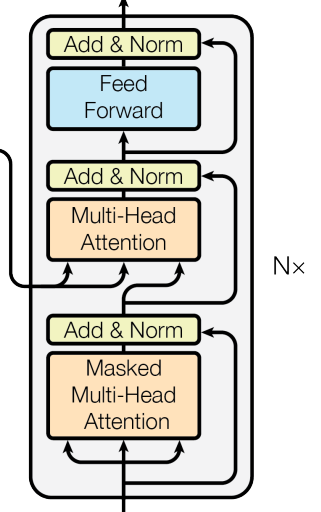
编码器(Decoder)部分也是由n个相同的层(Decoder Block)堆积而成的,但除了encoder中的两个子层,解码器还在中间插入了第三个多头注意力层,并且在第一个的多头注意力层中,query,key,value都是由x生成的,而第二个多头注意力中的query由x生成,key和value由编码器encoder的输出生成。
class DecoderBlock(nn.Module):
def __init__(self, d_x, d_model, ffn_num_hiddens, num_heads=8, dropout=0.1):
super().__init__()
self.atten_1 = MultiHeadAttention(d_x, d_model, num_heads, dropout)
self.add_norm_1 = AddNorm(d_x)
self.atten_2 = MultiHeadAttention(d_x, d_model, num_heads, dropout)
self.add_norm_2 = AddNorm(d_x)
self.ffn = PositionwiseFeedForward(d_x, ffn_num_hiddens, dropout)
self.add_norm_3 = AddNorm(d_x)
def forward(self, x, memory, tgt_mask=None, src_mask=None): # memory = encoder output
x = self.add_norm_1(x, self.atten_1(x, x, x, tgt_mask))
x = self.add_norm_2(x, self.atten_2(x, memory, memory, src_mask))
return self.add_norm_3(x, self.ffn(x))
class Decoder(nn.Module):
def __init__(self, d_x, d_model, ffn_num_hiddens, num_heads=8, num_blocks=6, dropout=0.1):
super().__init__()
self.blocks = nn.Sequential()
for i in range(num_blocks):
self.blocks.add_module("block" + str(i), DecoderBlock(d_x, d_model, ffn_num_hiddens, num_heads, dropout))
def forward(self, x, memory, tgt_mask=None, src_mask=None): # memory = encoder_output
for block in self.blocks:
x = block(x, memory, tgt_mask, src_mask)
return x复制
Mask
我们先解释为什么需要Mask操作。
我们在训练模型时,样本是批量输入的,但是自然语言的句子长度往往是不一样的,为了能将不同长度的句子一起送入模型,我们需要使他们的长度一致,比如"I like you"长度为3,"This cat is cute"长度为4,接下来我们要将他们对齐,我们先引入几个特殊标识符:
| 特殊标识符 | 含义 | ID |
|---|---|---|
| [BOS] | 句子开始 | 1 |
| [EOS] | 句子结束 | 9 |
| [PAD] | 填充位置 | 0 |
现在我们进行如下操作:
"I like you" -> [BOS] I like you <EOS> <PAD>
-> 1 2 3 4 9 0 #token id
"This cat is really cute" -> <BOS> This cat is cute <EOS>
-> 1 5 6 7 8 9 #token id复制
现在这两个句子的长度就一样了。然而我们在计算单词和单词之间注意力分数(attention scrore)的时候,(注意哈下面的注意力分数是我瞎写的,只是举个例子),[PAD]
| [BOS] | I | like | you | [EOS] | [PAD] | |
|---|---|---|---|---|---|---|
| [BOS] | 0.5 | 0.3 | 0.2 | 0.1 | bla | bla |
| I | bla | 0.5 | bla | bla | bla | bla |
| like | bla | bla | 0.5 | bla | bla | bla |
| you | bla | bla | bla | 0.5 | bla | bla |
| [EOS] | bla | bla | bla | bla | 0.5 | bla |
| [PAD] | bla | bla | bla | bla | bla | bla |
Encoder中的Mask(对应代码中的src_pad_mask):
| [BOS] | I | like | you | [EOS] | [PAD] | |
|---|---|---|---|---|---|---|
| [BOS] | 1 | 1 | 1 | 1 | 1 | 0 |
| I | 1 | 1 | 1 | 1 | 1 | 0 |
| like | 1 | 1 | 1 | 1 | 1 | 0 |
| you | 1 | 1 | 1 | 1 | 1 | 0 |
| [EOS] | 1 | 1 | 1 | 1 | 1 | 0 |
| [PAD] | 1 | 1 | 1 | 1 | 1 | 0 |
另外在Decoder中,因为单词是一个一个生成的,那么前面的单词应该是看不到后面的单词的,即我们要防止Decoder看到未来的信息,所以除了[PAD]要遮蔽
Decoder中的第一个Mask(对应代码中的tgt_self_attn_mask):
| [BOS] | 我 | 喜欢 | 你 | [EOS] | [PAD] | |
|---|---|---|---|---|---|---|
| [BOS] | 1 | 0 | 0 | 0 | 0 | 0 |
| 我 | 1 | 1 | 0 | 0 | 0 | 0 |
| 喜欢 | 1 | 1 | 1 | 0 | 0 | 0 |
| 你 | 1 | 1 | 1 | 1 | 0 | 0 |
| [EOS] | 1 | 1 | 1 | 1 | 1 | 0 |
| [PAD] | 1 | 1 | 1 | 1 | 1 | 0 |
在Decoder的第二个多头注意力处,Query是由Encoder的输出生成的,Key和Value是由Decoder的输入生成的,所以Decoder还有第二个Mask(对应代码中的tgt_ency_attn_mask):
| [BOS] | 我 | 喜欢 | 你 | [EOS] | [PAD] | |
|---|---|---|---|---|---|---|
| [BOS] | 1 | 1 | 1 | 1 | 1 | 0 |
| I | 1 | 1 | 1 | 1 | 1 | 0 |
| like | 1 | 1 | 1 | 1 | 1 | 0 |
| you | 1 | 1 | 1 | 1 | 1 | 0 |
| [EOS] | 1 | 1 | 1 | 1 | 1 | 0 |
| [PAD] | 1 | 1 | 1 | 1 | 1 | 0 |
def create_mask(src, tgt, pad=0): # src (b, l1) tgt (b, l2)
src_pad = src != pad
src_pad_mask = src_pad.unsqueeze(1).expand(-1, src.shape[1], -1)
tgt_ency_attn_mask = src_pad.unsqueeze(1).expand(-1, tgt.shape[1], -1)
tgt_pad = tgt != pad
tgt_pad_mask = tgt_pad.unsqueeze(1).expand(-1, tgt.shape[1], -1)
tgt_seq_mask = torch.triu(torch.ones((tgt.shape[1], tgt.shape[1])), diagonal=1) == 0
tgt_seq_mask = tgt_seq_mask.unsqueeze(0).expand(tgt.shape[0], -1, -1).type_as(tgt)
tgt_self_attn_mask = tgt_seq_mask & tgt_pad_mask
return src_pad_mask.bool(), tgt_self_attn_mask.bool(), tgt_ency_attn_mask.bool()复制
Combine all
class Transformer(nn.Module):
def __init__(self, src_vocab_size, tgt_vocab_size, embedding_dim, d_model, ffn_num_hiddens, max_len=5000, num_heads=8, num_blocks=6, dropout=0.1):
super().__init__()
self.src_emb = Embedding(src_vocab_size, embedding_dim, max_len, dropout)
self.tgt_emb = Embedding(tgt_vocab_size, embedding_dim, max_len, dropout)
self.encoder = Encoder(embedding_dim, d_model, ffn_num_hiddens, num_heads, num_blocks, dropout)
self.decoder = Decoder(embedding_dim, d_model, ffn_num_hiddens, num_heads, num_blocks, dropout)
self.proj = nn.Linear(embedding_dim, tgt_vocab_size)
def forward(self, src, tgt, src_pad_mask=None, tgt_self_attn_mask=None, tgt_ency_attn_mask=None):
src = self.src_emb(src)
tgt = self.tgt_emb(tgt)
memory = self.encoder(src, src_pad_mask)
output = self.decoder(tgt, memory, tgt_self_attn_mask, tgt_ency_attn_mask)
return self.proj(output)复制
-END-
Reference
Attention Is All You Need
The Annotated Transformer
http://jalammar.github.io/illustrated-transformer/

