


【摘要】MySQL高可用的正确姿势。
一、前言
最近调研了一下MySQL的高可用集群建设,发现MySQL在二十多年的发展历程中,高可用的建设方案真的是百花齐放,各具特色,这也是这款开源数据库最让人着迷的地方。经过研究对比,选择了最合适自身业务的两款高可用建设方案(MySQL InnoDB Cluster和Percona XtraDB Cluster),今天我们主讲MySQL InnoDB Cluster高可用集群建,这也是未来的趋势。
二、概述
2.1 MySQL InnoDB Cluster
这些年MySQL官方也感觉到了“你有我有,不如自己有”。话说有竞争才有进步嘛,随着MySQL官方的不断发力,在基于MySQL复制的基础上,推出了一系列的高可用方案,例如,主从半同步复制、InnoDB ReplicaSet、组复制(MGR)、InnoDB Cluster,及目前最新的InnoDB ClusterSet,这也导致了某些开源高可用的建设方案的停维了。MySQL InnoDB Cluster是MySQL提供的完整的高可用性解决方案之一。InnoDB Cluster主要由MySQL Shell、MySQL Router和MySQL服务集群组成,三者协同工作,共同为MySQL提供完整的高可用性解决方案。如下图所示为InnoDB Cluster的整体架构。
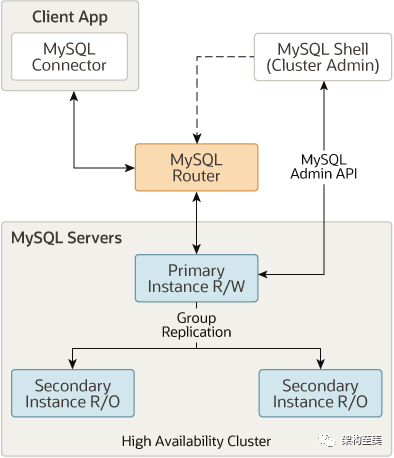
InnoDB Cluster以组复制为基础,集群中的每个MySQL服务器实例都是组复制的成员,提供了在InnoDB Cluster内复制数据的机制,并且具有内置的管理、容错、自动故障转移等功能。
MySQL Shell在InnoDB Cluster中充当控制台角色,使用它包含的AdminAPI,可以使安装、配置、管理、维护多个MySQL组复制实例的工作更加轻松。通过AdminAPI的几条交互指令就可自动完成组复制配置。
MySQL Router可以根据集群部署信息自动生成配置,将客户端应用程序透明地连接到MySQL服务器实例。如果服务器实例意外故障,群集将自动重新配置。在默认的单主模式下,InnoDB Cluster 具有单个读写主服务器实例。多个辅助服务器实例是主服务器实例的副本。如果主服务器出现故障,则辅助服务器将自动升级为主服务器。MySQL Router可以检测到这种情况并将客户端应用程序自动转发到新的主服务器。
2.2 Percona XtraDB Cluster(PXC)
Percona XtraDB Cluster(简称PXC)是一个开源的MySQL高可用解决方案。他将Percona Server和XtraBackup与Galera库集成,以实现同步多主复制,是MySQL领域中比较成熟可靠的集群方案。
三、部署MySQL InnoDB Cluster
3.1 环境要求
一个InnoDB集群由至少三个MySQL服务器组成实例。 MySQL Router最好也是单独部署。-> 这里先不对MySQL Router做冗余设计,生产中推荐对MySQL Router做冗余设计,搞个双机热备。按照上面架构的要求最好是四台相同配置的物理主机。由于机器有限,本次测试采用1台虚机,利用docker-compose来部署。-> MySQL的版本为5.7.27,这里为了做数据迁移,需要保持一致,建议搭建InnoDB Cluster最好采用MySQL8的最新稳定版本。
3.2 编写docker-compose配置文件
version: '3.7'
services:
mysql-server-1:
env_file:
- mysql-server.env
image: mysql/mysql-server:5.7.27
container_name: mysql-server-1
command: ["mysqld","--server_id=1","--skip_ssl","--innodb_ft_min_token_size=1","--ft_min_word_len=1","--ngram_token_size=1","--binlog_checksum=NONE","--gtid_mode=ON","--enforce_gtid_consistency=ON","--log_bin","--log_slave_updates=ON","--master_info_repository=FILE","--relay_log_info_repository=FILE","--transaction_write_set_extraction=XXHASH64","--user=mysql","--skip-host-cache","--skip-name-resolve", "--default_authentication_plugin=mysql_native_password","--lower-case-table-names=1","--innodb_strict_mode=1","--character_set_server=utf8mb4","--innodb_file_per_table=1","--max_allowed_packet=64M"]
ports:
- "3301:3306"
restart: always
volumes:
- ./data/mysql-1:/var/lib/mysql
networks:
- pkulaw_net
mysql-server-2:
env_file:
- mysql-server.env
image: mysql/mysql-server:5.7.27
container_name: mysql-server-2
command: ["mysqld","--server_id=2","--skip_ssl","--innodb_ft_min_token_size=1","--ft_min_word_len=1","--ngram_token_size=1","--binlog_checksum=NONE","--gtid_mode=ON","--enforce_gtid_consistency=ON","--log_bin","--log_slave_updates=ON","--master_info_repository=FILE","--relay_log_info_repository=FILE","--transaction_write_set_extraction=XXHASH64","--user=mysql","--skip-host-cache","--skip-name-resolve", "--default_authentication_plugin=mysql_native_password","--lower-case-table-names=1","--innodb_strict_mode=1","--character_set_server=utf8mb4","--innodb_file_per_table=1","--max_allowed_packet=64M"]
ports:
- "3302:3306"
restart: always
volumes:
- ./data/mysql-2:/var/lib/mysql
depends_on:
- mysql-server-1
networks:
- pkulaw_net
mysql-server-3:
env_file:
- mysql-server.env
image: mysql/mysql-server:5.7.27
container_name: mysql-server-3
command: ["mysqld","--server_id=3","--skip_ssl","--innodb_ft_min_token_size=1","--ft_min_word_len=1","--ngram_token_size=1","--binlog_checksum=NONE","--gtid_mode=ON","--enforce_gtid_consistency=ON","--log_bin","--log_slave_updates=ON","--master_info_repository=FILE","--relay_log_info_repository=FILE","--transaction_write_set_extraction=XXHASH64","--user=mysql","--skip-host-cache","--skip-name-resolve", "--default_authentication_plugin=mysql_native_password","--lower-case-table-names=1","--innodb_strict_mode=1","--character_set_server=utf8mb4","--innodb_file_per_table=1","--max_allowed_packet=64M"]
ports:
- "3303:3306"
restart: always
volumes:
- ./data/mysql-3:/var/lib/mysql
depends_on:
- mysql-server-1
networks:
- pkulaw_net
networks:
pkulaw_net:
external: true复制
“参数说明:
”
server_id=1表示本服务的序号为1,主从需要不一致。 skip_ssl表示以非SSL方式连接数据库,在mysql5.7是将被废弃的选项,将来版本不再支持,建议使用--ssl-mode选项,如–ssl-mode=DISABLED。 innodb_ft_min_token_size=1表示mysql存储在InnoDB的FULLTEXT索引中的最小词长为 1,在mysql5.7.27中最小搜索长度 MyISAM 引擎下默认是 4,InnoDB 引擎下是 3。通过语句show variables like '%ft%';可以查询。 ft_min_word_len=1表示最短的索引字符串,默认值为4,意思是在创建全文索引时不考虑那些由3个或更少的字符构建单词。修改后必须重建索引文件。 ngram_token_size=1表示以ngram解释器搜索全文索引时,指定的搜索字符数最小为2个字符(非字节)。 binlog_checksum=NONE是全局动态参数。启用后,会校验主服务器写入二进制日志中的每个事件。binlog_checksum支持值NONE(禁用)和CRC32,默认值为CRC32。不能在事务中更改binlog_checksum的值。当binlog_checksum禁用(值 NONE)时,服务器通过写入和检查每个事件的事件长度(而不是校验和)来验证它是否仅将完整事件写入二进制日志。更改此变量的值会切换二进制日志,导致校验总是写入整个二进制日志文件,而不是只写入其中的一部分。在主服务器上将此变量设置为从服务器无法识别的值会导致从服务器将自己的binlog_checksum值设置为NONE,并停止复制并出现错误。(Bug #13553750,Bug #61096)如果与旧从站的向后兼容性是一个问题,可能需要显式设置该值为NONE. gtid_mode=ON是全局动态参数,默认关闭。此选项指定是否使用全局事务标识符(GTID) 来标识事务。将此选项设置为--gtid-mode=ON要求将enforce-gtid-consistency其设置为ON。记录的事务可以是匿名的或使用GTID。匿名事务依赖二进制日志文件和位置来识别特定事务。GTID事务具有用于引用事务的唯一标识符。不同的模式是:OFF: 新的和复制的事务都必须是匿名的。OFF_PERMISSIVE: 新交易是匿名的。复制的交易可以是匿名交易或 GTID 交易。ON_PERMISSIVE: 新交易是 GTID 交易。复制的交易可以是匿名交易或 GTID 交易。ON:新事务和复制事务都必须是 GTID 事务。从一个值到另一个值的更改一次只能是一个步骤。例如,如果 gtid_mode当前设置为 OFF_PERMISSIVE,则可以更改为 OFF或ON_PERMISSIVE但不能更改为ON。 enforce_gtid_consistency=ON是全局动态参数,默认关闭。启用后,服务器通过只允许执行可以使用GTID安全记录的语句来强制执行GTID一致性。在启用基于GTID的复制之前,必须将--enforce-gtid-consistency选项设置为ON。可以配置的值为:OFF:允许所有事务违反 GTID 一致性。ON: 不允许任何事务违反 GTID 一致性。WARN:允许所有事务违反 GTID 一致性,但在这种情况下会生成警告。enforce_gtid_consistency开启时,只能记录可以使用GTID安全语句记录的语句,因此以下操作不能使用:CREATE TABLE ... SELECT statements。CREATE TEMPORARY TABLE 或 DROP TEMPORARY TABLEstatements 在事务内部。更新事务和非事务表的事务或语句。如果所有非事务性表都是临时的,则在与事务性DML相同的事务或同一语句中允许非事务性DML是一个例外。 log_bin是全局静态参数。打开二进制日志功能,在复制(replication)配置中,作为MASTER主服务器必须打开此项。如果需要从最后的备份中做基于时间点的恢复,也同样需要二进制日志。默认在datadir下。这样设置后相当于,制定了log_bin_basename和log_bin_index的配置。 log_slave_updates=ON是全局静态参数,默认false。表示slave将从主服务器接收到的复制事件写进自己的二进制日志,必须在从属设备上启用二进制日志记录才能使此变量生效。 master_info_repository=TABLE是全局动态参数,5.7默认为FILE,8.0默认值为TABLE。该变量的设置决定了从服务器是将主状态和连接信息记录到系统数据库中mysql.slave_master_info表中,还是记录到数据目录中的文件中。在配置多个复制通道之前,必须设置此变量,只有在没有执行复制线程时才能更改此变量的值。在5.7的InnoDB Cluster集群中该值必须为TABLE。如下说明:Some variables need to be changed, but cannot be done dynamically on the server: an option file is required. NOTE: Please use the dba.configureInstance() command to repair these issues.
{
"config_errors": [
{
"action": "config_update+restart",
"current": "FILE",
"option": "master_info_repository",
"required": "TABLE"
},
{
"action": "config_update+restart",
"current": "FILE",
"option": "relay_log_info_repository",
"required": "TABLE"
}
],
"status": "error"
}复制
“”
relay_log_info_repository=TABLE是全局动态参数,5.7默认为FILE,8.0默认值为TABLE。该变量的设置决定了从服务器是将其在日志中的位置记录到系统数据库中的mysql.slave_relay_log_info表中,还是记录到数据目录中的文件中。配置多个复制通道时需要设置。还需要中继日志信息日志的TABLE设置以使复制对意外停止具有弹性,为此还必须启用--relay-log-recovery选项。在5.7的InnoDB Cluster集群中该值必须为TABLE,同上。 transaction_write_set_extraction=XXHASH64表示使用哈希算法将其编码为散列。 user=mysql指启动mysql的用户。 skip-host-cache表示不使用高速缓存区来存放主机名和IP地址的对应关系。 skip-name-resolve表示全局静态参数,默认值为OFF。该变量是根据--skip-name-resolve选项的值设置的。如果是OFF,mysqld在检查客户端连接时解析主机名。如果是ON,mysqld只使用IP号码;在这种情况下,Host授权表中的所有列值必须是IP地址或localhost。 default_authentication_plugin=mysql_native_password表示在配置生效后的新建用户,将使用配置指定的认证方式。 lower-case-table-names=1是全局静态参数,默认为2。设置为0,则按指定存储表名,并且区分大小写。设置为1,则表名以小写形式存储在磁盘上,并且不区分大小写。设置为2,则表名按给定方式存储,但以小写形式进行比较。此选项也适用于数据库名称和表别名。 innodb_strict_mode=0表示严格语法检查,有错误直接抛出,而不是给出警告,MySQL5.7 默认打开的。innodb_strict_mode=1表示开启。 character_set_server=utf8是全局会话级动态参数,5.7默认为latin1,8.0默认为utf8mb4。服务器的默认字符集。建议使用utf8mb4,为utf8的超集。 innodb_file_per_table=1是全局动态参数,默认开启。InnoDB为独立表空间模式。InnoDB将每个新创建的表的数据和索引存储在单独的.ibd文件中,而不是系统表空间中。当这些表被删除或截断时,这些表的存储空间会被回收。此设置启用 InnoDB表 压缩等功能。通过ALTER TABLE操作会将InnoDB表从系统表空间移动到单个文件。 max_allowed_packet=64M是全局会话级动态参数,默认值为4MB,最大值为1GB,设置值必须为1024的倍数。设置在网络传输中一次消息传输量的最大值。net_buffer_length和max_allowed_packet都以给出的大小开始,每个SQL语句的net_buffer_length根据需要动态放大到max_allowed_packet的值,结果缓冲区缩小到net_buffer_length的值。此参数值不用配置,连接缓冲区会自动扩大,在会话级别是只读的。如果使用大BLOB列或长字符串,则必须增加此值,应该与BLOB使用的最大值一样大,避免MySQL客户端或mysqld服务器收到大于 max_allowed_packet 字节的信息包时,报“信息包过大”错误,并关闭连接。对于某些客户端,如果通信信息包过大,在执行查询期间,可能会遇到“丢失与 MySQL 服务器的连接”错误。当通过更改max_allowed_packet变量的值来更改消息缓冲区大小时,如果客户端程序允许,还应该在客户端更改缓冲区大小。客户端库中内置的默认max_allowed_packet值为1GB,但个别客户端程序可能会覆盖此值。例如,mysql和mysqldump的默认值分别为16MB和24MB。可以在命令行或选项文件中更改客户端max_allowed_packet的值。此变量在会话级别是只读的,客户端最多可以接收与会话值一样多的字节。但是,服务器不会向客户端发送比当前全局max_allowed_packet值更多的字节。注:如果客户端连接后更改全局值,则全局值可能小于会话值。
3.3 编写mysql-server.env的内容
MYSQL_ROOT_PASSWORD=Yourpassword
MYSQL_ROOT_HOST=%复制
“这块的密码最好和旧数据库密码一致,将来迁移的时候不用改密码了。因为采用xtrabackup热备份是整库备份的。
”
3.4 自定义网络
docker network create --driver bridge --subnet 10.128.0.0/16 --gateway 10.128.0.1 pkulaw_net复制
3.5 启动数据库服务
新建一个mysqlcluste目录,将mysql-server.env和docke-compose文件放入
[root@qy50128 mysqlcluste]# docker-compose -f docke-compose-mysqlCluster.yml up -d
Creating mysql-server-1 ... done
Creating mysql-server-2 ... done
Creating mysql-server-3 ... done
[root@qy50128 mysqlcluste]# docker ps
CONTAINER ID IMAGE COMMAND CREATED STATUS PORTS NAMES
68d3bd240f95 mysql/mysql-server:5.7.27 "/entrypoint.sh mysq…" 51 seconds ago Up 49 seconds (healthy) 33060/tcp, 0.0.0.0:3303->3306/tcp, :::3303->3306/tcp mysql-server-3
bf20e30cc812 mysql/mysql-server:5.7.27 "/entrypoint.sh mysq…" 51 seconds ago Up 49 seconds (healthy) 33060/tcp, 0.0.0.0:3302->3306/tcp, :::3302->3306/tcp mysql-server-2
b64181c92eaa mysql/mysql-server:5.7.27 "/entrypoint.sh mysq…" 53 seconds ago Up 51 seconds (healthy) 33060/tcp, 0.0.0.0:3301->3306/tcp, :::3301->3306/tcp mysql-server-1复制
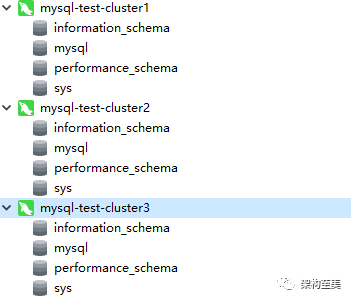
“通过上面可以看到三个mysql服务都已启动成功,通过Navicat连接测试。生产部署拆分docker-compose文件分别部署在3台物理主机上。目前3个服务都是独立的mysql服务。
”
3.6 组建InnoDB Cluster集群
3.6.1 查看用户和数据库的机器名信息
[root@qy50128 mysqlcluste]# for N in 1 2 3
> do docker exec -it mysql-server-$N mysql -uroot -pYourpassword \
> -e "SHOW VARIABLES WHERE Variable_name = 'hostname';" \
> -e "SELECT user FROM mysql.user where user = 'root';"
> done
mysql: [Warning] Using a password on the command line interface can be insecure.
+---------------+--------------+
| Variable_name | Value |
+---------------+--------------+
| hostname | b64181c92eaa |
+---------------+--------------+
+------+
| user |
+------+
| root |
| root |
+------+
mysql: [Warning] Using a password on the command line interface can be insecure.
+---------------+--------------+
| Variable_name | Value |
+---------------+--------------+
| hostname | bf20e30cc812 |
+---------------+--------------+
+------+
| user |
+------+
| root |
| root |
+------+
mysql: [Warning] Using a password on the command line interface can be insecure.
+---------------+--------------+
| Variable_name | Value |
+---------------+--------------+
| hostname | 68d3bd240f95 |
+---------------+--------------+
+------+
| user |
+------+
| root |
| root |
+------+
[root@qy50128 mysqlcluste]#复制
“命令:for N in 1 2 3 do docker exec -it mysql-server-$N mysql -uroot -pYourpassword
”
-e "SHOW VARIABLES WHERE Variable_name = 'hostname';"
-e "SELECT user FROM mysql.user where user = 'root';" done
3.6.2 使用mysqlsh 进行实例的创建
docker exec -it mysql-server-1 mysqlsh -uroot -pbdyh@2020复制
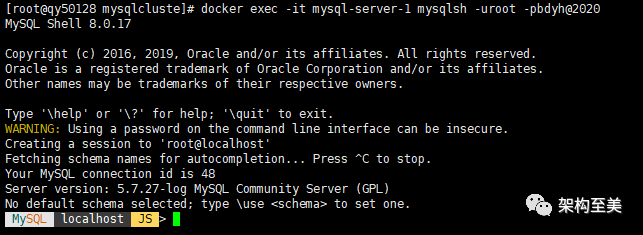
“在mysql8中如下命令进入:docker exec -it mysql-server-1 mysqlsh -uroot -pYourpassword -S/var/run/mysqld/mysqlx.sock
”
3.6.3 检查数据库实例的配置是否适合集群
MySQL localhost JS > dba.checkInstanceConfiguration("root@mysql-server-1:3306")复制
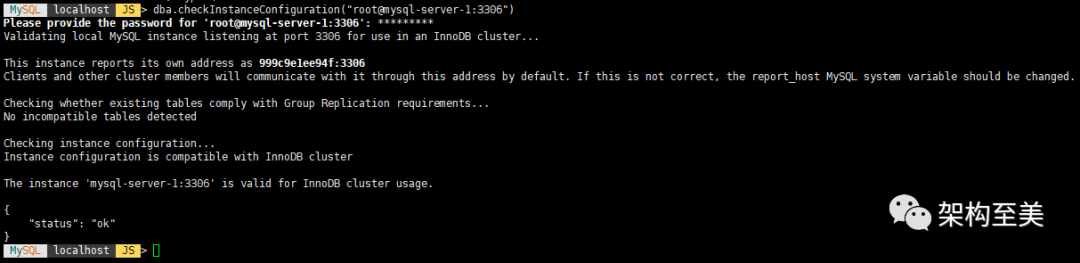
“通过上面的状态看到实例'mysql-server-1:3306'对于InnoDB集群使用是有效的。依次检查mysql-server-2和mysql-server-3
”
MySQL localhost JS > dba.checkInstanceConfiguration("root@mysql-server-2:3306")
Please provide the password for 'root@mysql-server-2:3306': *********
Validating MySQL instance at mysql-server-2:3306 for use in an InnoDB cluster...
This instance reports its own address as df752d3abe31:3306
Clients and other cluster members will communicate with it through this address by default. If this is not correct, the report_host MySQL system variable should be changed.
Checking whether existing tables comply with Group Replication requirements...
No incompatible tables detected
Checking instance configuration...
Instance configuration is compatible with InnoDB cluster
The instance 'mysql-server-2:3306' is valid for InnoDB cluster usage.
{
"status": "ok"
}
MySQL localhost JS > dba.checkInstanceConfiguration("root@mysql-server-3:3306")
Please provide the password for 'root@mysql-server-3:3306': *********
Validating MySQL instance at mysql-server-3:3306 for use in an InnoDB cluster...
This instance reports its own address as a198ad43918f:3306
Clients and other cluster members will communicate with it through this address by default. If this is not correct, the report_host MySQL system variable should be changed.
Checking whether existing tables comply with Group Replication requirements...
No incompatible tables detected
Checking instance configuration...
Instance configuration is compatible with InnoDB cluster
The instance 'mysql-server-3:3306' is valid for InnoDB cluster usage.
{
"status": "ok"
}
MySQL localhost JS >复制
3.6.4 自动配置数据库实例适配集群
mysql-server-1上执行:
MySQL localhost JS > dba.configureInstance("root@mysql-server-1:3306")
Please provide the password for 'root@mysql-server-1:3306': *********
Configuring local MySQL instance listening at port 3306 for use in an InnoDB cluster...
This instance reports its own address as 999c9e1ee94f:3306
Clients and other cluster members will communicate with it through this address by default. If this is not correct, the report_host MySQL system variable should be changed.
The instance 'mysql-server-1:3306' is valid for InnoDB cluster usage.
The instance 'mysql-server-1:3306' is already ready for InnoDB cluster usage.
MySQL localhost JS >复制
mysql-server-2上执行:
#先进入mysqlsh 中
docker exec -it mysql-server-2 mysqlsh -uroot -pbdyh@2020
#自动配置数据库实例适配集群
MySQL localhost JS > dba.configureInstance("root@mysql-server-2:3306")复制
mysql-server-3上执行:
#先进入mysqlsh 中
docker exec -it mysql-server-3 mysqlsh -uroot -pbdyh@2020
#自动配置数据库实例适配集群
MySQL localhost JS > dba.configureInstance("root@mysql-server-3:3306")复制
3.6.5 创建一个集群
#连接到mysql-server-1实例
MySQL localhost JS > \c root@mysql-server-1:3306
Creating a session to 'root@mysql-server-1:3306'
Please provide the password for 'root@mysql-server-1:3306': *********
Fetching schema names for autocompletion... Press ^C to stop.
Closing old connection...
Your MySQL connection id is 126
Server version: 5.7.27-log MySQL Community Server (GPL)
No default schema selected; type \use <schema> to set one.
MySQL mysql-server-1:3306 JS >复制
“命令:\c root@mysql-server-1:3306
”
#创建集群以及可以查看集群状态
MySQL mysql-server-1:3306 JS > var cluster = dba.createCluster("mycluster")
A new InnoDB cluster will be created on instance 'mysql-server-1:3306'.
Validating instance at mysql-server-1:3306...
This instance reports its own address as 999c9e1ee94f:3306
Instance configuration is suitable.
WARNING: Instance 'mysql-server-1:3306' cannot persist Group Replication configuration since MySQL version 5.7.27 does not support the SET PERSIST command (MySQL version >= 8.0.11 required). Please use the <Dba>.configureLocalInstance() command locally to persist the changes.
Creating InnoDB cluster 'mycluster' on 'mysql-server-1:3306'...
Adding Seed Instance...
Cluster successfully created. Use Cluster.addInstance() to add MySQL instances.
At least 3 instances are needed for the cluster to be able to withstand up to
one server failure.
MySQL mysql-server-1:3306 JS > cluster.status()
{
"clusterName": "mycluster",
"defaultReplicaSet": {
"name": "default",
"primary": "999c9e1ee94f:3306",
"ssl": "DISABLED",
"status": "OK_NO_TOLERANCE",
"statusText": "Cluster is NOT tolerant to any failures.",
"topology": {
"999c9e1ee94f:3306": {
"address": "999c9e1ee94f:3306",
"mode": "R/W",
"readReplicas": {},
"role": "HA",
"status": "ONLINE"
}
},
"topologyMode": "Single-Primary"
},
"groupInformationSourceMember": "999c9e1ee94f:3306"
}
MySQL mysql-server-1:3306 JS >复制
“命令1:var cluster = dba.createCluster("mycluster") 命令2:cluster.status() 通过上面可以看到集群创建成功了,使用Cluster.addInstance()添加MySQL实例,集群至少需要3个实例。
”
3.6.6 添加实例到集群
cluster.addInstance("root@mysql-server-2:3306")
cluster.addInstance("root@mysql-server-3:3306")复制
“要请选择恢复方式,默认回车即可,过程如下所示:
”
MySQL mysql-server-1:3306 JS > cluster.addInstance("root@mysql-server-2:3306")
Please provide the password for 'root@mysql-server-2:3306': *********
NOTE: The target instance 'mysql-server-2:3306' has not been pre-provisioned (GTID
set is empty). The Shell is unable to decide whether incremental distributed
state recovery can correctly provision it.
The safest and most convenient way to provision a new instance is through
automatic clone provisioning, which will completely overwrite the state of
'mysql-server-2:3306' with a physical snapshot from an existing cluster member.
To use this method by default, set the 'recoveryMethod' option to 'clone'.
The incremental distributed state recovery may be safely used if you are sure
all updates ever executed in the cluster were done with GTIDs enabled, there
are no purged transactions and the new instance contains the same GTID set as
the cluster or a subset of it. To use this method by default, set the
'recoveryMethod' option to 'incremental'.
Please select a recovery method [I]ncremental recovery/[A]bort (default Incremental recovery):
Validating instance at mysql-server-2:3306...
This instance reports its own address as df752d3abe31:3306
Instance configuration is suitable.
WARNING: Instance 'mysql-server-2:3306' cannot persist Group Replication configuration since MySQL version 5.7.27 does not support the SET PERSIST command (MySQL version >= 8.0.11 required). Please use the <Dba>.configureLocalInstance() command locally to persist the changes.
A new instance will be added to the InnoDB cluster. Depending on the amount of
data on the cluster this might take from a few seconds to several hours.
Adding instance to the cluster...
Monitoring recovery process of the new cluster member. Press ^C to stop monitoring and let it continue in background.
State recovery already finished for 'mysql-server-2:3306'
WARNING: Instance '999c9e1ee94f:3306' cannot persist configuration since MySQL version 5.7.27 does not support the SET PERSIST command (MySQL version >= 8.0.11 required). Please use the <Dba>.configureLocalInstance() command locally to persist the changes.
The instance 'mysql-server-2:3306' was successfully added to the cluster.
MySQL mysql-server-1:3306 JS >复制
“在添加实例到集群的过程中会出现一个警告如下:WARNING: Instance 'mysql-server-2:3306' cannot persist Group Replication configuration since MySQL version 5.7.27 does not support the SET PERSIST command (MySQL version >= 8.0.11 required). Please use the
”.configureLocalInstance() command locally to persist the changes. 这个警告告诉我们在mysql5.7做集群修改的配置没有持久化,我们再次在每个节点都执行dba.configureLocalInstance()就可以了,他会一大堆group_replication配置信息写入到/etc/my.cnf。版本大于等于8.0.11就没有这个警告了。
mysql-server-1操作:
MySQL mysql-server-1:3306 JS > dba.configureLocalInstance()
The instance 'mysql-server-1:3306' belongs to an InnoDB cluster.
Detecting the configuration file...
Default file not found at the standard locations.
Please specify the path to the MySQL configuration file: /etc/my.cnf
Persisting the cluster settings...
The instance 'mysql-server-1:3306' was configured for use in an InnoDB cluster.
The instance cluster settings were successfully persisted.
MySQL mysql-server-1:3306 JS >复制
“指定MySQL配置文件的路径为/etc/my.cnf
”
mysql-server-2操作:
MySQL localhost JS > \c root@mysql-server-2:3306
MySQL mysql-server-2:3306 JS > dba.configureLocalInstance()复制
“指定MySQL配置文件的路径为/etc/my.cnf
”
mysql-server-3操作:
MySQL localhost JS > \c root@mysql-server-3:3306
MySQL mysql-server-3:3306 JS > dba.configureLocalInstance()复制
“指定MySQL配置文件的路径为/etc/my.cnf
”
3.6.7 查看集群状态
1. 通过函数来查看集群状态
MySQL mysql-server-1:3306 JS > var cluster = dba.getCluster("mycluster");
MySQL mysql-server-1:3306 JS > cluster.status()
{
"clusterName": "mycluster",
"defaultReplicaSet": {
"name": "default",
"primary": "999c9e1ee94f:3306",
"ssl": "DISABLED",
"status": "OK",
"statusText": "Cluster is ONLINE and can tolerate up to ONE failure.",
"topology": {
"999c9e1ee94f:3306": {
"address": "999c9e1ee94f:3306",
"mode": "R/W",
"readReplicas": {},
"role": "HA",
"status": "ONLINE"
},
"a198ad43918f:3306": {
"address": "a198ad43918f:3306",
"mode": "R/O",
"readReplicas": {},
"role": "HA",
"status": "ONLINE"
},
"df752d3abe31:3306": {
"address": "df752d3abe31:3306",
"mode": "R/O",
"readReplicas": {},
"role": "HA",
"status": "ONLINE"
}
},
"topologyMode": "Single-Primary"
},
"groupInformationSourceMember": "999c9e1ee94f:3306"
}
MySQL mysql-server-1:3306 JS >复制
“查看集群状态必须用 var cluster = dba.getCluster("mycluster");来定义一下,在通过cluster.status()查看。
”
2. 使用sql方式进行查看集群状态
# 输入 \sql 进入sql模式
MySQL mysql-server-1:3306 JS > \sql
Switching to SQL mode... Commands end with ;
MySQL mysql-server-1:3306 SQL > select * from performance_schema.replication_group_members;
+---------------------------+--------------------------------------+--------------+-------------+--------------+
| CHANNEL_NAME | MEMBER_ID | MEMBER_HOST | MEMBER_PORT | MEMBER_STATE |
+---------------------------+--------------------------------------+--------------+-------------+--------------+
| group_replication_applier | b21e6ead-b7e9-11ed-82a6-02420a8b0004 | 999c9e1ee94f | 3306 | ONLINE |
| group_replication_applier | b3d9b317-b7e9-11ed-81f4-02420a8b0005 | df752d3abe31 | 3306 | ONLINE |
| group_replication_applier | b3dbbc33-b7e9-11ed-82c5-02420a8b0006 | a198ad43918f | 3306 | ONLINE |
+---------------------------+--------------------------------------+--------------+-------------+--------------+
3 rows in set (0.0007 sec)
MySQL mysql-server-1:3306 SQL >复制
3.7 部署mysql-router
3.7.1 编写docker-compose文件
version: '3.7'
services:
mysql-router:
environment:
MYSQL_HOST: mysql-server-1
MYSQL_PORT: 3306
MYSQL_USER: root
MYSQL_PASSWORD: bdyh@2020
MYSQL_INNODB_CLUSTER_MEMBERS: 3
TZ: Asia/Shanghai
image: mysql/mysql-router
container_name: mysql-router
ports:
- "6446:6446"
- "6447:6447"
- "6448:6448"
- "6449:6449"
- "8443:8443"
restart: always
networks:
- pkulaw_net
networks:
pkulaw_net:
external: true复制
“参数说明:MYSQL_HOST: 要连接到的 MySQL 主机 MYSQL_PORT: 要使用的端口 MYSQL_USER: 要连接的用户 MYSQL_PASSWORD: 要连接的用户 MYSQL_INNODB_CLUSTER_MEMBERS: 等待至少此数量的集群实例联机 MYSQL_CREATE_ROUTER_USER: 是否为路由器创建新帐户,以便在运行时使用。默认值为 1,设置为 0 表示禁用。TZ: 时区 6446:R/W 连接端口。连接到此端口的客户端将被转发到主端口 6447:R/O 连接端口。连接到此端口的客户端将被转发到辅助端口 6448:X 协议 R/W 连接端口。用于 X 协议客户端连接的 R/W 端口 6449:X 协议 R/O 连接端口。用于 X 协议客户端连接的 R/O 端口 8443:HTTPS REST 接口端口。
”
3.7.2 启动
docker-compose -p mysql-router -f docke-compose-mysqlRouter.yml up -d复制
“MySQL Router 8完全支持MySQL 5.7和MySQL 8,它取代了 MySQL 路由器 2.x 系列。如果您当前使用路由器 2.0 或 2.1,那么我们 建议将安装升级到MySQL Router 8。官方说明:https://dev.mysql.com/doc/mysql-router/8.0/en/mysql-router-general.html
”
四、测试MySQL InnoDB Cluster
1、通过Navicat连接测试,创建一个mysql-router的连接实例,端口:6446,用户:root

2、通过mysql-router创建一个数据库,在三个实例都同步成功了

· END ·
如果这篇文章对您有帮助或者有所启发的话,请帮忙三连暴击点赞、转发和在看。您的支持是我坚持更新的最大动力。


