


1 修改和编译内核
本文涉及的wifi模块和开发包购买自深圳市必联电子有限公司。
将驱动包中bluetooth_uart_driver文件夹下的文件直接拷贝(直接替换当前路径下的文件)到KERNEL/drivers/bluetooth。
make ARCH=arm CROSS_COMPILE=arm-himix100-linux- menuconfig
配置[Networking support >Bluetooth subsystem support]如下图所示,

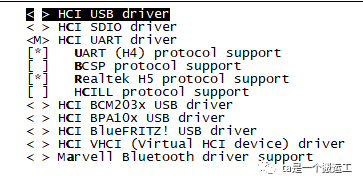
配置[Networking support >Bluetooth subsystem support->Bluetooth device drivers]如下图所示,
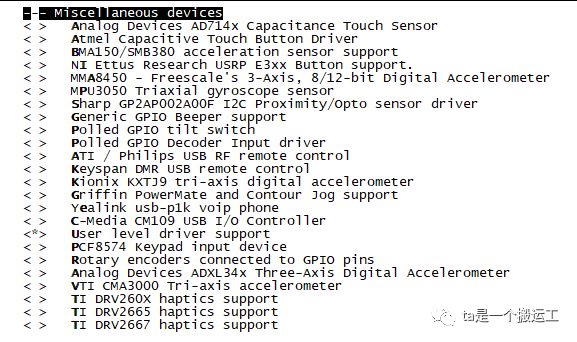
配置[Device Drivers > Input device support > Miscellaneous devices]如下图所示,
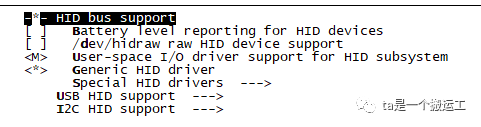
配置[Device Drivers > HID support]如下图所示,
make ARCH=arm CROSS_COMPILE=arm-himix100-linux-
生成rfcomm.ko、bnep.ko、uhid.ko、hci_uart.ko、hidp.ko等驱动文件。
make ARCH=arm CROSS_COMPILE=arm-himix100-linux- uImage
生成内核镜像文件uImage。
问题:scripts/kconfig/lxdialog/dialog.h:38:20: fatal error: curses.h: No such file or directory
解决办法:apt-get install libncurses5-dev
问题:"mkimage" command not found - U-Boot images will not be built
解决办法:sudo apt-get install u-boot-tools
2 编译rtk_hciattach
将rtk_hciattach文件夹拷贝到虚拟机,
cd rtk_hciattach
make CROSS_COMPILE=arm-himix100-linux-
arm-himix100-linux-strip rtk_hciattach
3 创建相关目录
dbus-daemon、bluetoothd运行时会去相关目录找配置文件和生成临时文件,需要提前创建好相关目录。根据编译过程中的配置,需要创建/etc/dbus-1/system.d、/tmp/var/run/dbus,
由于板端的/tmp目录用于tmpfs文件系统,所以在制作文件系统的时候只创建/tmp,在挂载好tmpfs文件系统之后再创建var/run/dbus(mkdir -p tmp/var/run/dbus)。
4 拷贝可执行程序和库文件
将bluetoothctl、bluetoothd、bnep.ko、dbus-daemon、dbus-launch、obexd、obexctl、hci_uart.ko、hciconfig、hcitool、hidp.ko、l2ping、rfcomm.ko、rtk_hciattach、sdptool、uhid.ko文件拷贝到嵌入式板端,将libbluetooth.so.3.17.8、libdbus-1.so.3.8.3、libexpat.so.1.6.0、libglib-2.0.so.0.4000.0、libintl.so.8.1.7、libreadline.so.6.3、libical.so.1.0.0、libicalss.so.1.0.0、libicalvcal.so.1.0.0拷贝到板端并创建链接,
ln -s libbluetooth.so.3.17.8 libbluetooth.so.3
ln -s libbluetooth.so.3.17.8 libbluetooth.so
ln -s libdbus-1.so.3.8.3 libdbus-1.so.3
ln -s libdbus-1.so.3.8.3 libdbus-1.so
ln -s libexpat.so.1.6.0 libexpat.so.1
ln -s libexpat.so.1.6.0 libexpat.so
ln -s libglib-2.0.so.0.4000.0 libglib-2.0.so.0
ln -s libglib-2.0.so.0.4000.0 libglib-2.0.so
ln -s libintl.so.8.1.7 libintl.so.8
ln -s libintl.so.8.1.7 libintl.so
ln -s libreadline.so.6.3 libreadline.so.6
ln -s libreadline.so.6.3 libreadline.so
ln -s libical.so.1.0.0 libical.so.1
ln -s libical.so.1.0.0 libical.so
ln -s libicalss.so.1.0.0 libicalss.so.1
ln -s libicalss.so.1.0.0 libicalss.so
ln -s libicalvcal.so.1.0.0 libicalvcal.so.1
ln -s libicalvcal.so.1.0.0 libicalvcal.so
注意:由于版本变化,libintl.so.8.1.7的文件名可能会改变。
拷贝配置文件和驱动固件
将rtl8723d_config、rtl8723d_fw拷贝到/lib/firmware/rtlbt文件夹下。
将bluetooth.conf(bluez-5.18/src/bluetooth.conf)拷贝到/etc/dbus-1/system.d文件夹下,将文件中的下列内容删除,
<!-- allow users of lp group (printing subsystem) to
communicate with bluetoothd -->
<policy group="lp">
<allow send_destination="org.bluez"/>
</policy>
如果不将上述内容删除则运行时会报错,此时则需要执行”addgroup lp”消除错误。
将system.conf(dbus-1.8.0/bus/system.conf)拷贝到/etc/dbus-1文件夹下。
问题:/home/BLUE # ./dbus-daemon --system
Failed to start message bus: Failed to open "/etc/dbus-1/system.conf": No such file or directory
解决办法:dbus-daemon运行时会去找配置文件,配置文件存放的路径由编译dbus时的configure操作指定(由--sysconfdir=xxx确定)。需要把配置文件放到指定的路径下面才能成功。
问题:/home/BLUE # ./dbus-daemon --system
Failed to start message bus: Failed to bind socket "/tmp/var/run/dbus/system_bus_socket": No such file or directory
解决办法:dbus-daemon运行时会生成pid和socket文件,文件存放的路径由编译dbus时的configure操作指定(由--prefix=xxx确定)。需要在程序运行前创建好文件夹并指定相应权限才能成功。
问题:/home/BLUE # ./dbus-daemon --system
Failed to start message bus: Could not get UID and GID for username "messagebus"
解决办法:编译dbus时的configure时如果不指定--with-dbus-user值,则默认以用户messagebus运行,如果当前系统没有该用户则报错,需要使用下面的命令添加用户,
addgroup -S messagebus
adduser -S messagebus -G messagebus
在编译dbus时的configure指定--with-dbus-user=root,则以root用于运行该程序。
问题:/home/BLUE # ./bluetoothd -d -n &
/home/BLUE # bluetoothd[960]: Bluetooth daemon 5.18
D-Bus setup failed: Failed to connect to socket /tmp/var/run/dbus/system_bus_socket: No such file or directory
bluetoothd[960]: Unable to get on D-Bus
解决办法:bluetoothd运行时使用socket与dbus通信,所以编译dbus、bluez时configure的--prefix字段要一致,且在运行bluetoothd之前运行dbus-daemon。
5 修改蓝牙设备名字
默认名字为“BlueZ 5.18”。通过main.conf修改为指定的名字,创建/etc/bluetooth文件夹,将main.conf(bluez-5.18/src/main.conf
)拷贝到该文件夹,修改Name字段的值即可。
6 在板端运行
//GPIO1_4复用为UART2_RXD,GPIO1_5复用为UART2_TXD,GPIO1_6复用为UART2_CTSN,GPIO1_7复用为UART2_RTSN
himm 0x120c0010 0x1e04 && himm 0x120c0014 0x1e04 && himm 0x120c0018 0x1d04 && himm 0x120c001c 0x1404
cd /home/BLUE && insmod rfcomm.ko && insmod bnep.ko && insmod uhid.ko && insmod hci_uart.ko && insmod hidp.ko
cd /home/BLUE && ./rtk_hciattach -n -s 115200 ttyAMA2 rtk_h5 &
./hciconfig
./hciconfig hci0 up
//使能扫描和被扫描(配对)功能
./hciconfig hci0 piscan
./dbus-daemon --system
./bluetoothd -d -n &
./hcitool scan
7 使用函数发现附近蓝牙设备(C程序)
通过test1.c(百度网盘)找到附近的蓝牙设备ID(MAC)和设备名字(Name);编译方式:arm-himix100-linux-gcc test1.c -o test1 -lbluetooth -L/usr/local/bluez/lib -I/usr/local/bluez/include;参考:BTBook.pdf、https://blog.csdn.net/caobai/article/details/53225235;
8 连接打印机
参考:BTBook.pdf
打印机实现了SPP(依靠RFCOMM通信),所以板端只要实现RFCOMM通信的客户端即可。以下程序test2_client.c(百度网盘)是板端连接打印机并打印两行内容。
arm-himix100-linux-gcc test2_client.c -o test2_client -lbluetooth -L/tmp/lib -I/tmp/include
9 蓝牙接收、发送文件
9.1 参考网址
https://ubuntu.com/core/docs/bluez/reference/sending-files
http://www.unixlinux.online/unixlinux/linuxjc/gylinux/201703/65040.html
9.2 核心思路
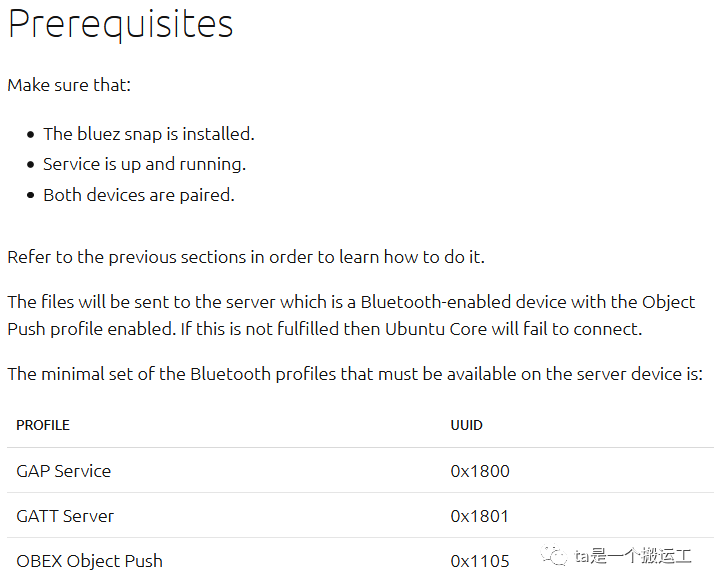
正如ubuntu指导文档所示,相应软件服务有正常运行、两端设备已配对。
9.3 支持obex协议时的注意事项
obex应用协议支持文件传输等功能,在编译bluez时需要打开obex的功能,所以bluez的配置如下:
./configure --host=arm-himix100-linux --prefix=/tmp/ PKG_CONFIG_PATH=/tmp/lib/pkgconfig --disable-systemd --disable-udev --disable-cups --enable-library CFLAGS="-I/tmp/include"
9.4 相关文件准备
有些路径是在编译代码的时候就确定的,所以运行时可能会报有些文件或文件夹找不到,可以创建相同文件名的空文件或者文件链接解决这几个问题。
/tmp/bind/bus-daemon -> mkdir -p /tmp/bin/ && cd /tmp/bin && ln -s /home/BLUE/dbus-daemon dbus-daemon
/etc/dbus-1/session.d -> mkdir /etc/dbus-1/session.d
/etc/dbus-1/session.conf -> 将dbus-1.8.0/bus/session.conf拷贝到该路径
9.5 收发后台程序准备
mkdir -p /tmp/bin/ && cd /tmp/bin && ln -s /home/BLUE/dbus-daemon dbus-daemon
cd /home/BLUE/ && export `./dbus-launch`
cd /home/BLUE/ && ./dbus-daemon --system
cd /home/BLUE/ && ./bluetoothd -d -C -n --noplugin=a2dp --plugin=avrcp &
9.6 蓝牙接收文件
cd /home/BLUE/ && ./obexd -r /tmp/ -n -a &
9.7 蓝牙发送文件
cd /home/BLUE/ && ./obexctl
connect 9C:0C:DF:48:D9:6A
send /mnt/kernel.txt
9.8 sdptool brower local遇到No such file or directory

解决办法:
在启动bluetoothd时加--compat选项或者-C选项,
cd /home/BLUE && ./bluetoothd -d -n --compat &
9.9 obexctl,connect 9C:0C:DF:48:D9:6A,出现Client proxy not available
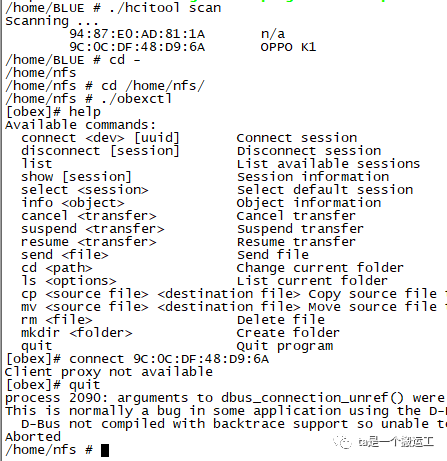
解决办法:
先执行obexd程序
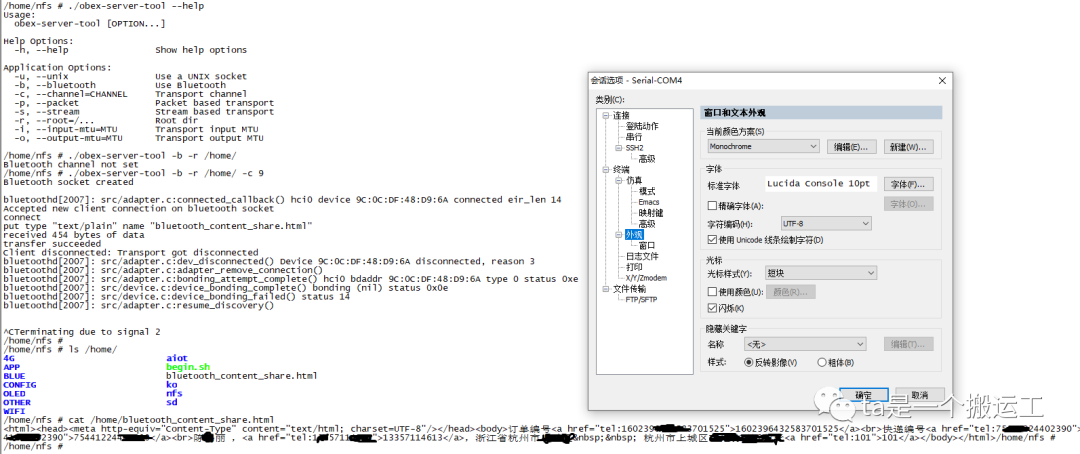
9.10 使用obex-server-tool接收从手机端发来的文件
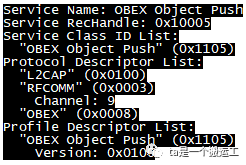
使用”sdptool add OPUSH”命令增加"OBEX Object Push" (0x1105)服务,使用”sdptool brower local”命令查看是否增加成功。使手机配对上开发板,在手机上选择指定的文件并通过蓝牙发送或分享。可以后台运行相应的程序,如./obex-server-tool -b -c 9 -r /home/ &。
9.11 过程问题及解决
1:手机通过蓝牙发送文件时没有显示开发板
需要先配对,手机配对开发板且开发板有OPUSH服务之后可以显示出开发板
2:手机通过笔记或者便签发送文字时容易不稳定
OPPO K1、ViVo等手机通过该方式发送时,到达开发板存放的文件名每次都是bluetooth_content_share.html,可以在处理该文件的内容之后删除该文件,实测稳定性高很多,另外也可以通过发送文件的方式传输数据内容,此时开发板保存相同文件名的文件。
3:手机端第一次发送文件给开发板后就不能继续发送
暂未解决,目前的解决办法是手动重新配对再继续发送
4:process 2124: arguments to dbus_message_iter_append_basic() were incorrect, assertion "dbus_type_is_basic (type)" failed in file dbus-message.c line 2664.
注释掉改行,重新编译并将涉及到的库文件和可执行程序(主要是dbus-daemon、libdbus-1.so.3.8.3)更新,应该可以解决此问题。
5:蓝牙速率
实测开发板发送文件到手机,近距离(低于20cm)大约110KB/s,远距离(超过10m)大约70KB/s。
6:有些文件不能传送
实测时发现有些文件不能传送,这些文件一般都是没带后缀的,网上查资料得知一般需要传送手机端能识别的文件才行,所以需要给文件带上合适的后缀以保证传送成功。
7:发送文件的成功率比接收文件的成功率大些
分析应该跟系统内存有关,当系统内存或者flash紧张时接收文件更容易失败。
8:Using X11 for dbus-daemon autolaunch was disabled at compile time, set your DBUS_SESSION_BUS_ADDRESS instead
需要导出一些环境变量,这些环境变量在执行dbus-launch时生成,可以通过执行下面两条命令解决,
cd /home/BLUE/ && export `./dbus-launch`
cd /home/BLUE/ && ./dbus-daemon --system
9:安卓手机可以收发,苹果手机不能收发
实测能够配对苹果手机,但是不能进行文件收发操作。从网上得知是苹果系统内部做了限制。
10 将蓝牙发送文件的功能合并到代码中
使用obexctl蓝牙发送文件需要使用交互式的命令,不太智能和可控。
需要找出生成可执行程序obexctl的流程,从Makefile入手,在Makefile中搜索关键字“obexctl”可以大致找出脉络。

添加适当的打印信息可以知道编译时的具体操作,


源文件:tools/obexctl.c client/display.c
头文件:/tmp/include/dbus-1.0、/tmp/lib/dbus-1.0/include、/tmp/include/glib-2.0、/tmp/lib/glib-2.0/include、/tmp/include
库文件:-L/tmp/lib glib-2.0、intl、-L/tmp/lib dbus-1、readline
可以使用如下命令重新编译生成obexctl,跟使用Makefile编译出来的一样可以使用,
arm-himix100-linux-gcc -I/home/lijun/bluez-5.18/gdbus -I/home/lijun/bluez-5.18/ -I/tmp/include/dbus-1.0 -I/tmp/lib/dbus-1.0/include -I/tmp/include/glib-2.0 -I/tmp/lib/glib-2.0/include -I/tmp/include /home/lijun/bluez-5.18/tools/obexctl.c /home/lijun/bluez-5.18/client/display.c -o /home/lijun/obexctl /home/lijun/bluez-5.18/gdbus/.libs/libgdbus-internal.a -L/tmp/lib -lglib-2.0 -lintl -L/tmp/lib -ldbus-1 -lreadline -DVERSION=5.18
由上可知主要工作量在obexctl.c中。经过调试手段找出连接手机、向手机发送文件的关键代码。
连接设备:
打印关键函数:obexctl.c/connect_reply
连接失败:Failed to connect
连接成功:Connection successful
发送文件:
打印关键函数:关键函数:obexctl.c/print_iter
手机端点击接收且传送完成:关键打印:transfer/complete
手机端点击取消:关键打印:transfer/error
手机端超时不处理:关键打印:transfer/error
传输过程中出错:关键打印:transfer/error
文件不存在:关键函数:send_reply,关键打印:Failed to send
传输过程中:关键函数:transfer_property_changed,关键打印:Transferred
接收文件:
TO DO
以下是更改之后的代码(obexctl.c,百度网盘),将交互式的功能合并到代码中,通过参数传入控制连接的设备和发送的文件。
arm-himix100-linux-gcc -I/home/lijun/bluez-5.18/gdbus -I/home/lijun/bluez-5.18/ -I/tmp/include/dbus-1.0 -I/tmp/lib/dbus-1.0/include -I/tmp/include/glib-2.0 -I/tmp/lib/glib-2.0/include -I/tmp/include /home/lijun/bluez-5.18/tools/obexctl.c /home/lijun/bluez-5.18/client/display.c -o /home/lijun/obexctl /home/lijun/bluez-5.18/gdbus/.libs/libgdbus-internal.a -L/tmp/lib -lglib-2.0 -lintl -L/tmp/lib -ldbus-1 -lreadline -lpthread -DVERSION=5.18
./obexctl connect 9C:0C:DF:48:D9:6A send /mnt/1M.txt
11 接收文件的简单处理
默认情况下接收时不会判断文件的大小,这会引入风险,需要控制文件的大小,并作出对应的处理。
接收文件:
识别出接收文件的大小:关键函数:parse_length、cmd_put,关键打印:os->size
更改了obex.c,以下是更改之后的文件(obex.c,百度网盘)。
